Canva Review: Is It A Good PowerPoint Alternative?

Canva is probably best known as a social media graphics design tool. But just in case you didn’t know, you can also use it to create visually stunning presentation slides! But would it be a good enough PowerPoint alternative? Well, that’s what you’re going to find out in this Canva review.
I’ll be breaking this article into 3 sections. First, I’ll go through the pros (positives) of using Canva. Then, I’ll discuss the cons (negatives). Lastly, I’ll show you a step by step guide on how you can use Canva to create stunning presentations in minutes.
Section I: The pros of using Canva to create your presentation slides
Canva has millions of users logging on to the platform every single month. And it’s no surprise really. It’s a great, fast-loading platform that can help you design attractive graphics in no time at all. That said, here are several reasons why Canva is a good PowerPoint alternative.
- It’s free and easy to use, but Canva Pro is also relatively affordable
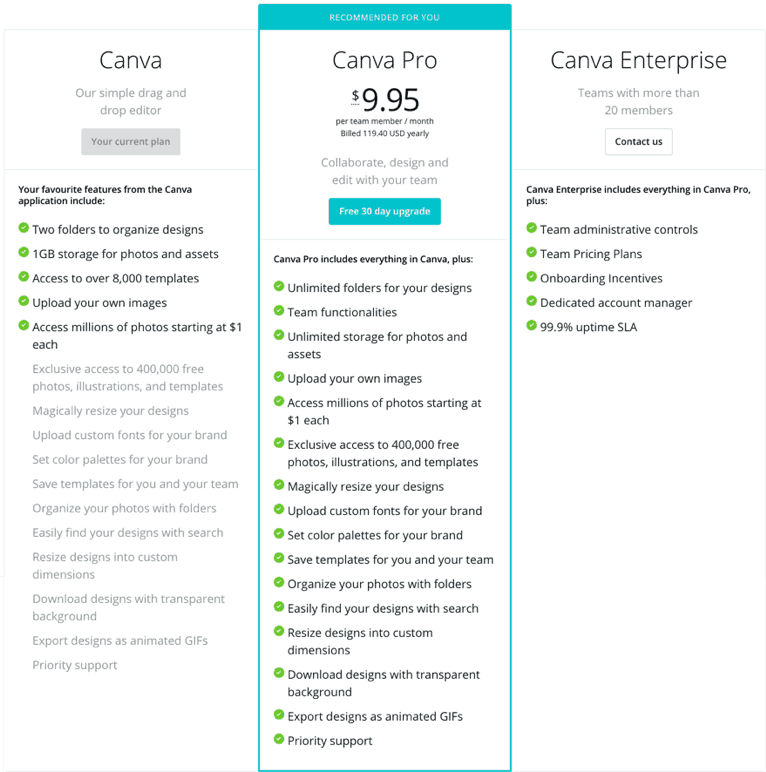
Yes, that’s right, there’s a free Canva plan that’s accessible to everyone. You just need to register an account, and you can start creating your designs right away! The free plan is a bit limited though, so if you think you can benefit from upgrading to Canva Pro, you can do so anytime. However, for the most part, the free plan is good enough for casual users.
Note that the $9.95/mo Pro plan needs to be paid annually; if you want to go monthly, the price will be $12.95/mo. In my opinion, this is still a pretty good deal considering everything you get with your subscription. If you want to check if the Pro features are worth the money, you can try it out for 30 days!
- It’s great for creating beautiful presentations in just a few minutes!
Canva is, first and foremost, a graphic design platform. But it’s literally got all the tools you need to create top notch presentation slides. In addition to its templates and photos, you can also add various elements like grids, charts, frames, shapes, gradients, lines, illustrations, icons, social media logos, arrows, avatars, and so much more!
You can also change your slide’s background with just a single click – you can use either a solid color or an image. Plus, you can use hundreds of free fonts directly on your slides without needing to download any new fonts to your computer. And if you’re wondering, yes, your favorite Google Fonts are also included in Canva’s font selection!
Check out this slide I made in just a minute:
I just used a free template, changed the background image, tweaked the fonts and colors, and I got the design above!
- You can access your designs anywhere
Anywhere you’ve got an Internet connection, that is. Whether you’re on your computer, your iPad or your smartphone, Canva is there ready to help you design great presentations. You can start working on your laptop at home and then finish your presentation on your phone whilst you’re on your daily commute. It’s quite awesome, really!
- You can use thousands of free photos (plus upload your own)
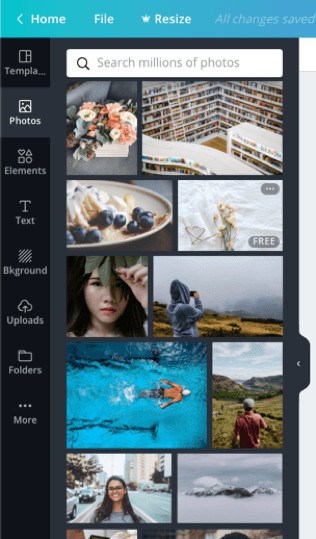
You’ve got thousands of free photos to choose from on Canva. Just click on the Photos tab on the left side of the Canva screen, and you can select the images you like. To find out if a picture is free or not, hover your mouse over the image.
If it’s free, a FREE label will appear on the image. If it’s not free, it’s going to say either “$1” or “? FREE”. The one with the crown means the image is free if you have a Canva Pro subscription. Canva Pro, in addition to its unlimited storage feature, also gives you access to an additional 2 million premium images for free.
Fortunately, you can upload your own photos to Canva and use these in your designs. The downside is that you only get 1GB of storage in your free account. So, if you want to save some space, I suggest resizing your photos first using a tool like TinyPNG before uploading to Canva.
Lastly, if you’re editing your slides on the Canva mobile app, you can easily upload photos from your device (just grant permission for it to access your photos). So, this means there’s no need to transfer the images to your computer so you can then upload to Canva. It’s an underrated feature, if you ask me, especially if you’ve got a lot of nice photos taken with your smartphone!
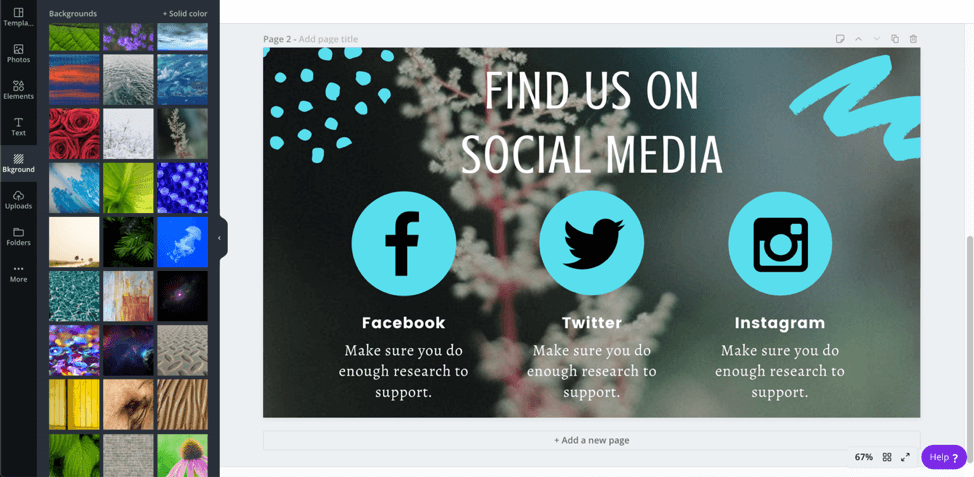
- Tons of free presentation layouts to choose from
This Canva review won’t be complete if I didn’t mention the layouts. I mean, thinking of a great layout for your presentation is challenging enough. And you can get design inspiration from plenty of places online, like for example, the 24Slides Template Hub. However, if you’re on Canva you can just browse through their available layouts, and you’ll gets tons of gorgeous free presentation layouts to choose from.
Take a look at the screenshot below. As you can see, there are plenty of presentation layouts available. From creative presentations, simple presentations, all the way to medical presentations, Canva has a lot of free templates for you to choose from.
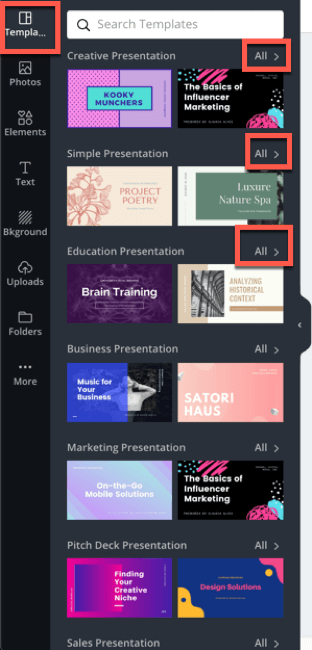
You can further expand the options by clicking on All. If you’re coming from PowerPoint, I promise you’ll be blown away by the number of free layouts available. And these aren’t even basic-looking layouts. You can tell right away that a lot of professional effort has gone into designing the slides. And when you start using the templates and tweaking it here and there, you’ll be amazed by how easy it is to create beautiful slides in just a few clicks!
- Very user-friendly
There’s a slight learning curve to using Canva, but it’s pretty straightforward. Compared to learning how to use PowerPoint, Keynote or even Google Slides, Canva is easier to learn and master. According to this TechCrunch article from 2003, the platform is “aimed at the mainstream user who doesn’t consider him or herself a designer.”
This is one of the reasons why Canva is so popular among designers and non-designers alike. It can shave hours off your design workflow, and you’ll look like a total pro even though you’ve never designed anything in your life!
The user interface is also relatively simple. Here’s a basic navigation guide:
First, you need to select what kind of graphic you want to design. Then you can either choose from templates or build your slides from scratch. Click on the elements you want to use, and it will appear on the slides. Do this a few more times and you’ve got your design finished!
- You can download your presentation in PowerPoint format
Once you’ve finished designing your slide, you can then download your slides in PowerPoint format. Just head on over to the upper right corner of the screen where you’ll see the Present button. Click on the dropdown and you’ll see the option to download in Microsoft PowerPoint (it’s still in beta as of this time).
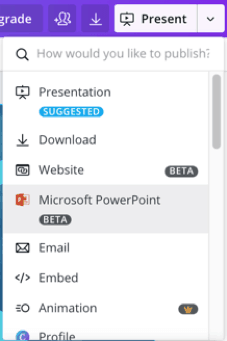
You can choose to download a few of the slides or all of them. If you haven’t used any premium photos, then you should be able to download without any issues. However, if you used a premium image, then you’ll need to pay up first before you can download the file.
- Nifty autosave feature
That’s right! You don’t need to worry about losing any of your work. If you’re prone to accidentally closing down unsaved files or you’ve got a computer that likes to randomly shut down, then you’ll find Canva to be an absolute life saver. Canva automatically saves every little thing you edit or change on your slides. You’ll see the message ‘All changes saved’ on the left side of the menu bar, like this:

- You can present directly from your computer
If you’re presenting in front of a small group, you can just hit the Present button in Canva and show people your computer screen. Or, if you’re presenting to a larger group in a larger room, then you can hook up your computer to a television or projector and just play your presentation.
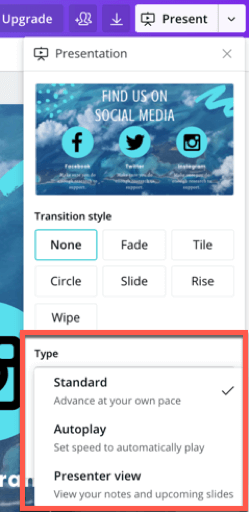
As you can see in the screenshot above, you’ve got 3 presentation types to choose from. You can do a standard presentation where you proceed at your own pace. You can set it to autoplay which is great for playing at kiosks in conferences. Or you can select presenter view if you want to view your speaker notes during the presentation.
- You can collaborate with others
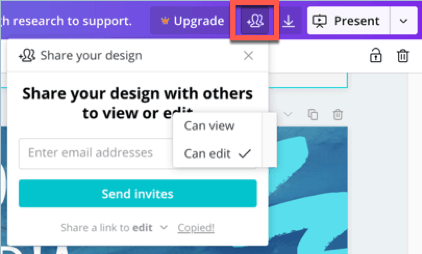
Sharing your presentation with others is extremely easy as well. Just click on the share icon on the upper right corner. Then you can enter your colleagues’ email addresses and select whether you want them to edit or just view the slides. Alternatively, you can copy the link to your presentation and send it to others via chat, email, SMS, etc.
Section II: The cons of using Canva as a presentation app
While Canva is great for quickly coming up with beautiful presentation slides if you’re in a rush, it’s not for those who want full control over their slides. So, in this section of this Canva review, I’ll share soem reasons why this app may not be for you:
- The $1 photos can quickly add up if you don’t pay attention
Sure, $1 may sound like a good deal when you compare buying stock images from sites like Shutterstock where a prepaid plan can set you back $9 per image. However, the catch is that you can get trapped into thinking it’s just $1. Before you know it, you’ve used up 20 images!
In this case, you’d be better off just purchasing a Canva Pro subscription which you can have for as low as $9.95. This way you get access to more than 2 million images available to members. And you don’t need to worry about spending extra (unless of course you still prefer to use those $1 images).
- Limited functionality – not for advanced presentation designers
If you’re expecting Canva to be PowerPoint 2.0, you’ll be very disappointed. While Canva is a powerful app in its own right, it doesn’t hold a candle to “real” presentation apps like PowerPoint, Keynote, or even Google Slides.
If you’re coming from any of these apps, especially PowerPoint, you’ll probably feel a bit constricted with what you can do. Sure, you have a lot of design elements and options at your fingertips, but it’s not the same as being able to control every single aspect of the design.
Here’s an example. If you add a shape in Canva, your options are limited. You can only resize, change the color, rotate it, and change the transparency level. But in PowerPoint, when you click on the shape, there’s a whole new Format Shape menu tab that appears on the ribbon. You can change the shape fill, outline, add some shadow, and so much more.
So, if you consider yourself an advanced presentation designer, Canva may not be for you. But still, you can use it to get some design inspiration (their designers and contributors do know how to create stunning visuals)!
- Customizing your slides can be a tad slow
If you’ve got slow or intermittent Internet connection, then you may feel frustrated with Canva. For instance, you’d click on an element you want to use in your slide, but it may take a few seconds to load. Whereas if you were editing on a desktop app like PowerPoint or Keynote, your selected element will appear immediately on the slide. Of course, in cases like this, I don’t think Canva is at fault. It’s just the downside or limitation of being a drag-and-drop, browser-based and Internet-dependent application. So, perhaps try working in a place with more stable Internet?
Section III: How to use Canva for your presentations
So, here we are finally at the final section of this Canva review article where I’ll give you step by step guidance on how to start using Canva for your next presentation. Let’s begin!
Step 1. Register a free account. You can sign up using your email address, Facebook account or Google account.
Step 2. Once you’re logged in, you’ll see something like this on your screen:
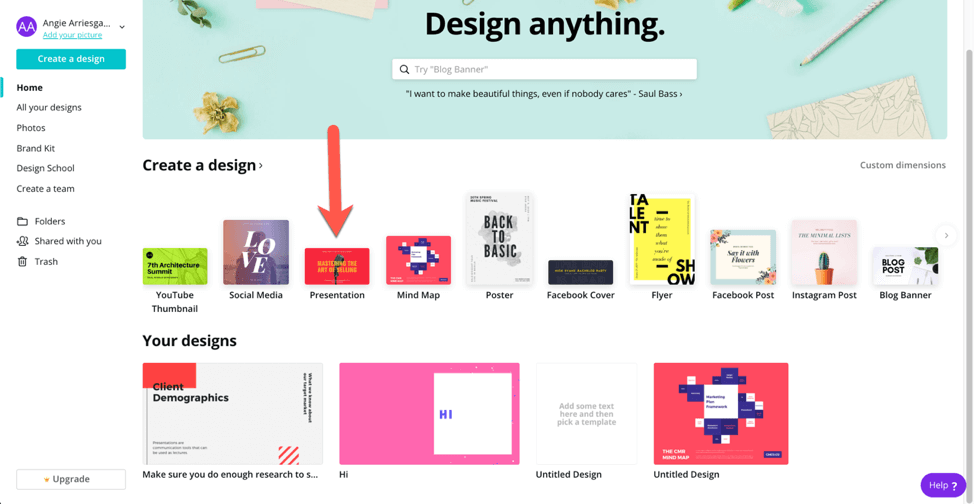
As you can see, there are many design types you can create in Canva. But for this article, we’re only interested in creating a presentation, so that’s what you need to click on (see red arrow above).
Step 3. You’ll be presented with a blank slide (or page) on your screen. This is the canvas we’re going to be working on. Note that the default slide size is 16:9 (or widescreen format).
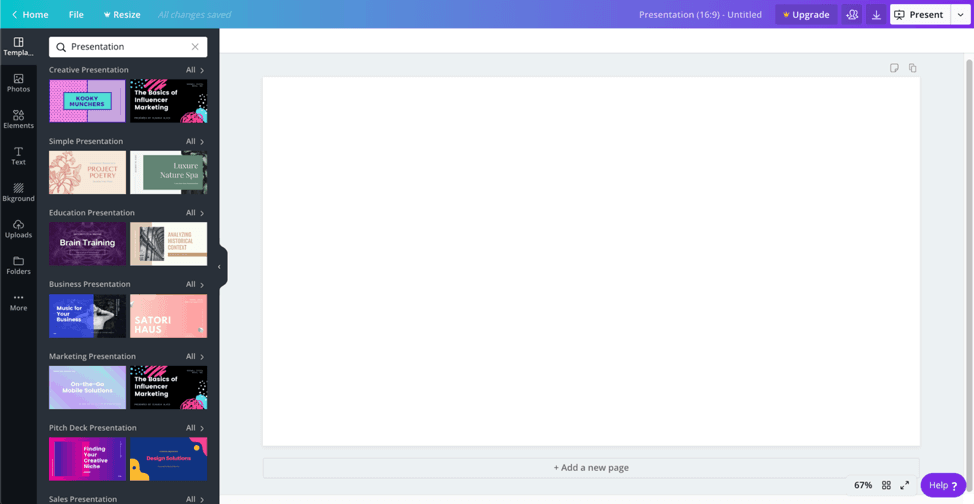
Step 4. At this point, you can either use templates (the first option on the left-hand side menu). Or you can start adding photos, text, and other elements, one-by-one. Since we’re looking to create a high-quality slideshow in as short a time as possible, we’ll go with templates.
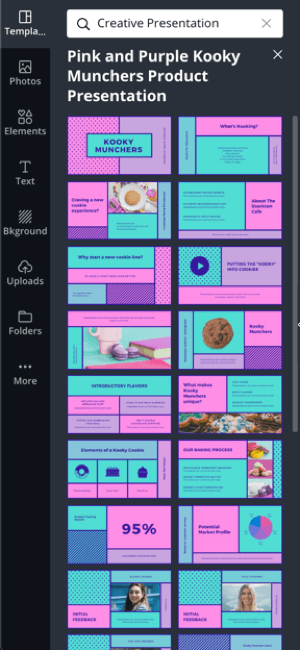
Step 5. There are so many presentation templates to choose from. For example, if you click on All in the first category (Creative Presentation), you’ll see a long list of creative templates:
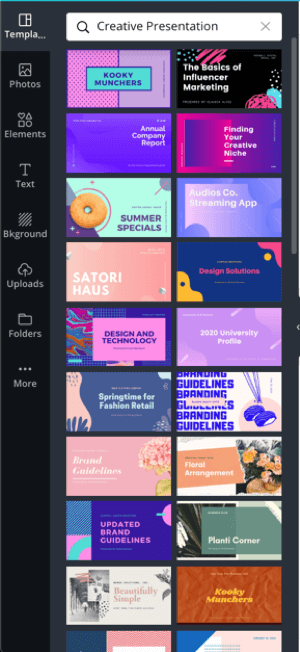
As you can see, the templates are all breathtaking! They’re absolutely gorgeous! So, for this example, I’ll select the first template on the list (Kooky Munchers). I’ll then have access to all available layouts for the Kooky Munchers template, like this:
Step 6. At this point, you can click on a few layouts or you can use all of them. The catch is that you’ll need to click on the ‘Add a new page’ button every time you want to use a new layout. Then once a new blank page is added, you can then click on the next layout you want to use.
Step 7. To edit the slides, just click on the elements you want to replace. You can edit and format the text, change the background, add new elements, and more. Again, you need to temper your expectations with regard to customization options. And also, if you need ideas on how to design your slides properly, you should check out the Presentation Design category of our blog.
Note: If you can’t edit an element the way you like it, I would recommend downloading the entire file as a PowerPoint file. And then open up PowerPoint on your computer, and edit your Canva presentation to your heart’s desire! I think this is truly the best of both worlds – you can take advantage of Canva’s highly creative templates and use PowerPoint’s power and robustness to edit and finalize the slides!
Step 8. If you’d like to use Canva to present your slides, just click the Present button on the upper right corner of your screen. Then choose your Presentation type. And that’s basically it! You’ve just finished creating your first Canva presentation!
But remember, your presentation isn’t just about your slides. Make the entire experience enjoyable for your audience by using these fun icebreakers for your next presentation!
To conclude this Canva Review…
I personally love Canva. It’s a great tool not just for creating presentations, but also for creating all sorts of social media graphics. The free plan is great, but Canva Pro is also an affordable option. It may not give PowerPoint a run for its money anytime soon, but then again, Canva is targeted towards a different kind of audience.
If you don’t have a lot of time and you want to create beautiful-looking slides in minutes, then Canva is definitely the right way to go. You can download stunning templates for PowerPoint as well, but the fact that everything is within easy reach in your Canva dashboard makes it a very attractive option indeed. So, what are you waiting for? Go check out Canva right now!
You might also find this interesting: Top 6 Tips To Give Better Presentations in 2019 (And Beyond)