How to Create Social Media Videos With PowerPoint

PowerPoint is a fantastic graphic tool that very few people take full advantage of! While making presentations is its primary use, there are actually dozens of other uses you can give to it. Using PowerPoint can help you upgrade your social media content more than you’ve ever thought. Here you’ll learn how to create social media videos using PowerPoint. Whether it’s to add some extra elements to an already existing video or making one from scratch, for Instagram, Facebook, or Linkedin, PowerPoint can help you create content that will catch your audience’s eye!

Why use PowerPoint for Social Media marketing?
While PowerPoint might not be the go-to software for creating social media content, you will be amazed at how versatile it actually is! It offers a wide array of very intuitive design tools, even for someone with little design experience. Photoshop, Illustrator, or After Effects… these are usually the default for those working on creating visual content. However, these types of software demand to be brought separately and have a steep learning curve.
The biggest advantage of PowerPoint is that chances are, you already have it installed on your computer! As part of the Microsoft Office Suite, it’s a widespread tool, so you’re probably already familiarized with its workspace. It doesn’t need any particular hardware specifications like some of the “bigger” programs do. Despite its apparent simplicity, you can do some incredible videos for social media with PowerPoint. Don’t believe it? Check out this video for 24Slides’ professional presentation design services:
Believe it or not, this video has been done 100% in PowerPoint. As you can see, it looks incredibly professional and clean. PowerPoint offers a ton of options for creating videos for social media. It’s more intuitive and friendly than many other design software. Its transition and animations options are pre-programmed, so you can create a smooth-running video without all the trouble of animating element by element manually. In short, it’s a great option to have when working on your social media content!
Things to consider when making a social media video
If you’re already familiar with making presentation slides in PowerPoint, you might feel tempted to approach making videos for social media exactly the same. However, it’s important to remember that videos, especially social media ones, need a very different approach.
For starters, when doing a presentation, your audience is most likely already interested in the topic. At the very least, they are probably open to the subject (since they are attending your presentation for a reason). On the contrary, in social media, your content is always going to fight to get attention. Social media channels are extremely “noisy,” and there are thousands and thousands of videos and images that people can go through. It is constantly updating itself and growing.
That’s why so much social media content is focused on what it can offer to the viewer. Instead of just advertisement for the product or service, social media content usually focuses on getting the target’s attention by giving them valuable and useful content. Ask yourself why your audience should keep watching. This way, you’ll be able to think it through and be very strategic with the content you make. Here are other things to take into consideration when creating social media videos with PowerPoint:
More visual elements, less text
According to studies, the average attention span on Facebook is between 1.7 and 2.5 seconds. This means you have around 2 seconds to convince a person they want to continue watching your video. Human brains are naturally wired to pay more attention to images than text. That’s why visual content is so prominent on all sorts of platforms. Make sure that the social media videos you’re creating with PowerPoint take full advantage of the visual aspect. While it might be tempting to add a written explanation as you would on a presentation, keep the text at a minimum. Use keywords and visual elements to convey your message in a more engaging way.

Make it short and sweet.
Following the last point, it’s essential to make your content bite-size. The overall ideal length of your video depends on what platform you’re using. But the general rule is to make it as short as possible. A short attention span on social media also means that people jump quickly from one publication to the next. That’s why it is extra important to deliver your message as efficiently as possible and don’t drag it too long!
Exploit PowerPoint tools!
PowerPoint offers an amazing array of tools that can be used to create social media videos. Animations and transitions will make your video run smoothly. If you have Office 365, great options to take into consideration are the Morph and Zoom features. The Morph tool, in particular, will allow you to “transform” certain elements from one slide to the next automatically! This will give your video a more professional, seamless look without any work.
Social Media aspect ratios
Take into consideration that different social media channels have different aspect ratios and limitations. For example, Facebook and Instagram stories have a vertical aspect ratio of 9:16. However, Instagram in-feed videos work better with a square 1:1. These aspect ratios are constantly changing, so you must know what platform you’re posting your video to and the preferred specifications. Here you can find SproutSocial’s always-up-to-date guide of video specs to make sure you’re on the right track.
Luckily for you, when working on a social media video with PowerPoint, you can customize it to fit your needs perfectly! You just need to go to the de Design tab > Slide Size > Custom Slide Size. You’ll get a new window where you can make your slide fit precisely the aspect ratio you’re looking for. Don’t forget to make your videos big enough, so it doesn’t lose any quality when posted online. For example, a good size for a Facebook square video would be 12.5 x 12.5.
How to create a social media video with PowerPoint from an already existing video
If you want to make an already existing video more social media-friendly, PowerPoint is a great option. You can add your recording to your slides just like you would in a common presentation. This way, you’ll be able to crop it, ad a frame, text, or extra graphics, and download it as a video.
Step 1: Customize your slide aspects
As it was said in the section before, one of the best things about making videos for social media in PowerPoint is that you can customize them. This way, you’ll have content that fits perfectly whatever channel you’re going to use. You just need to go to the Design tab > Slide Size > Custom Slide Size. In the new window that pops up, you’ll be able to add the aspect ratio that better fits your needs.

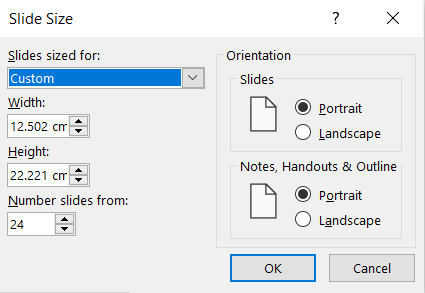
In this example, I will be making an Instagram Story post. This means my slide size will follow the 9:16 aspect ratio.
Step 2: Insert your video into your slide
Go to the Insert tab > Video. Here you will be able to choose whatever video you want to add, or even choose from the PowerPoint stock video library.
Step 3: Adjust video settings
By clicking on your video, you’ll be able to access the Video Format tab. This is where you can edit your video as much as you want. You can change the color, brightness, add different “styles” and frames, and even change the overall shape of your video. Here you can also crop your video to make sure it fits your slide perfectly and that everything that you want to showcase is within the frame.

Step 4: Add graphics and text
Now that you have your main video ready, it’s time to add all the compliments! You can add anything you would add to a normal PowerPoint slide. Text, images, shapes, icons, your imagination is the limit!
Remember that you can also add animations and transitions to these elements. This will make the elements “appear” in a certain order, versus just “being there” from the start. You can even customize the effects to change directions and durations.
Step 5: Make your video run automatically
This is an extremely important step when making social media videos with PowerPoint! In order to get your video to work, you first need to set it to run automatically. Otherwise, when you export it, your video will remain as a still image. Luckily this is very easy to do.
Click on your video and choose the Playback tab option. In this section, you’ll be able to customize all the video settings and how it will look when played. In the Video Options section, choose Start: automatically. Here you can also choose if you want to video to loop or rewind once it’s over.
If you have added text, graphics, or other elements with animation effects, you must also make them run automatically.
Step 6: Export as a video
Now you’re all done! If you haven’t yet, play your video first as you would a normal slide to make sure it looks exactly as you wanted it to be. Take into consideration that all animation effects and your video should run automatically, no clicks needed.
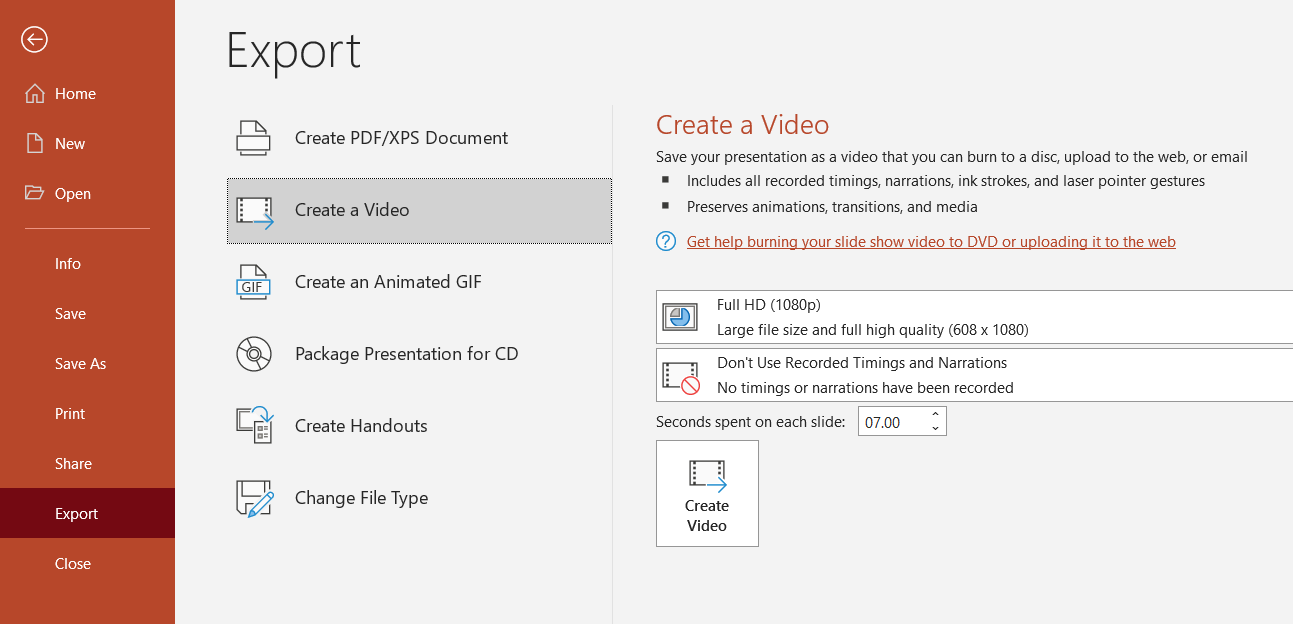
Once you’re sure it is perfect, you just need to go to File > Export > Create a Video. Choose the quality you want for your video and how long you want to spend on each slide. Since all your video is condensed into one slide, this time should be the length of your original video so you don’t lose any footage. Select Create Video, and you’re all done!
Final note: Once it’s in video form, you won’t be able to edit it. That’s why you might want to save the document as a PowerPoint file too! This will allow you to go back and edit it in case you need it. Otherwise, you’ll need to do everything back to back!
How to create social media videos from scratch with PowerPoint
You can also use PowerPoint to create social media videos from scratch! You can add content to different slides and use transitions to give the effect of a seamless animation.
Step 1: Customize your slide aspects
Just like last time, start by choosing the technical aspects of your video. Change your canvas size in the Design tab > Slide Size > Custom Slide Size to fit the aspect ratio of the social media platform you’re going to use.
In this case, I’ll be using a 12.5×12.5 to create with PowerPoint a square social media video. This will make it fit both Instagram and Facebook organic feeds.
Step 2: Get your slides done!
Now that you have your canvas, it is time to get to the design aspect of it all! To make your life a little easier, you can use a template to help you with the design. You’ll probably have to edit it to fit the slides’ new aspect ratio, but it’s still a good starting point! In this case, I’ll be using one from our Templates by 24Slides free library.
Work your way through the slides and add all the elements you want in your social media video. Remember to make the most of the visual elements like images and icons, and keep the text to the minimum!
Step 3: Add animations
Now it’s time to make it look like a video instead of just PowerPOint slides. A great option for Office 365 users is the Morph feature. This tool will make your slides have a seamless transition between slides by identifying similar elements and “transforming” them one into the next from slide to slide. Learn more about how to use the morph feature here.
You can also add animation effects within one same slide. This will make specific elements appear (or exit) in their own way and. If you have animations in one same slide that need to follow a certain order or too many elements, the Animation Pane tool is a must! This side window will let you see all the active animations and transitions in each slide, what order will they appear in, their duration, and their start cue.
While this process might seem complicated at first, it’s all about trial-and-error. It’ll probably take a time to get used to it. It’s all about playing it over and over and tuning it up until it looks exactly as you want it to be!
Step 4: Export as a video
Finally, it’s time to turn your PowerPoint file into a video you can use for social media. go to File > Export > Create a Video. Pick your video quality and how much time you want to spend on each slide. Don’t forget to save it as a PowerPoint file too, so you can edit it later if needed!
And there you have it, a social media video created 100% with PowerPoint!
Leave PowerPoint in our hands!
It’s always nice to have new tool options, and PowerPoint is definitely one to consider when talking about creating social media videos. Its amazing graphic tools and animation features will help you make a video that looks professional with minimum effort.
However, as intuitive as PowerPoint is, creating a video from scratch will still need practice and effort to make. And creating slides that look appealing to the eye still needs some design knowledge. While you can probably make it on your own, why waste time on such a secondary task?
Whether it’s an outstanding presentation, an eye-catching infographic, or a professional video, 24Slides’ designers will use their PowerPoint expertise to give you the best possible product. And the best thing is, you can just sit back and relax! Use your time smartly on developing your social media strategy, while our professional designers do all the heavy lifting.