The Ultimate Guide To Using Images, Videos, And SmartArt Graphics In PowerPoint
In this article, you will learn how to use images, videos, and SmartArt graphics in PowerPoint to make your presentations and slideshows even more engaging than usual. I’ve divided this article into 6 mini-tutorials and covered the topics in-depth so be prepared to take down notes. By the time you finish reading this, you will be an expert in using images, videos and graphics to spice up your presentation and impress your audience.
Tutorial 1: How To Crop An Image In PowerPoint
In this tutorial, you will learn how you can crop an image in PowerPoint not just in the usual rectangle or square shape but in virtually any shape you want. If you master these cropping techniques, you’ll be bringing your presentation slides to a new level and impressing your audience with your savvy design skills.
To make sure you truly understand these cropping techniques, it’s best if you open up PowerPoint and follow along with each step of the tutorial. As they say, practice makes perfect!
The 6 Easy Methods To Crop Images In PowerPoint
Some of these methods may appear complicated at first but I can assure you that once you get the hang of cropping images, you’ll be cropping to any shape you like in no time at all. Let’s begin!
Method 1. How To Do A Simple Crop (Square Or Rectangle Shape)
This is by far the most common method by which PowerPoint images are cropped.
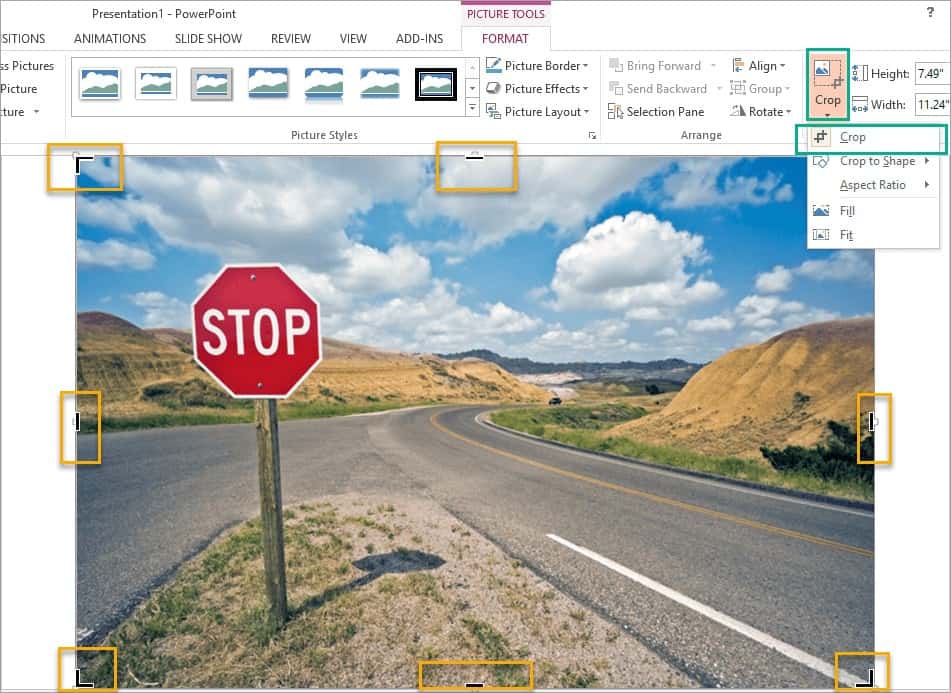
- Click on the image you would like to crop. You should then see the Picture Tools option appear on the ribbon, like this:

- Click on Crop. The black cropping handles will then appear on the image’s edges (see the orange boxes below):
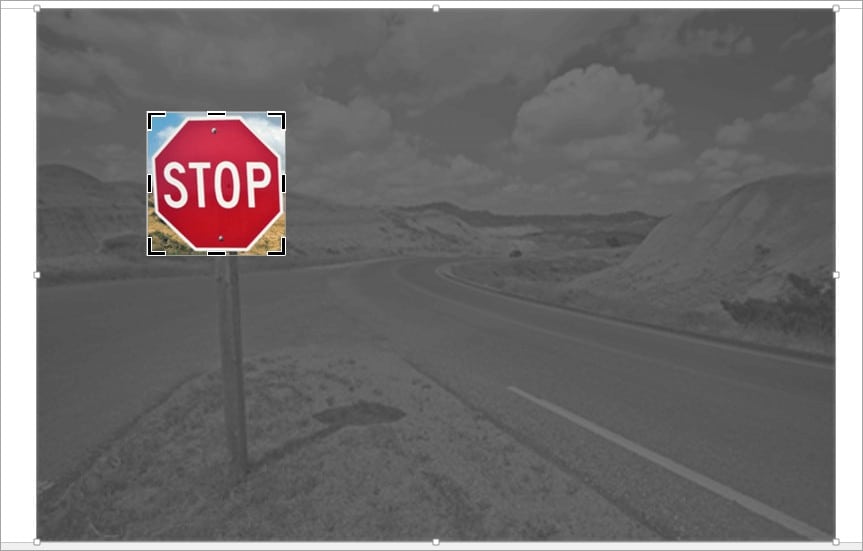
- Drag the corner and center cropping handles inward as you see fit. In this example, we only want the red stop sign on the image. Note that the cropped section now appears in gray and the cropping handles have moved closer to the sign.
- To crop the stop sign in the image, all I have to do is click on the Crop button a second time and this is what happens:

The rest of the image disappears and only the red sign is visible. Note, however, that the rest of the image is not really gone. It hasn’t been deleted at all and is just hidden from view.
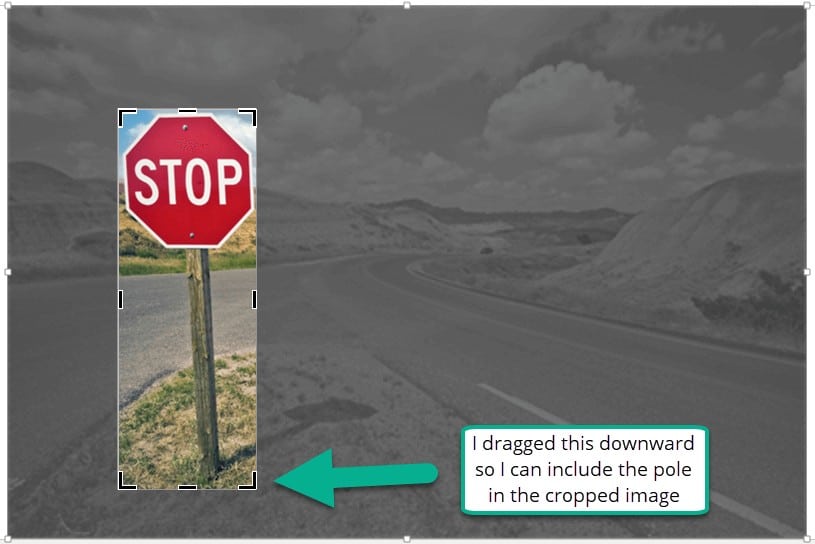
- If you want to resize the crop and include the wooden pole, all you have to do is just click on the Crop button again and the full image will appear like in step 3. You then need to drag the cropping handle downward until you get the exact image you want to crop.
- I click on Crop once more and I get the cropped image below:

Very simple, right? With just a few mouse clicks, you can have a rectangular or square shaped image on your slide. Let’s proceed to the next method.
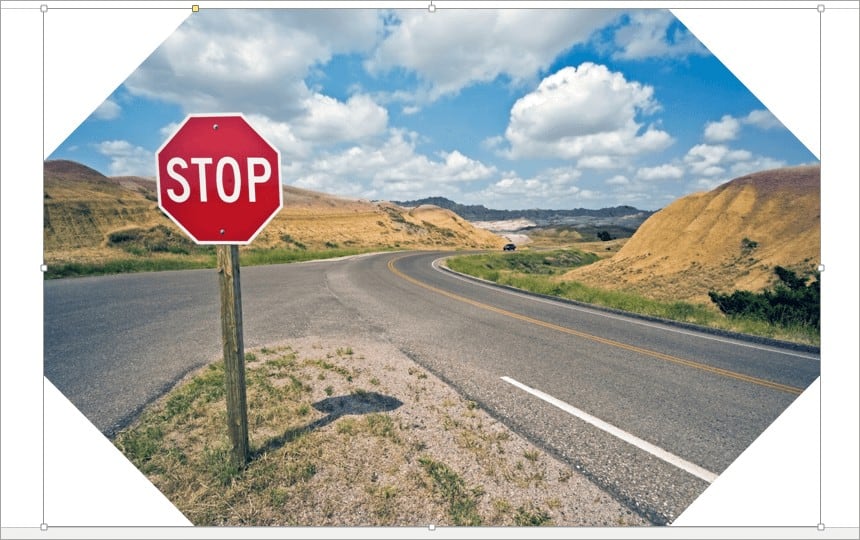
Method 2. How To Crop An Image To A Specific Shape
In the example above, we could only crop the image in either a square or rectangle shape. In this method, I would like to have the red stop sign in an octagon shape. This is how it’s done:
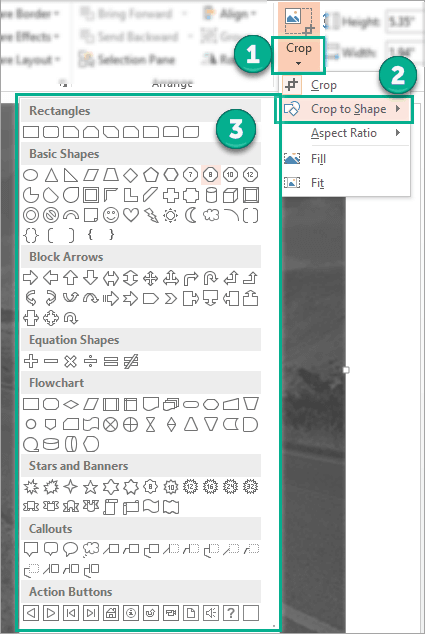
- Click on the image to open up the Picture Tools Then click on the small arrow right below Crop to reveal more options. Choose Crop to Shape from the dropdown list then choose the shape you want (in this case, it’s the octagon shape).
- This is what our cropped octagon-shaped image looks like. Notice how there’s no cropping handles anywhere? At this point, you can only resize the octagon-shaped image but you can’t crop it further.
- To get the cropping handles to appear, you will need to click on the Crop button again. There it is highlighted in the orange boxes:
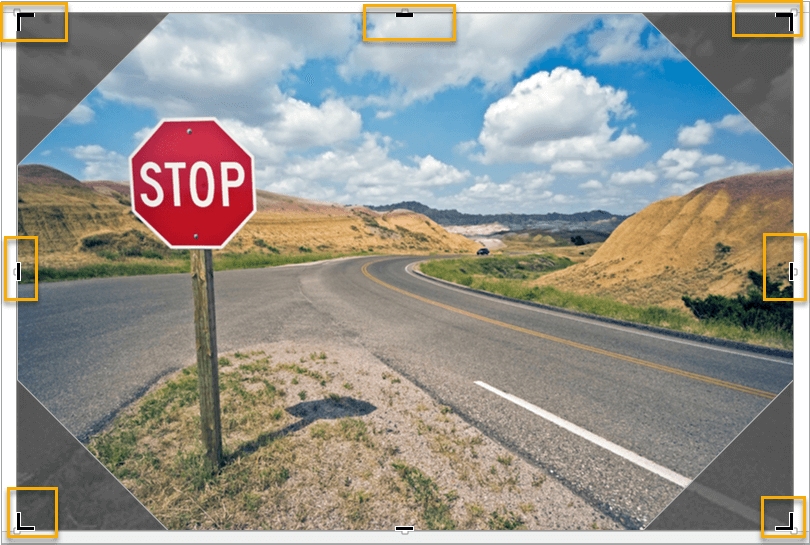
- You can now adjust the crop by dragging the cropping handles as you see fit. Here’s the final octagon-shaped image just like I wanted:

Experiment with the different shapes until you master this technique. When it’s time to design your slides, you can quickly crop your images to different shapes!
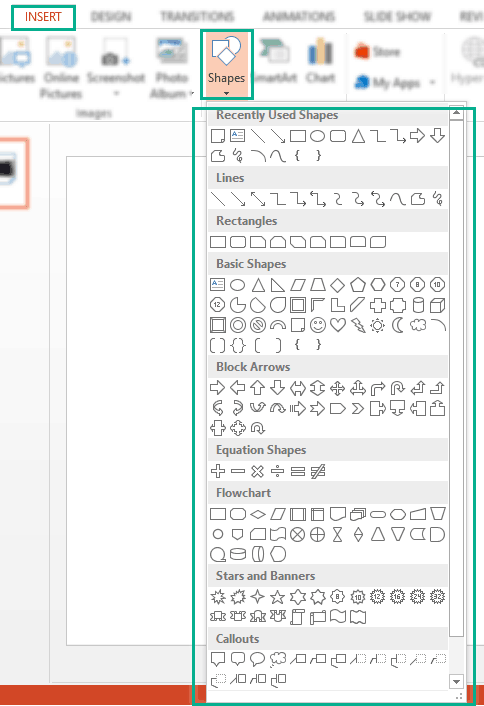
Method 3. How To Use An Image To Fit Or Fill A Shape
This method is a bit similar to Method 2 but it’s done in reverse. In Method 2, we add the image first and then crop it to shape. In this method, we add a shape first and then we add the image to fill the shape (sort of like a background, if you will). Here’s how you do it:
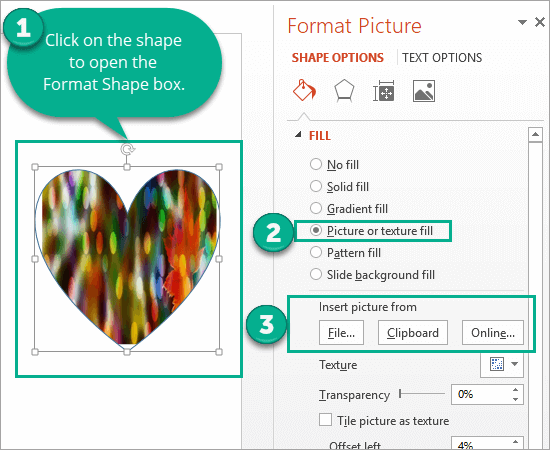
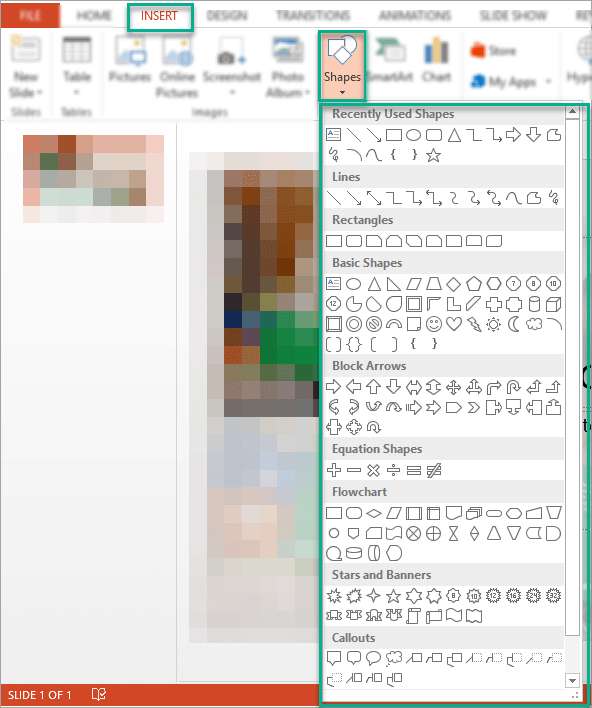
- Click on Insert > Shapes and then click on the shape you want to use.
- Draw your desired shape on the slide. For this example, we’ve drawn a heart shape.

- Click again on the shape to view the Format Shape options then click on Picture or Texture fill.
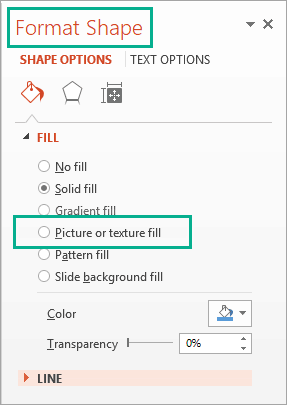
- This will open the Format Picture Choose whether you want to add an image from a local file, clipboard or online. Your image will now appear in your desired shape just like our example below:
Which method do you think is easier? Method 2 where you add the image first or Method 3 where you add the shape first?
Method 4. How To Crop An Image To A Common Aspect Ratio
Use this method if you want to crop your image to a common aspect ratio (a.k.a. common photo size). These are the common aspect ratios available on PowerPoint:
- Square – 1:1
- Portrait – 2:3, 3:4, 3:5 and 4:5
- Landscape – 3:2, 4:3, 5:3, 5:4, 16:9, 16:10
Here’s what you need to do to quickly crop your image using this method:
- Click on the image you would like to crop. In the Picture Tools tab, click on the little black arrow on the Crop button to reveal more options. Then click on Aspect Ratio. You will then see the different aspect ratios.

- Choose the aspect ratio you would like to use, position your image, and click on Crop to remove the unwanted sections. Again, if you are not happy with the resulting cropped image, simply click on Crop to see the full image again and choose a different aspect ratio. You can also use the cropping handles to resize the image.
As you can see, this method is quite straightforward just like Method 1. The main advantage of using Method 4, however, is you get a lot more quick cropping options than Method 1.
Method 5. How To Use The Intersect-Merge Method To Crop An Image
This method may sound complicated but once you get the hang of it, it’s really quite easy. Here’s what you need to do:
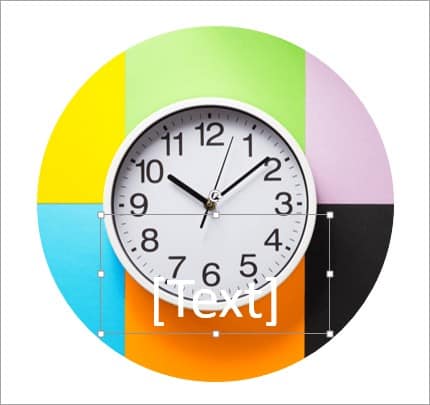
- Add the image to your slide then click on Insert > Shapes. In this example, we’ll insert a circle since our photo’s subject is a round wall clock.
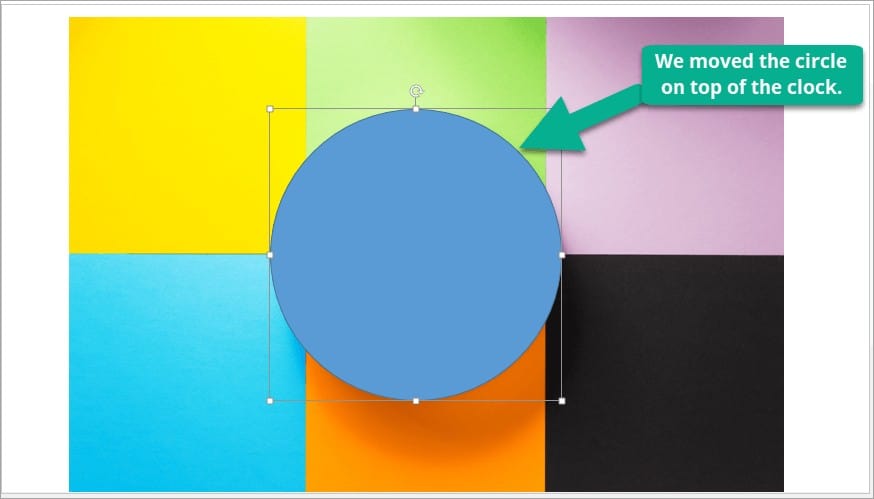
- We then moved the blue circle on top of the clock.
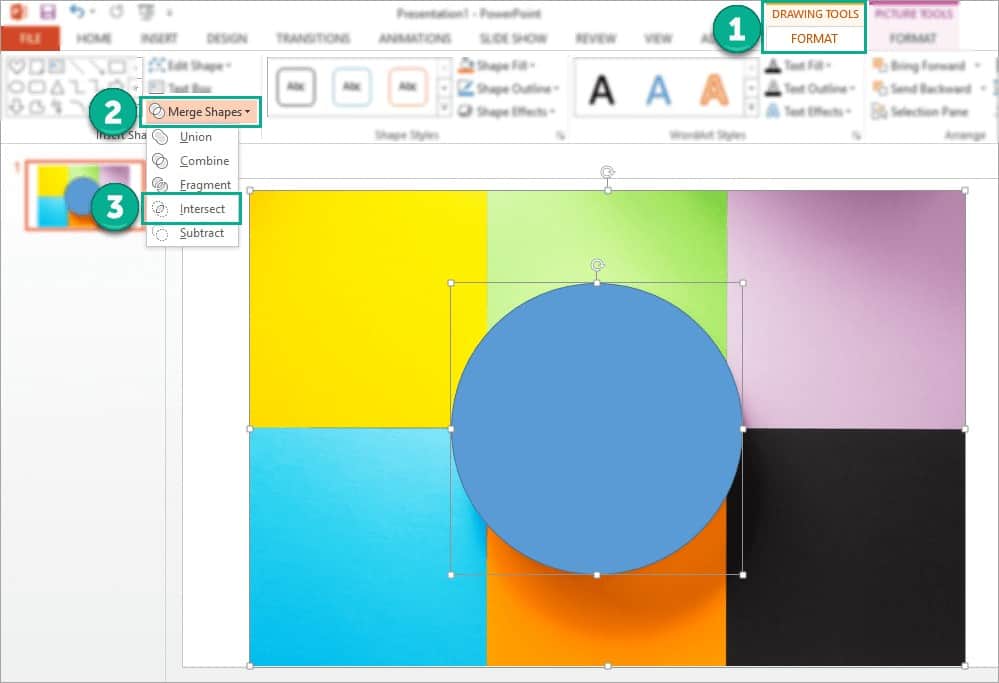
- This step is very important so make sure you do this exactly in the order listed below:
- Click on the image.
- Hold the CTRL key on your keyboard (don’t release).
- Click on the blue circle shape.
- This will open the Drawing Tools tab on the ribbon. Click on Merge Shapes then Intersect.
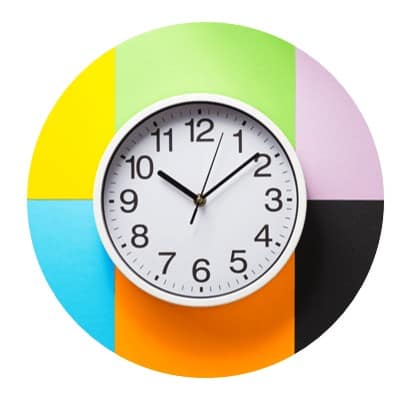
- When you click on Intersect, this is the resulting cropped image:

A very easy method, don’t you think? Just don’t forget the exact steps I listed so you get the desired result.
Method 6. How To Use SmartArt To Crop An Image
Just like Method 5, this method may sound complicated at first but it really is not! Here’s how you use SmartArt to crop an image:
- Insert the image into your slide. Click on the image to open up the Picture Tools Click on Picture Layout and choose your desired layout.
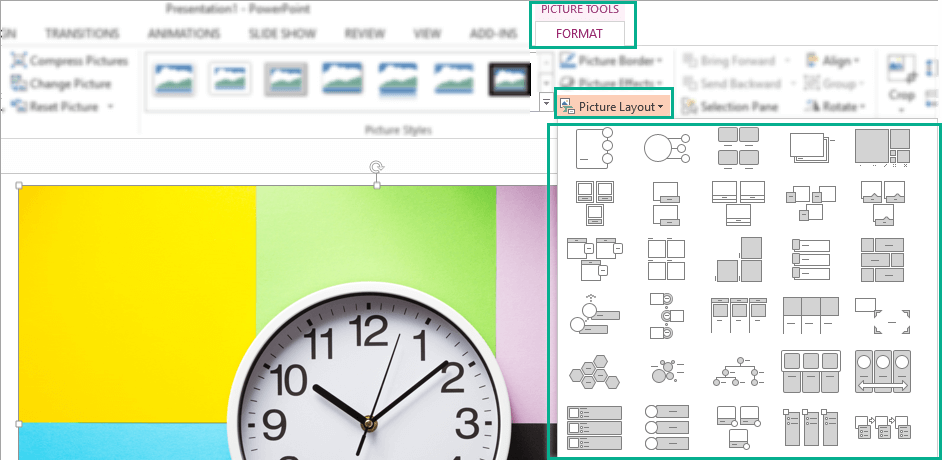
- For this example, we’ve chosen the first layout in the second column. Here’s what our image looks like now.
- As you can see in the screenshot above, a text box is present. If you don’t want this in your image, you can Ungroup the different elements by right-clicking on the image and selecting Group > Ungroup.

- Once the different elements are ungrouped, you can then go ahead and delete the elements you don’t need. Here’s the final cropped image using the SmartArt method:
If you want to change the shape of the cropped image, you can click on the image then go to Drawing Tools. Click on Edit Shape > Change Shape to change to a predefined shape or Edit Shape > Edit Points to further customize the shape.
As I have shown you in this tutorial, you no longer need to open your favorite graphics software to edit your images. With PowerPoint, you can easily crop your images in a few seconds to any shape and form you want.
Tutorial 2: How To Make A Picture Transparent in PowerPoint
Have you ever felt frustrated having a colorful and attractive photo on your presentation slide that does not contrast well with your text? And you felt you had no choice but to remove it because you thought the text was more important than the photo?
Well, now I’m going to show you 3 image transparency techniques on PowerPoint so you can use all the nice photos you want on your slides!
I’ll divide this tutorial into 3 sections. The first one will teach you how to make any image transparent, the second one will show you how to make a background image transparent, and the third section will walk you through how you can make only a part of the image transparent (not the entire picture).
Section 1: How To Make Any Image Transparent In PowerPoint
If you already have PowerPoint open, simply follow the steps below:
- Go to Insert > Shapes then click on the shape you want to use.
- In this example, I chose the rectangle shape from the dropdown I clicked on the rectangle and drew the shape on the slide (that’s the blue rectangle in the screenshot below). Feel free to use any shape you want.

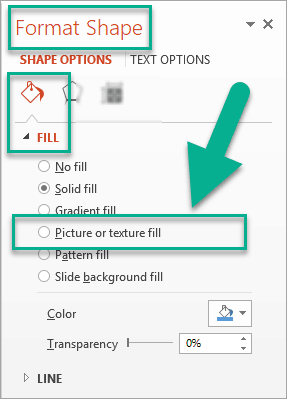
- Next, right-click on the blue rectangle to access the different options. Click on Format Shape.
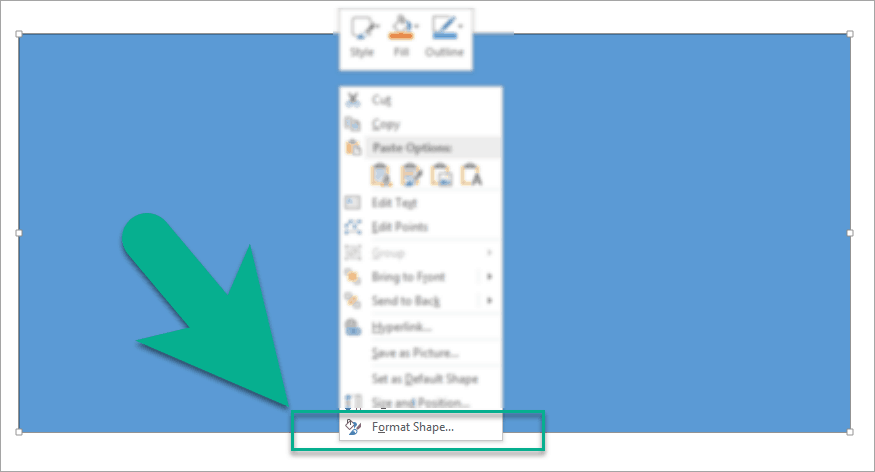
- The Format Shape menu will appear on the right side of your screen. In Shape Options click on Fill then Picture or texture fill.
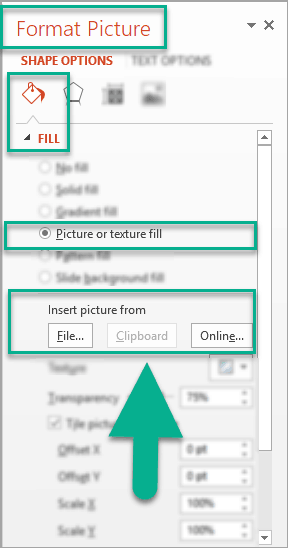
- Clicking on Picture or texture fill will open the Format Picture menu as you can see below. The next step is to select where your image is located. Your picture will then be inserted into the slide.
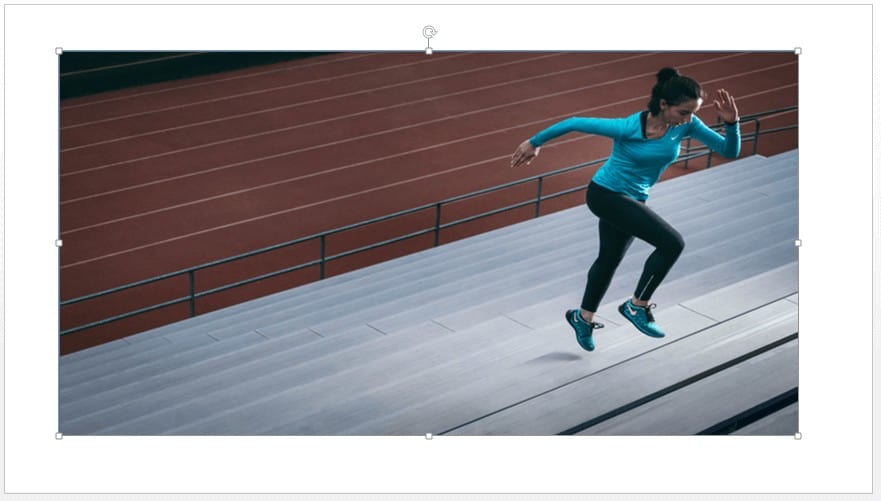
- Here’s a sample photo we inserted to our rectangle shape.
- Next, you need to repeat Steps 3 and 4 so you can access the transparency option.
To summarize: right click on the image, click on Format Picture from the dropdown, click on Shape Options then Fill.
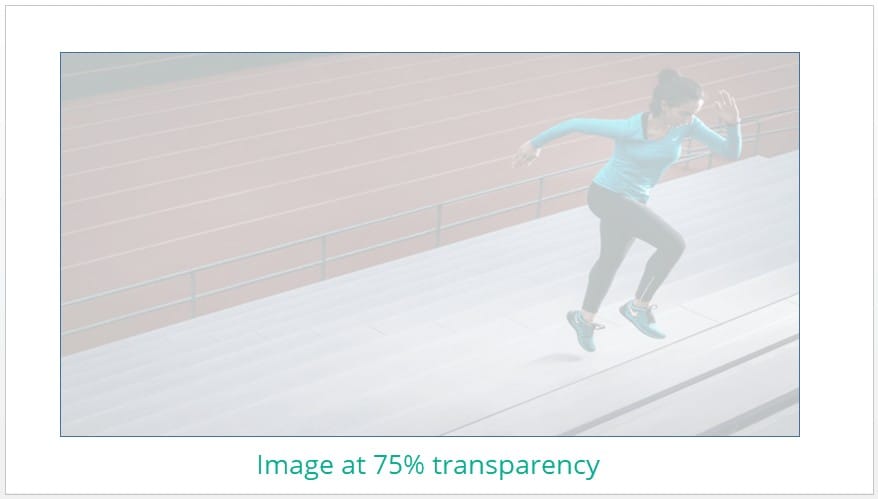
You can then adjust the image transparency by sliding the bar to your desired setting or by typing in the percentage directly in the text field.
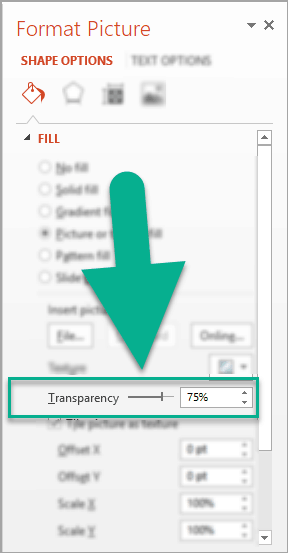
- This is what our photo looks like at 75% transparency:
Section 2: How To Make Your Background Image Transparent In PowerPoint
Sometimes you want to use a nice photo as a background for your PowerPoint slide(s) as it helps get your point across and engages your audience too. However, it can overpower the text and any other images you’d like to add to your slide.
When adding an image as a background, you have two ways to go about it:
Option 1. If you want to use a single image as a background for ALL slides, instead of adding it manually to every slide (imagine doing it for 100 slides!), you can edit your master slides.
Option 2. If you want to use different background images per slide and adjust the transparency too, here’s how you do it:
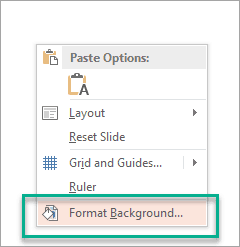
- Right-click on the slide, then click on Format Background to access the different options.
- The Format Background menu will then appear. Click on Fill (1) then Picture or texture fill (2). Next, insert your picture either from your computer or online (3).

- This is what our background image looks like:

As you’d expect, the background image will fill out the entire slide. And if you don’t adjust the transparency, text would be a bit hard to read. (Of course, you can always add an overlay to circumvent this problem but that’s outside the scope of this tutorial).
- To make the background image transparent, you’d need to go back to the Format Background options again and look for the Transparency

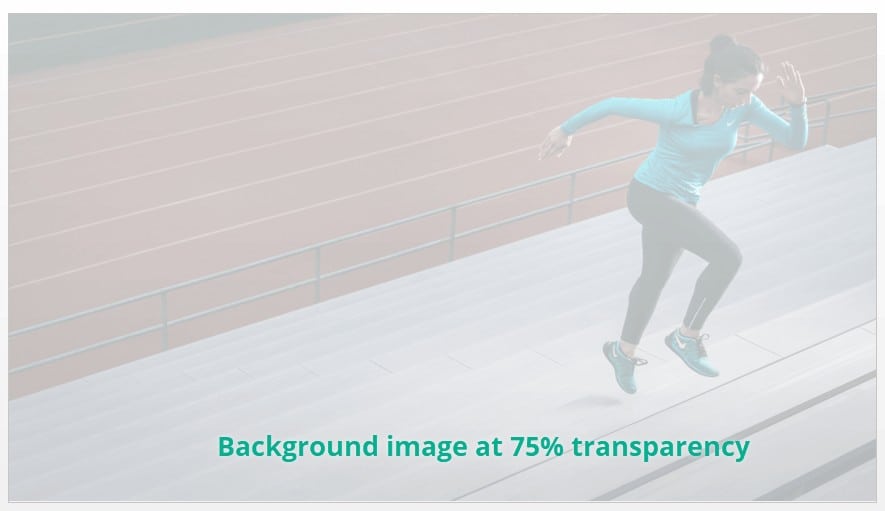
- In this example, I set the background image transparency to 75%. You can adjust the transparency by sliding the bar to your desired setting or typing in the percentage directly in the text field.
This is what my background image looks like at 75% transparency:
Section 3: How To Make Part Of Your Picture Transparent
PowerPoint is not going to give Photoshop a run for its money soon but this feature is very cool. It’s also not very well known so not a lot of people know you can do this on PowerPoint. Read on to find out how you can make a part of your image transparent by making a single color transparent.
Important Note: This technique doesn’t work if you use Insert > Shapes > Format Shape. It also doesn’t work for background images.
- To add an image that can be made partially transparent, you can either use Insert > Pictures or you can simply drag and drop an image directly to the slide.
For this example, I chose a colorful image with a dark background.

- Click on the image you just added to open up the Picture Tools On the Format tab (1), click on Color (2). You’ll then be presented with a dropdown list of Color options. Click on Set Transparent Color (3).
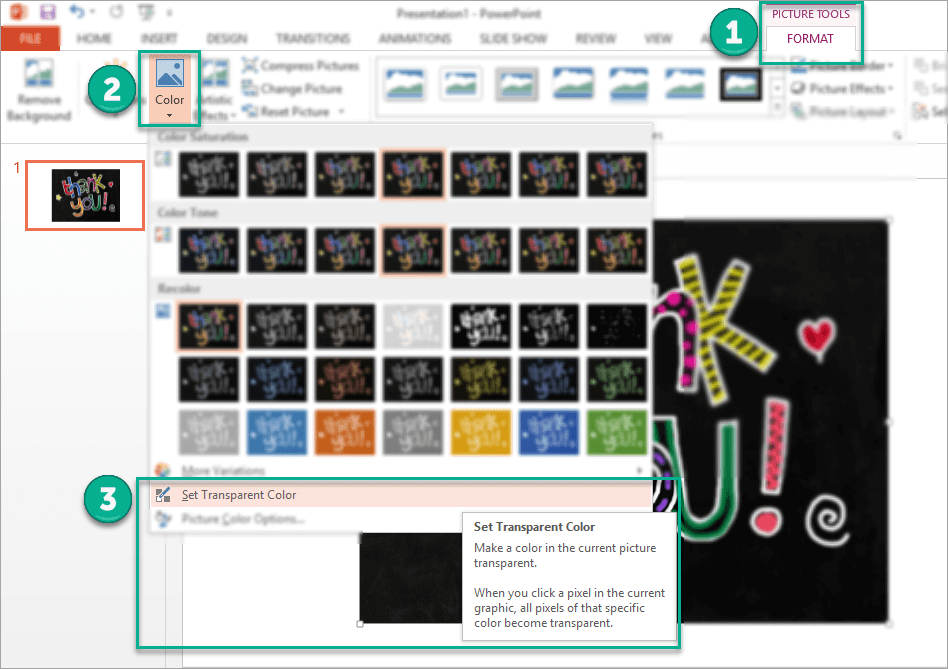
- Next click on the color you want to make to make transparent. Note that all pixels with that color will become transparent.
In this example, I’d like to make the dark background transparent. Here’s the outcome:

If you change your mind, you can easily undo the changes by clicking on the Undo button or by pressing CTRL+Z on your keyboard. Then you can choose another color you want to make transparent.
Feel free to experiment and have fun with the different transparency options on PowerPoint until you find just the right mix of design and functionality that’s perfect for your presentation.
Tutorial 3: How To Flip An Image In PowerPoint
Flipping an image in PowerPoint is a very straightforward process. You don’t need to open up your graphics editing software to do this simple task. In this tutorial, I’ll show you how to flip an image from left to right (horizontal flip) and upside-down (vertical flip) in less than 10 seconds.
How To Quickly Flip Your Image In PowerPoint
- Add an image to your PowerPoint slide. You can do either of the following methods:
Option 1. Click on Insert > Pictures then select the image you’d like to use (your picture will use its original shape).
Option 2. Click on Insert > Shapes then choose the shape you want for your picture. Right-click on the shape, choose Format Shape then under the Fill tab, tick the option Picture or texture fill. Then select the picture you’d like to insert into your slide.
- Once you’ve done the first step, simply click on the image to open up either Picture Tools or Drawing Tools (1). You’ll be able to access the Rotate option (2) in either tab. Simply select whether you want to flip your image vertically or horizontally (3).
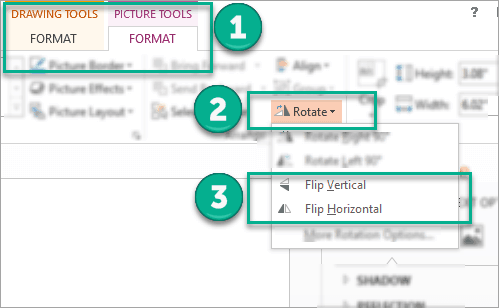
Here is my example image which I’ve flipped both horizontally and vertically.
Normal image:

Flipped horizontally:

Flipped vertically:

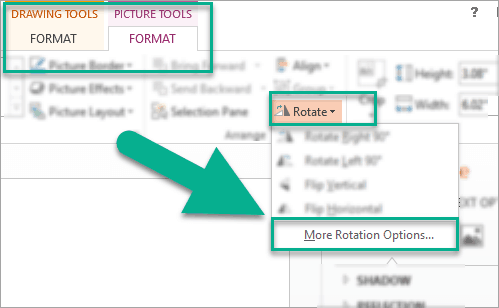
More Rotation Options For Your Images
In addition to flipping your images, you can also rotate them 90 degrees to the right or 90 degrees to the left. This is also a very straightforward technique which can be done in 10 seconds or less. Here’s how:
- Click on the image you want to rotate.
- Depending on how the image was added, it will open up either the Picture Tools or Drawing Tools menu (1). Both tabs will have the Rotate option (2) available. Simply choose whether you want to rotate right or left (3).

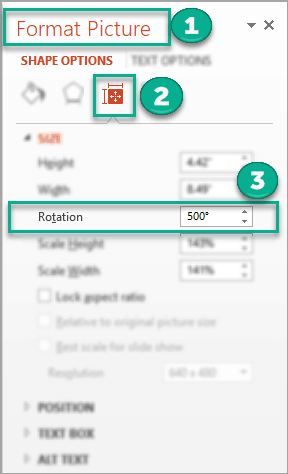
- If you want to rotate the image to 45 degrees, 30 degrees or any other number, simply click on More Rotation Options like you see below.
- This will open the Format Picture option (1). Under Shape Options, click on Size & Properties (2), then adjust the Rotation settings as you see fit.
That’s it – our two quick 10-second tutorials on how to flip images on PowerPoint. Play around with the different rotation options until you find the right angle that’s just right for your image and your presentation.
Tutorial 4: How To Insert Video In PowerPoint
Using nice typography and images in your presentation is a great way to engage your viewers. But if you truly want to get their attention, try inserting a video! In this tutorial, you will learn that adding videos from your computer, YouTube or via screen recording is as easy as 1-2-3. I will break this tutorial down into 3 sections so you can just scroll down to the type of video you want to add to your PowerPoint presentation.
Section 1. How To Insert A Video File From Your Computer
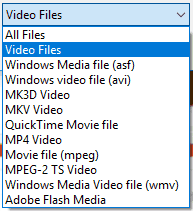
There are many video file types available today. Unfortunately, PowerPoint does not support all of them. To make sure your video plays on PowerPoint, use any of the following file types below:
- Windows Media File (.asf)
- Windows Video File (.avi)
- MK3D Video (.mk3d)
- MKV Video (.mkv)
- QuickTime Movie file (.mov)
- MP4 Video (.mp4)
- Movie file (.mpeg)
- MPEG-2 TS Video (.ts)
- Windows Media Video file (.wmv)
- Adobe Flash Media (.swf)
If, for some reason, your video won’t play, there’s probably something wrong with the audio and/or video codec.
You can try converting the file into another supported file type. Or you can try uploading to YouTube and just embedding it in your presentation slide (see next section for detailed help on this topic).
Note: There are many possible reasons why a video won’t play. Unfortunately, it’s a broad area and this topic no longer falls within the scope of this article.
Let’s proceed with the tutorial:
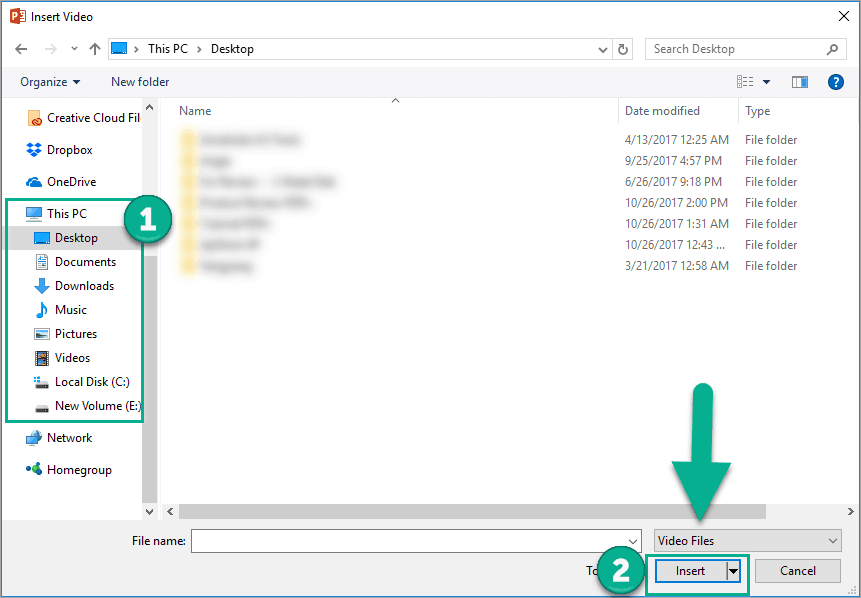
- On the ribbon, click on Insert > Video > Video On My PC.

- Locate the video file you want to insert into your slide. Don’t forget to hit Insert.
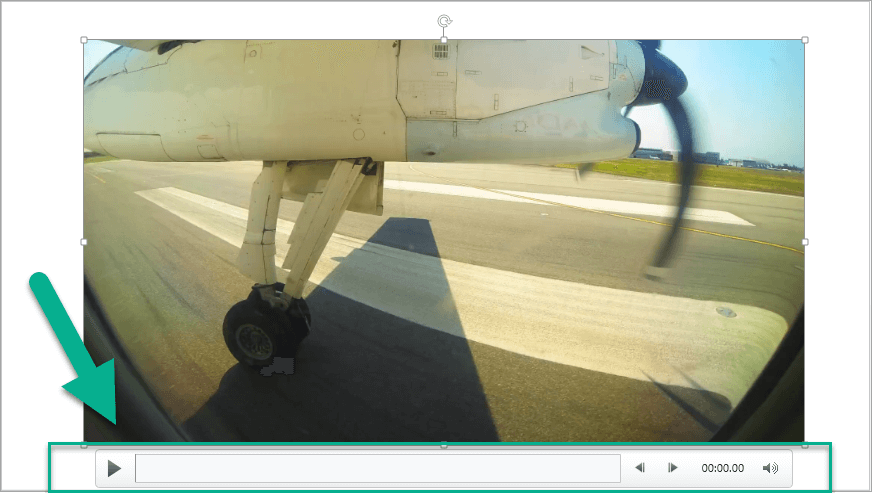
- You know you’ve successfully inserted your video to your slide when you see the video controls (see image below) when you either hover or click on the video.
- When you click on the video, the Video Tools menu will appear. You will then be able to change the video’s format or playback

Alternatively, you can also right-click the video and this handy little menu will pop-up on your screen.

Section 2. How To Insert A Video From YouTube
Before we get started, I would like to point out that PowerPoint only supports YouTube videos. According to Microsoft, the embed codes from other video sharing sites will no longer work.
Inserting a video from YouTube is really quite straightforward. Here’s what you need to do:
- Click on Insert > Video > Online Video.

- You will then see this menu pop-up on your screen:
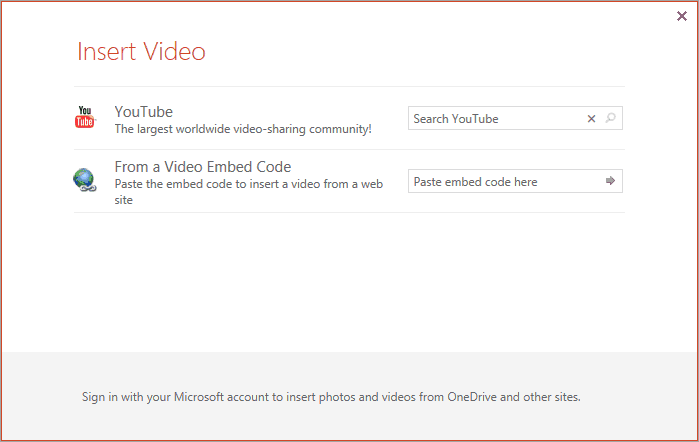
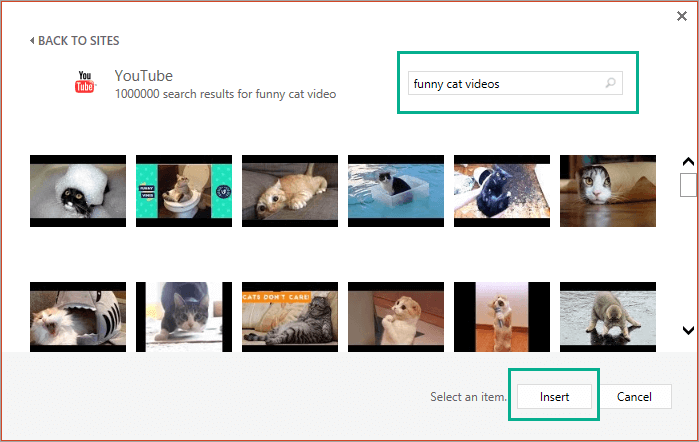
- If you don’t have a specific YouTube video in mind, you can search YouTube directly by typing on the first text box which says ‘Search YouTube’. Once you’ve selected your video, click on Insert.
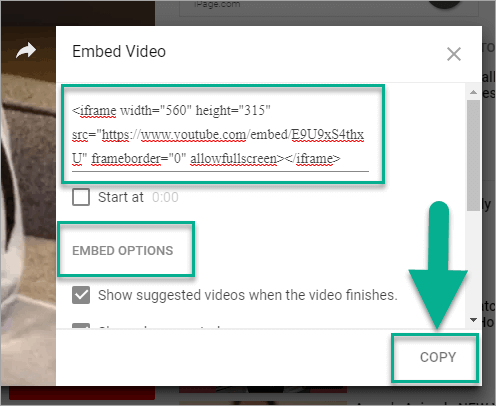
- If you want to link to a specific video, you need to get an embed code. You can get the code by going to the video’s SHARE options and the copying the embed code to PowerPoint.
4a. Click on the Share link:

4b. Click on Embed:
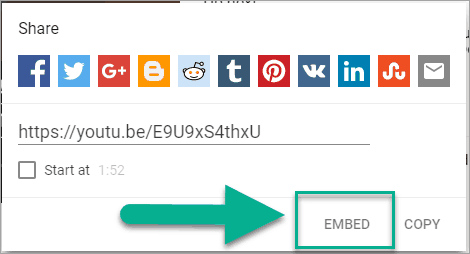
4c. You can copy the embed code straightaway or you can go through the Embed Options if you don’t want the default settings. Either way, when you’re done, just click on COPY.
- Go back to your PowerPoint slide and insert the embed code into the box that says ‘From a Video Embed Code’.
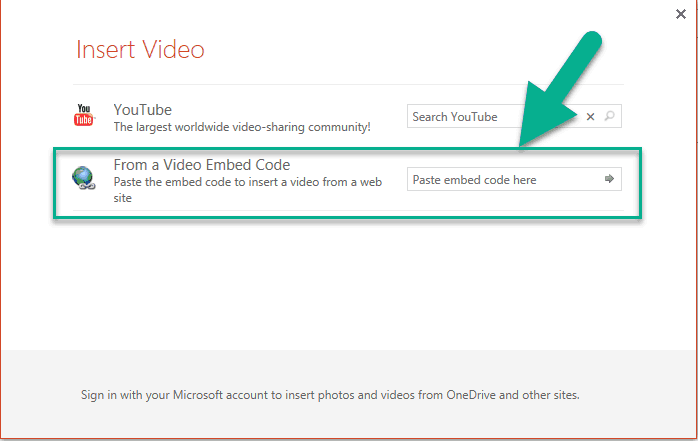
- And that’s it. Your YouTube video will now be embedded in your PowerPoint slide!
Section 3. How To Insert A Video From A Screen Recording
Recording your screen and embedding it in your PowerPoint presentation is very easy to do if you have PowerPoint 2013 and 2016. Here are the steps:
- Go to Insert > Screen Recording.
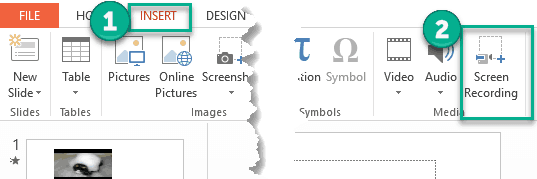
- You will then see the Screen Recording menu pop-up:
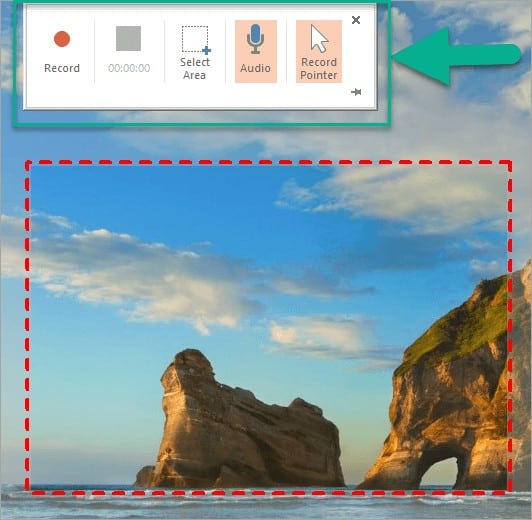
Here are the screen recording options:
- Select the area you want to record (the area inside the red box gets recorded).
- Choose to have your computer’s microphone record the audio (this is great for tutorials and video walkthroughs).
- Choose to record your mouse pointer (this is perfect for tutorials and how-to videos so people can see what you are referring to on your screen).
The recording options on PowerPoint are very basic so if you want more control over your screen capture videos, feel free to use more advanced software such as Camtasia, Screencast-O-Matic, ScreenFlow if you’re on Mac, and more.
- When you’ve defined your settings, it’s time to hit the red Record button.
- After recording, your screen capture video will be added to your PowerPoint slide. Just like a regular video uploaded from your computer (see Section 1 of this article), you can adjust your screen recording video’s Format and Playback settings.
Depending on what your presentation is all about, you can insert one, two or even all three video types in your presentation! Now it’s quite easy to get carried away inserting videos here and there so remember to not overdo it and make sure that your videos are still relevant to your presentation.
Also, keep in mind that if you do insert videos directly from your computer (this includes screen recordings), your PowerPoint file size will be so much bigger than if you just embed a YouTube video.
The advantage of this type of videos, however, is that you don’t need an Internet connection to play it. If you use a YouTube video, don’t forget to make sure you have access to the Internet so your video plays without any issues.
There you have it – three different video types you can insert into your PowerPoint slides to liven up your presentation and engage your viewers!
Tutorial 5: How To Use SmartArt In PowerPoint
If you want to know how to add professional illustrations to your presentations quickly, without the headache of manually drawing various shapes and lines, then you’re reading the right tutorial. In the fifth section of this comprehensive article, you will learn how to use SmartArt in PowerPoint.
There are many different kinds of diagrams you can create with SmartArt. These include simple graphical lists, process and cycle diagrams to more complex graphics like matrices, organizational charts and Venn diagrams.
What I really like about SmartArt is that your graphic/chart will reshape and adjust based on the content you add. This means you spend less time arranging and organizing the SmartArt when compared to building charts and diagrams manually (which could take you hours!). Let’s proceed to our tutorial:
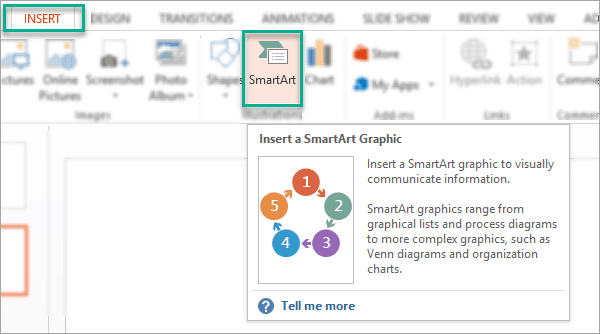
- Go to Insert > SmartArt to open up the SmartArt tool:
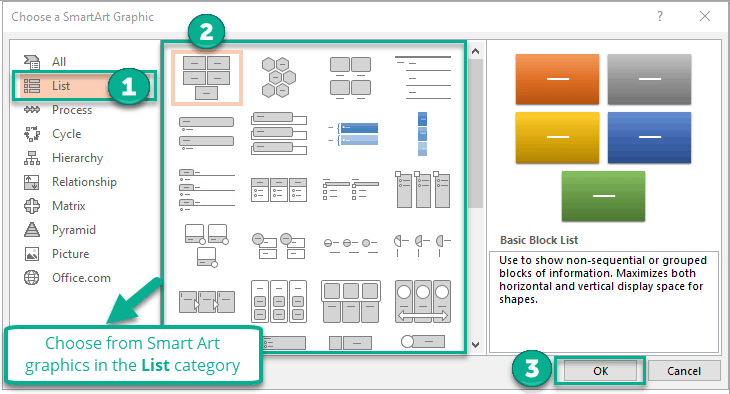
- This is what the SmartArt menu looks like:
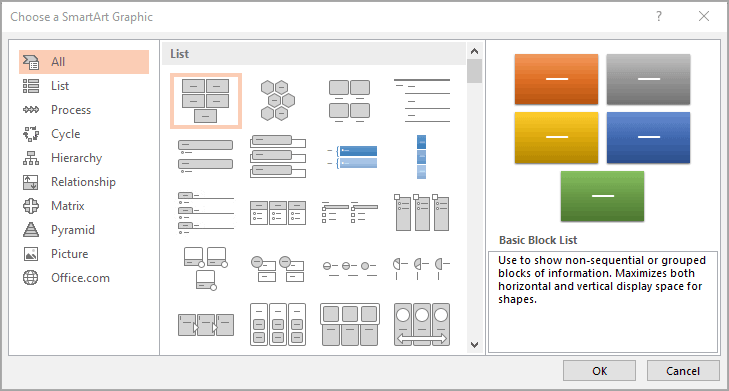
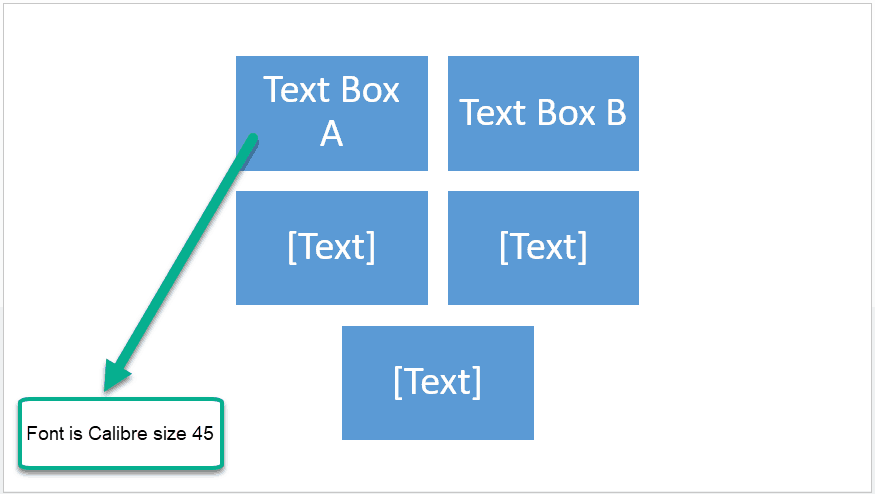
- Each category on the left has a set of associated SmartArt graphics. So if you click on List (1), you’d have 40 (as of this writing) different graphics to choose from. In this example, I chose the first SmartArt graphic in the List category, the Basic Block List (2). Then I clicked on the OK button (3) to insert the graphic into the slide.
- This is the Basic Block List graphic that’s inserted on my slide:

- Next, I edited the text boxes and typed some dummy text on the top 2 boxes. Keep in mind the font size is quite big at this point (Calibre, size 45)
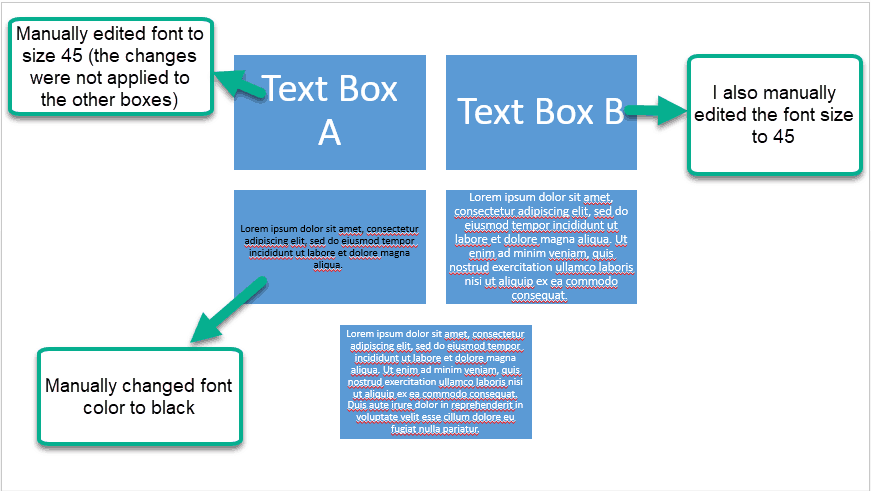
- Now, look at the next screenshot to see what happens when I added longer dummy text to the other boxes:

As you can see in the screenshot, I added the longest text in the bottom box. SmartArt automatically adjusted the font size on the bottom box to make all the text fit inside. Since the 5 boxes are grouped together, SmartArt made all the font sizes uniform across all boxes.
If you want to change the font size on the other boxes or you want to change the font color, you would need to click on the appropriate box and do the edits manually.
In the next screenshot, I edited the font sizes for the top boxes back to the original size (45 points). I also changed the font color on the third box to black.
More Options For Your SmartArt Graphics
There are plenty of editing and styling options you can do for your SmartArt graphics to further customize your graphical illustration and make your point easily understood by your audience.
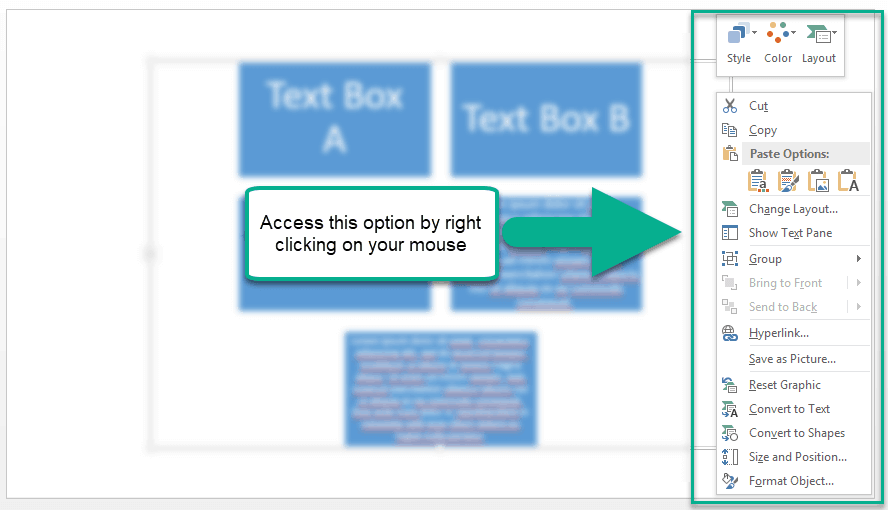
Here are two methods to access additional editing and styling options:
- When you right-click on your mouse, this menu will appear on your screen:
- Alternatively, you can also left-click on the graphic and the SmartArt Tools menu will appear on your PowerPoint ribbon. This is what the Design tab looks like:

And this is what the Format tab looks like:

Go through the different SmartArt options to see what styles and designs best fit your presentation. If you want more control over how the SmartArt graphics look, you can always Ungroup it easily by right-clicking on the graphic itself and choosing the Group > Ungroup option.
Tutorial 6: How To Make A Slideshow In PowerPoint
In this tutorial, I’m going to show you exactly how to make a slideshow in PowerPoint without stressing yourself out too much!
A PowerPoint slideshow simply refers to a PowerPoint presentation where you add text, images, videos, audio files, charts, graphs, and more, to your slides. You do your best to make your presentation as visually enticing as possible to get your audience’s attention (no, blocks of text don’t qualify as attractive!).
You can animate various objects in your slides (just don’t overdo it) as well as add transition effects in between slides. When you present or show your slides, you’re essentially doing a slideshow. If you think it’s difficult to do this, don’t worry it’s not.
Before we go into the technical details of turning slides into a slideshow, I’d like to give you a quick rundown of why slideshows are so important as well as what exactly makes a slideshow attractive.
Why Are Slideshows So Popular Today?
We both know the reason why you’re making a PowerPoint presentation or slideshow – you want to present or share some information with a group of people. There are many ways to convey the same set of information to the same group.
For instance, you can just stand in front of the same group and talk about your topic. But I don’t think it’s really going to engage your audience unless you’re a stand-up charismatic actor who can captivate an audience with just words and body language.
Slideshows are a visual aid for you to convey your message in a way that’s easy for your audience to understand. Instead of describing an event for 10 minutes, you can simply present a graphic timeline that displays the same information.
Instead of talking about how awesome your product is, you can simply put up a slideshow showing off your products. And then you can talk and describe your product in detail – at least your audience won’t be left imagining what your product looks like and why they should care about it. As the saying goes, “A picture paints a thousand words” so for brevity’s sake, use images and graphics, not just text.
How To Make An Attractive and Effective Slide Show In PowerPoint
Not everyone has an eye for design. But if you know the basics of a good attention-grabbing slideshow, then no one will be the wiser that you’re not an artistic person by nature. Here are a few tips to help you make attractive slideshows that will glue your audience to their seats:
1. Use bullet points instead of whole sentences
Sentences are boring. No one wants to read a wall of text in a PowerPoint presentation. We would assume you’re presenting to a room full of literate people who can read your content quickly. If people are reading your content on the screen, then there’s really no point in having you stand in front of them and reading the same thing aloud.
To keep your audience’s attention, put your key points in bullet points. Then go through each point verbally. Walk them through what’s on your slide. Using speaker notes is a great idea, and you should fully use it to your advantage.
2. Put one idea or point per slide
Don’t cram a bunch of information on a single slide. Instead, try to put only one idea or point for each slide. Presenting one idea on one slide has another positive effect as well – you’re able to leave lots of white space on your slide. Doing so helps your audience to remember the salient points in your slideshow and lessen information overload, too.
3. Don’t use crazy color combinations
I admit I’m a fan of neutral colors. Selecting a color scheme is a matter of personal preference unless you’re working on a corporate presentation where you’re required to work using company colors, or your slideshow is about rainbows! Just remember that there is such a thing as too much color. Especially if you use 4 or more colors that don’t jive well with each other.
When choosing colors, you have to put yourself in your audience’s shoes. Can they read the text clearly? Am I getting my point across? Or are the colors too bright? If you’re unsure, stick to neutral colors like black, white, gray, beige, ivory, etc.
Also, I’d like to point out that certain colors do convey certain emotions. Red often infers energy, power, passion, and love. Blue symbolizes confidence and intelligence. There are so many possible meanings to each color, if you’d like to know more, check out this article.
4. Use sans-serif fonts
Serif fonts are normally used on printed material. For onscreen writing, most experts suggest the use of sans-serif fonts as these are easier on the eyes. Just like colors, fonts also convey different emotions so you need to choose fonts that can convey your message accordingly.
Your computer’s built-in fonts might be limited so you might want to take a look at the free Google Fonts. They have over 800+ fonts to choose from, and you can filter by different categories, trending, popularity, date added, etc.
For your slideshow, use at most 2-3 different types of fonts. You can use one font for headings and subheadings and another one for body text. If you’re not sure about the best font combinations, here’s a great site that lists the best Google font pairings.
5. Use large fonts
When presenting in front of an audience, you should always consider the venue where you’re giving your presentation. Are you presenting in a small room? A large hall? What’s the screen size?
Obviously, the bigger the room, the bigger your font size needs to be so that the people at the back of the room can read what’s on your slides.
If you scroll back up to point 2 in this tutorial, I mentioned you should only present 1 idea per slide. Doing so will allow you to use large font sizes because you’re not cramming entire sentences into a single slide.
6. Simplicity is key
Presenting a simple slideshow that conveys your message perfectly to your audience is so much better than trying to overwhelm them with a plethora of visual stimulation.
Using a combination of colorful imagery with a mismatched color scheme and font sizes that require a telescope to be read from a short distance, is a recipe for a slideshow disaster.
There are plenty of examples of PowerPoint slideshows that are truly horrible. You don’t want your slideshow to fall into that category.
When you follow all 6 points we’ve written in this tutorial, your PowerPoint slideshow will be so much more appealing and engaging to your audience.
How To Make A Slideshow In PowerPoint
Now that you know some basic tips to make your slideshow as attractive to your audience as possible, it’s time for me to show you how to make your slides come to life.
1. Add slide transitions and animations
Don’t go crazy with the animations. Yes, it’s fun to see different shapes flipping or bouncing around but if it distracts from what you’re trying to say, then leave it out of your slideshow. Object animations should be kept to a minimum.
For best results, it’s best to use animations that will help emphasize a point, not distract from it. For slide transitions, a simple fade transition is enough for most presentations. Click the link below to know more about PowerPoint animations:
How To Add Animations To PowerPoint
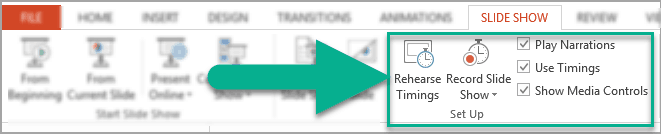
2. Rehearse your timings
When rehearsing your slide timings, you also need to consider the timings for your animations and slide transitions. You can set this in the Timing section which appears on both the Transitions and Animations tabs.


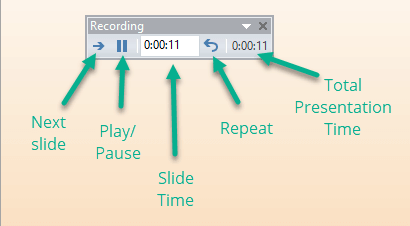
To rehearse your slide timings, you can go to Slide Show > Set Up > Rehearse Timings.
When you click on Rehearse Timings, the Recording dialog box will pop-up as you can see in the next screenshot:
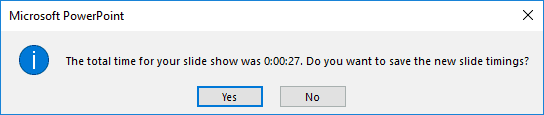
When you’re done recording, a dialog box will appear displaying the total time for your presentation and will ask you to confirm if you’d like to keep the rehearsed timings or not.
Click Yes if you’re happy with the timings, and No if you want to start over.
If you’d like to set-up a self-running slide show, for instance, at a kiosk or booth at a convention or trade show, then you should head over to this guide.
I hope this tutorial has given you plenty of tips on how to present a great slideshow using PowerPoint. Your slideshow is just one aspect of your presentation. Your commentary (whether it’s live or recorded) will add another dimension to your presentation. If you knock both out of the park, then you just may become your audience’s new favorite PowerPoint slideshow expert!
Are You Ready To Use The Power Of Images, Videos, and SmartArt Graphics In PowerPoint?
In this tutorial, I showed you how you can flip, crop and make your images transparent. You also learned just how easy it is to insert videos and SmartArt graphics to your slides. Now that you know the power of using different media and graphics to liven up your PowerPoint presentation, it’s time for you to apply all the techniques you have learned here and start using them to make awesome PowerPoint presentations and slideshows!