How to Make a PowerPoint Template (Tutorial with Pictures!)

PowerPoint templates are the hidden gem of top designers worldwide. That's why incorporating templates within your team is a wise choice!
They not only save you a lot of time but also help convey your brand identity across internal departments and stakeholders.
In this guide, you will learn how to make a PowerPoint template from scratch, which will also help you know how to edit an existing one.
In summary, you'll learn about:
- What exactly is a PowerPoint Template, and what is its difference from a PowerPoint Theme?
- Is there a Quick Method for creating a PowerPoint Template?
- How to create a Custom PowerPoint Template from scratch?
- How to get a Branded PowerPoint Template with a fast turnaround?
- Frequently Asked Questions (FAQs) about PowerPoint Templates
Let's begin with the basics – or jump to your favorite section using the list above.

What are PowerPoint Templates?
PowerPoint templates are a group of slides with predefined layouts, colors, fonts, and themes that will optimize your creative process when designing presentation decks.
A good PowerPoint template contains nice layouts, great background styles, and unique color combinations. It also has strategically positioned placeholders, allowing for seamless insertion of text, images, videos, charts, or tables.
Without a doubt, PowerPoint templates are an excellent tool for quickly creating professional slides!
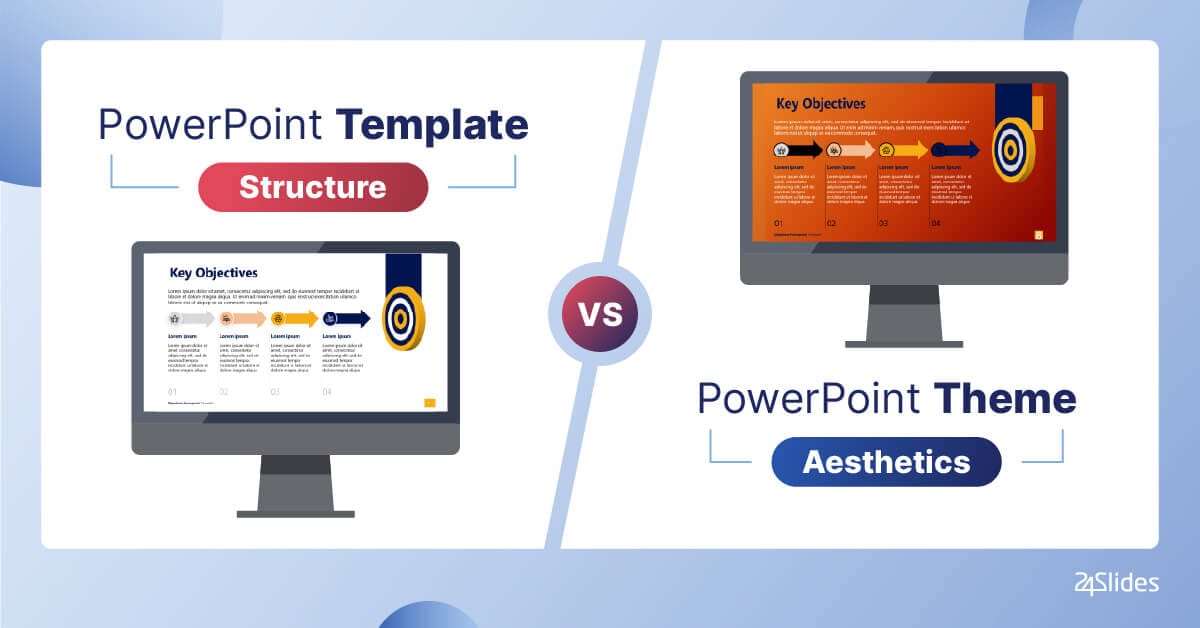
PowerPoint Template vs. PowerPoint Theme
You may have heard the terms "theme" and "template" being used interchangeably, but they don't have the same meaning in this software.
Let's learn about the real difference between a PowerPoint template and a PowerPoint theme:
- A PowerPoint template is a set of ready-made PowerPoint slides that contain layouts, themes, graphs, charts, and even content. Its extension is .potx.
- A PowerPoint theme is a pre-set of fonts, colors, and visual effects you apply to your slides. Its extension is .thmx.
So, in summary, a template provides a pre-set structure where you only need to insert your content. Meanwhile, a theme allows you to change the overall visual appearance of your presentation with just a click.
Naturally, you can apply any theme to an existing PowerPoint template or presentation. When it comes to design, your imagination is the only limit!
The Quick Method: Using an Existing PowerPoint Template
In a rush? You don't have enough time to build a PowerPoint template?
If so, you should use an existing PowerPoint template from the software itself or download a free PowerPoint template from Templates by 24Slides.
We can tell you that both are high-quality resources and easy to customize.
Regarding the PowerPoint templates by 24Slides, we have elaborate two types of templates:
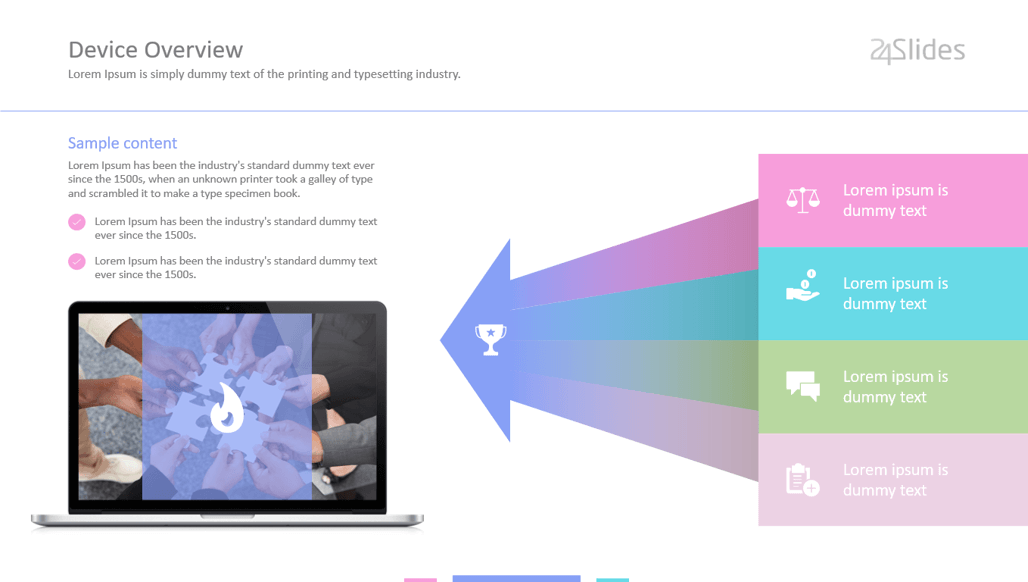
Presentation Deck Templates
They have a standard presentation structure.
It starts with a cover slide and a table of contents. Then, it gives you space to introduce yourself or your team with an "About Us" slide.
Also, you'll find slides with some diagrams and charts to organize your information. Check out this example:
Individual Slides Templates
These templates do not follow a step-by-step structure. So feel free to use each slide independently.
Most of the time, they're about the same topic and differ primarily in the layout design. Here is an example:

One of the greatest pros about templates is that you don't need expert knowledge to customize them, as PowerPoint is very intuitive software.
Keep in mind that you have the freedom to adapt our PowerPoint templates for personal or commercial projects!
Step-by-Step Guide: How to create a Custom PowerPoint Template from scratch?
Now, if you need an impactful template fully customized to your needs, you should create a PowerPoint template from scratch.
With a custom template in PowerPoint, you have complete control over the final design of your slides.
That being said, let's explore together how to make a PowerPoint template in six simple steps!
- Important: We recommend learning how to use Slide Master in PowerPoint. The key idea is that any element added to the Slide Master will be reflected across all subsequent slides.
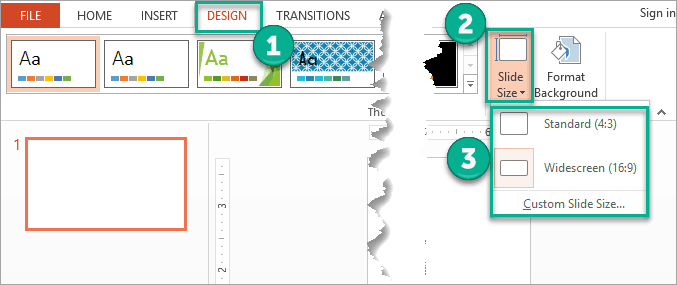
Step 1: Set your Slides Size
Adjusting slide sizes is really easy on a blank PowerPoint presentation –just three clicks, and you're done!
To set or change your slide size in PowerPoint, you only need to:
- Go to the Design tab.
- Click on the Slide Size button.
- Select the size you need for your presentation deck. If you choose "Standard (4:3)" or "Widescreen (16:9)," your slides will automatically change.
How do you Resize a Slide with Custom Measurements?
By default, the slides are sized for a widescreen presentation. This happens because most desktop screens have a 16:9 aspect ratio.
Good news! If you require it, you can customize the size of your slides in PowerPoint. You only need to:
- Press "Custom Slide Size," and a pop-up will appear.
- To change the size of your slides, type the new measurement in the boxes or use the arrows from the "Width" and "Height" sections.
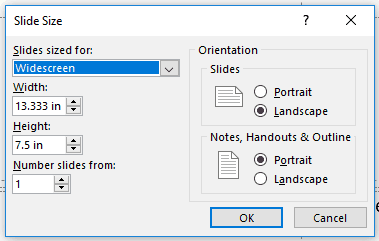
- If you are unsure about the specific Width and Height your slides require, click "Slides sized for" and select the most appropriate measurement for your PowerPoint template.

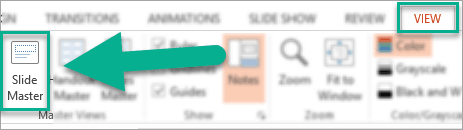
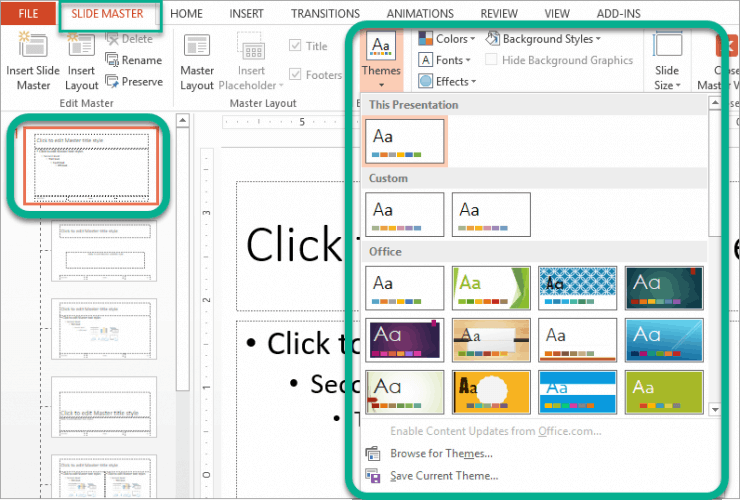
Step 2: Open the Slide Master View
Here's where a special PowerPoint feature comes in: Slide Master.
You wouldn't be able to learn how to make a PowerPoint template without this feature, so pay close attention!
- Go to the View tab.
- Press the button "Slide Master" (see image).
- The Slide Master tab will appear, and you will be able to access new features in PowerPoint.
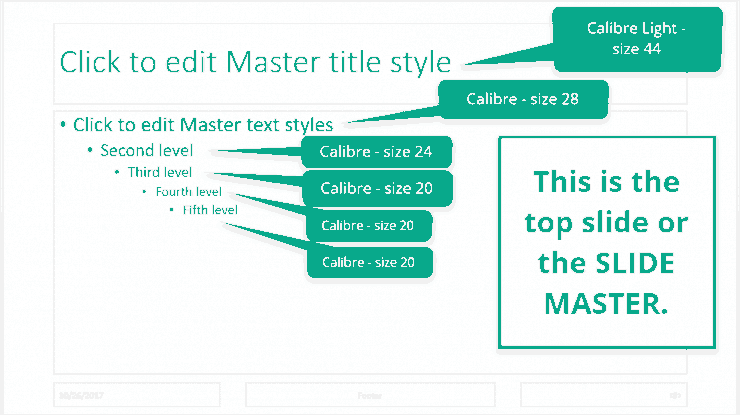
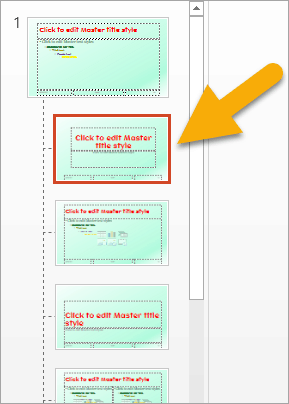
The first slide is called the "Slide Master," and any changes you make there will be reflected in the following slides (Layout Slides).
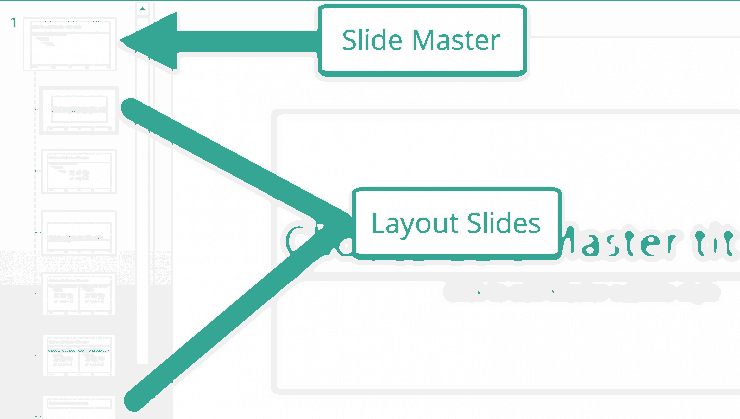
Let's delve into a concrete example! The next image shows the effectiveness of using Slide Master for creating templates or presentations in PowerPoint.
Step 3: Customize your Slide Master
Now that you opened the Slide Master view, it's time to learn how to customize this tool.
Here are some important changes you can apply to your Slide Master in PowerPoint:
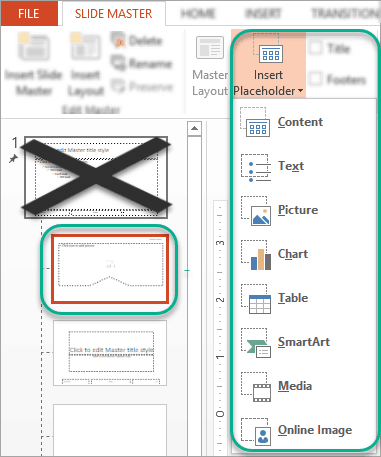
Edit the Placeholders on your Slide Master
Let's start with the easiest part: the placeholders of your Slide Master.
- Go to the Slide Master tab.
- Click on the "Master Layout" button.
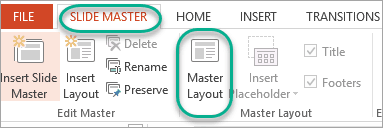
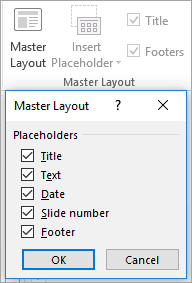
- A dialog box will appear with the different types of placeholders available in the software. There, you can check the placeholders you need to create a PowerPoint template.
Apply a PowerPoint Theme to your Slide Master
You are free to choose any default PowerPoint theme or a custom theme you already have for your project.
- If you like PowerPoint aesthetics, you'll see these options when clicking the Themes button.
- If you have a custom theme saved on your computer, you only need to click "Browse for Themes."
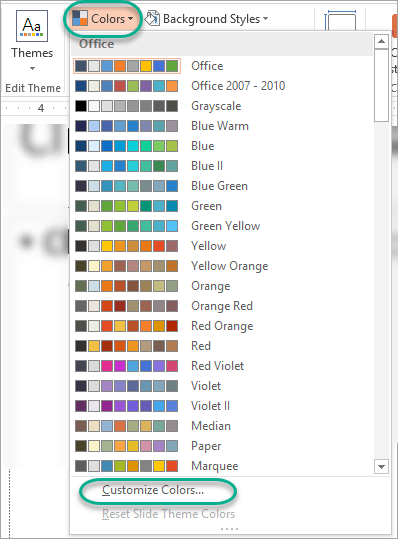
Set Up a Custom Color Palette on your Slide Master
By default, PowerPoint offers some built-in color palettes, but you can also use your own set of colors.
This approach is especially useful when your template is designed for a project with its own brand identity.
- Go to "Colors" in the Slide Master tab.
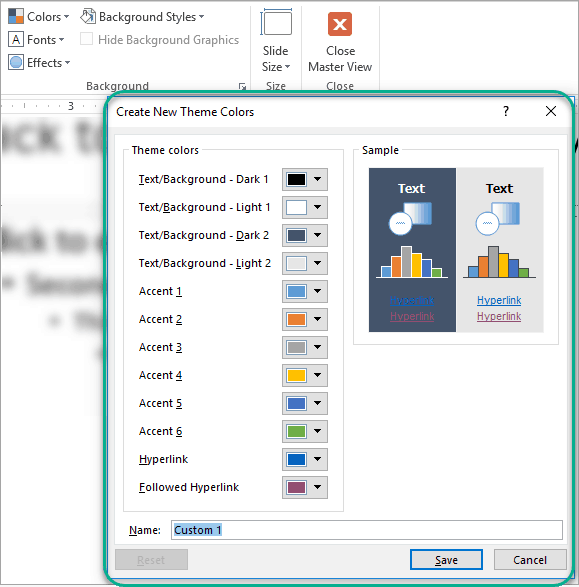
- Click "Customize Colors" to set your own color palette in Slide Master.
- A new pop-up will appear with 12 sections to fill out.
- Remember to name and save your final color palette in PowerPoint.
Choose a Custom Font Set for your Slide Master
In this process of creating your own PowerPoint template, you also need to know how to set up a font pack in this software.
Let's check how to do it:
- Go to "Fonts" in the Slide Master tab.
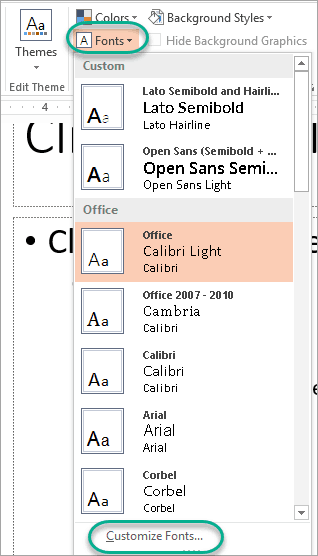
- Click on "Customize Fonts" to open a dialog box. There, you can set up your new Heading and Body fonts.
- Create a name for this font set and click on "Save."

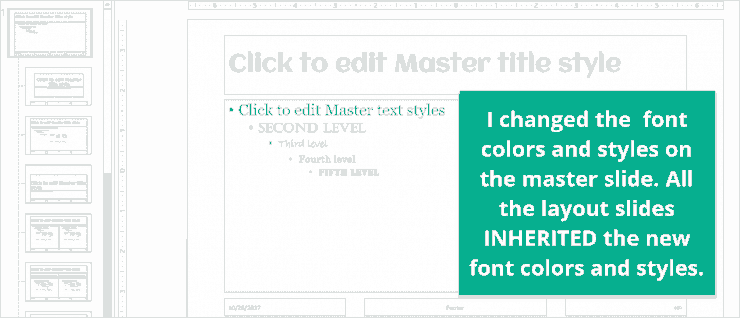
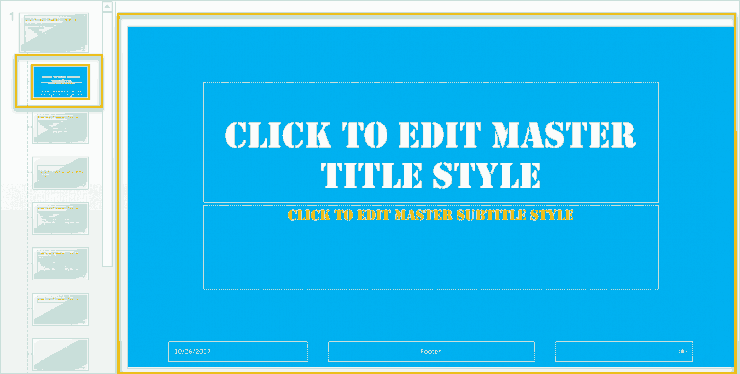
Here you can see how the Layout Slides change when employing the Slide Master functionality in PowerPoint:
- PRO TIP: If you want a more eye-catching result, install your own fonts in PowerPoint. Follow all the steps in our blog!
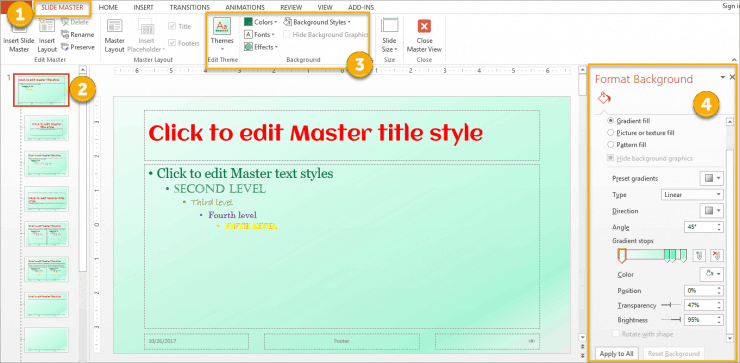
Customize the Background of your Slide Master
If you don't like PowerPoint themes or feel like "something is missing," you can customize your background style.
Let's learn how to do it:
- Make sure you're on the Slide Master tab.
- Stay on the first slide (Slide Master slide).
- Select "Background Styles" > "Format Background."
- A panel will open on the right side of the screen. There, you can customize your background with a solid color, a gradient, or even add a picture.
Add your Company Logo to your Slide Master
If you want to enhance brand consistency and improve brand awareness among your audience, it is advisable to incorporate your logo into the PowerPoint template.
It's very easy to do it – simply follow these instructions:
- Go to the Insert tab > Pictures > This device.
- Select your company logo image with a transparent background (PNG is the most common format).
- Place the logo on your Master Slides, and voilá!
Step 4: Design your Layout Slides
When you finish designing your Slide Master, you should know a little more about the following slides, known as "Layout Slides."
Designing layouts in PowerPoint facilitates the task of adding information to your presentation deck. Without a doubt, having different pre-set layouts saves a lot of your time!
Also, in case you share this master resource with different teams, you'll be able to adapt it to their needs. That way, your PowerPoint template will be more user-friendly!
Customize the Placeholders on your Layout Slides
Here are all the types of placeholders you can incorporate into your Layout Slides:
- Content
- Text
- Picture
- Chart
- Table
- SmartArt
- Media
- Online Image
To edit these placeholders, you only need to:
- Click on the placeholder you want to edit.
- A new Format tab will appear. Depending on each type of placeholder, the PowerPoint settings would be different.
- Finally, change the aesthetics of each placeholder as you want!
We recommend adding placeholders in strategic areas on your Layout Slides. Try and see which setting fits better for your project!
Hide Background Graphics on a Layout Slide
Remember how we added a logo in the Master Slide throughout the entire presentation deck?
Well, if you want to remove the logo or any other background graphics from specific Layout Slides, here's what you need to do:
- Click on the Layout Slide you want to edit.
- Go to the Slide Master ribbon.
- Check the box that says "Hide Background Graphics" (see image).
- If you want to apply this to multiple slides, hold down the "Ctrl" key and select the slides you want to replicate this change.

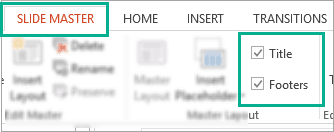
Hide Title or Footers on a Layout Slide
Beyond hiding background graphics in the Layout Slides, you can also opt to hide the title or any footers.
Let's check how to do it:
- Go to the Slide Master tab.
- Uncheck the options "Title" and "Footers," as required (see image).
- Unlike the previous functionality, these changes are made manually on each slide.
Create a New Layout Slide
What if you want different settings for only one Layout Slide? Well, you can break the rules a bit.
Let's say you desire to incorporate a different background color from your Master Slide, and you'd rather use a white Stencil font for the headings –but just for a particular Layout Slide.
Luckily for us, PowerPoint is flexible enough to make this happen. Here's what you need to do:
- Click on the layout you want to edit. In this example, we will change the Title Slide Layout (the layout immediately below the Master Slide).
- To change the color of the background, right-click on the slide and select "Format Background."
- To edit the font style and color, highlight the text and the Shape Format tab will appear. There, you can customize it with the tools Text Fill, Text Outline, and Text Effects.
Here's how the final Layout Slide looks like:
Step 5: Apply the Layout Slides to your PowerPoint Template
We are nearing the end of this guide on how to make a PowerPoint Template.
Now, it's time to apply the layout designs previously created to your template. Remember that you have the freedom to choose the order!
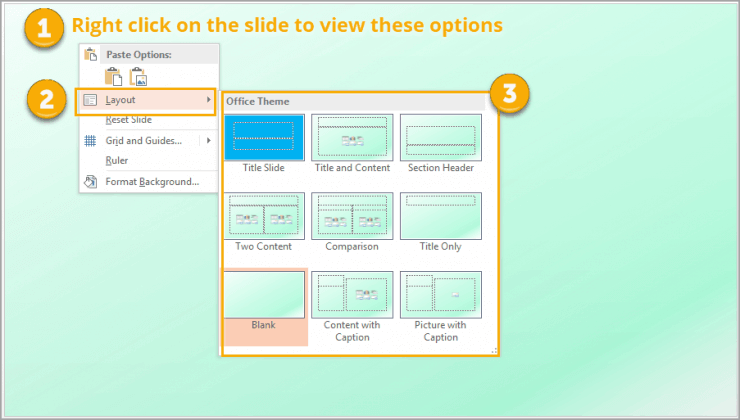
- Close the Master View by going to Slide Master > Close Master View.
- Right-click on the slide you want to edit (you can either create a new slide or edit an existing one).
- Select the "Layout" option, and a new list of layouts will appear (here you will see all the layouts created in the previous step!).
- Choose the layout that best suits your needs!
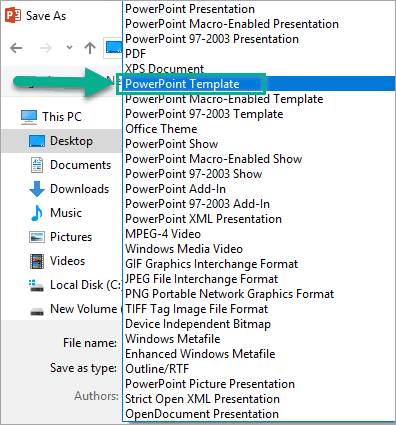
Step 6: Save your Custom PowerPoint Template
Once you're happy with the aesthetics of your slides, it's time to save your PowerPoint template:
- Go to the File tab.
- Click on "Save As" > "Browse."
- Then, select "Save as Type."
- Choose "PowerPoint Template" (see image).
- Change the name of the file if needed.
- Click on "Save," and that's it!
There you go! You have created a custom PowerPoint template ready to be used for any project.
We hope you like this tutorial on how to make a PowerPoint template from scratch. You're free to share it with everyone you want!
Get a Branded PowerPoint Template with a fast turnaround
What if I tell you there's a quicker option to have your PowerPoint template on-brand? And it has nothing to do with fiddling with PowerPoint's shapes and graphics yourself.
Nowadays, more and more big companies worldwide outsource their design tasks and get professional slides that significantly impact their audience.
If you're looking for a custom PowerPoint template, or want to elevate your business presentations, book a call with us!

Customer Frequently Asked Questions (FAQs) about PowerPoint Templates
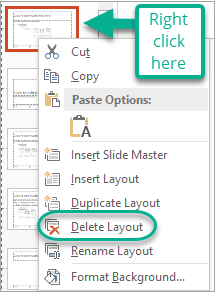
1. How to delete a Layout Slide from Slide Master?
To delete a Layout Slide from Slide Master, simply:
- Right-click on the Layout Slide you want to delete.
- Select the "Delete Layout" option, and that's it!
As you can see in the image below, you can insert, duplicate, delete, and rename a layout in this PowerPoint feature.
2. How to apply a PowerPoint Template to an existing Presentation?
To apply a template to a new presentation deck, you must know how to save the file as a theme:
- Choose the template you prefer (with the design and color palette you like the most!).
- Go to View tab > Slide Master > Themes.
- Press "Save Current Theme."
- Name it and save it on your device (see image).
- Open the PowerPoint presentation you want to edit.
- Go to Design tab > Themes > Browse for Themes.
- Choose the PowerPoint theme you just saved, and that's it!
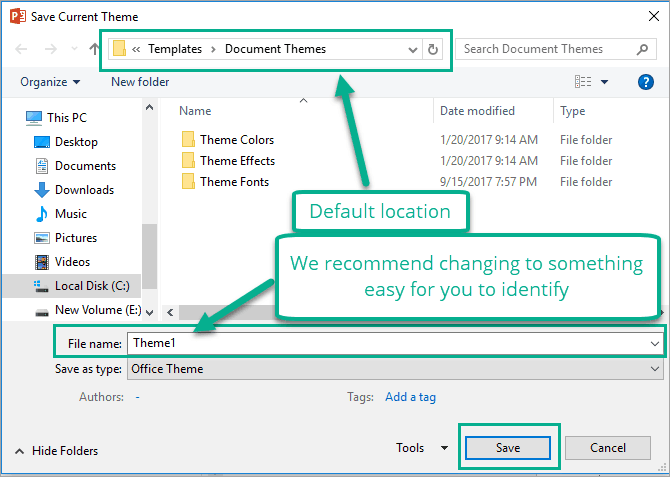
- Note: Remember that theme and template do not mean the same in PowerPoint.
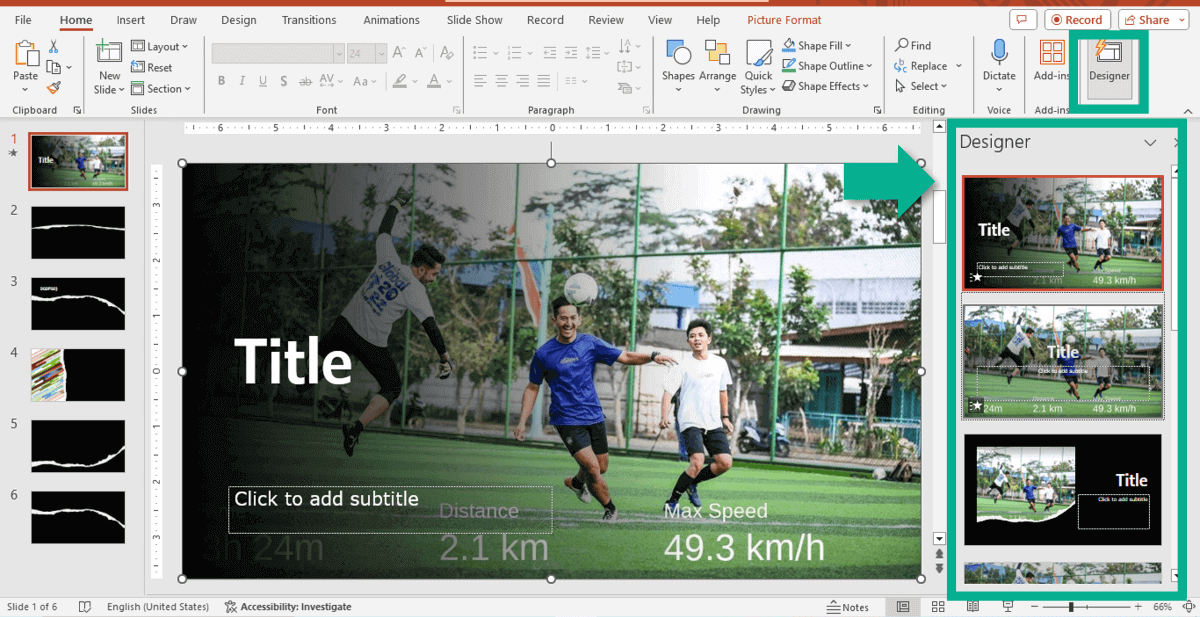
3. How to make your own PowerPoint Template with a Picture?
Thanks to the latest PowerPoint updates, you can create a template from scratch with any image.
To achieve this, follow these steps:
- Choose and save some images to add to your PowerPoint template.
- Create a new PowerPoint presentation and place yourself on the first slide.
- Go to Insert tab > Picture > This device (you can also try images from Office or Bing).
- Find the image you saved in the first step and insert it into your presentation.
- Go to the Design tab and press the PowerPoint Designer tool. The software will give you many design ideas for your template.
- Add the number of slides your PowerPoint template needs by pressing the "Enter" key on the first slide.
- Choose the layouts that best suit each slide, and voila, you finally have a unique PowerPoint template!
Found this guide helpful? Check out more content like this: