How To Loop a PowerPoint Presentation

Learn how to loop a PowerPoint in 3 easy steps! Usually, once you’re finished with your presentation, PowerPoint goes back to the slide editor. But if you want your presentation to go back to the start, this quick tutorial will show you how to loop any PowerPoint presentation and set it to run automatically.

Why Learn How to Loop a PowerPoint
It can be very awkward to have your audience looking at the black screen after going through all your slides. Or even worse, at the slide editor. If you’re planning on going back on some of your previous points, learning how to loop your PowerPoint presentation can be a useful tool. Sure, you can go back using the Back key. But this way can make it easier and more polished, especially if you have a long presentation with many slides.
Learning how to loop a PowerPoint can also be extremely useful for those making a pictured-based presentation. Slides don’t necessarily have to have a lot of information on them. PowerPoint can also be used just to present images and examples or to provide a background for the speaker. Looping your presentation will make sure that you’re never left with an empty screen.
In short, it’s a nice detail to make your presentation look more clean and polished. So, are you ready to learn how to loop a PowerPoint presentation?
How to Loop a PowerPoint Presentation
Luckily, learning how to loop a PowerPoint is very easy! Just follow these 3 steps:
1. Open your presentation and go to the Slide Show tab.

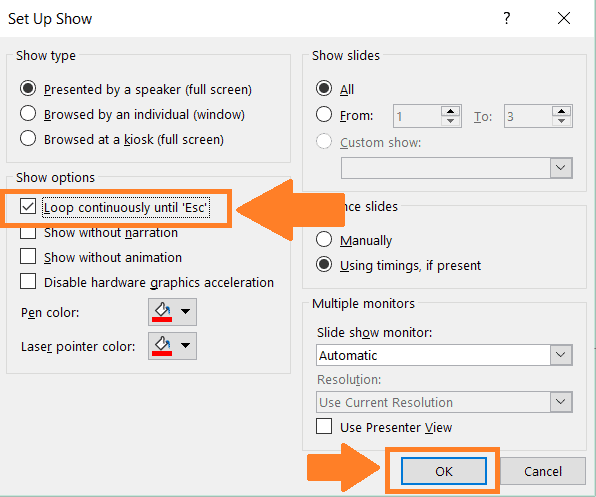
2. Select the Set Up Slide Show option for the Set-Up Options window to appear.

3. In this window, go to the “Show options group” and tick the Loop continuously until ‘Esc’ (the first option). Don’t forget to click OK to apply the new set-up!
And that’s all! Try putting your presentation on Slide Show mode. You’ll see that your presentation keeps going on until you press the ESC key in your keyboard.
How To Make a Self-Running PowerPoint Presentation
If you’re making a PowerPoint presentation to be used only as a background, then this information might be useful too. Usually, PowerPoint presentations only advance to the next slide when a mouse click occurs. But you can set your presentation to run automatically. This way, you don’t have to keep worrying about moving to the next slide since your presentation will do it on itself!
This is a great option for presentations that are only images on a loop, like in a Pecha Kucha presentation. You will be able to focus much better on what you have to say rather than in clicking on your slides to avoid boring your audience with only one picture.
1. Go to the Transitions tab.
2. In the “Timing” group (in the far right), tick the After option. In the timer on its side, enter how much time you want between slide and slide.

3. Select the Apply To All option so every slide follows the same set-up.
If you want different times for each slide, you can also customize it like so. You just have to go one at a time changing how much time you want to spend on each slide and ignore the last step. Don’t forget to practice before your presentation! Only then you’ll know if the times you set for each slide are right. Good luck!