Tutorial: How to Track Changes in PowerPoint
When the presentation depends on a whole team, it’s likely that they all will have to edit the PowerPoint. But how to know what have they changed and if the corrections they have made should be kept? Learning how to track changes in PowerPoint can be an outstanding tool when working in teams.

The “track changes” option
Ever since it first appeared, the “track changes” option has been a huge asset. Especially for those who work in teams. Being able to know what changes have been done since the last time you checked out the document can be an outstanding tool that helps you work more efficiently.
That’s why Google Drive is recognized as such a great option for teams working on the same document. It doesn’t only allow you to work remotely in real-time, but to track the changes and see who has added what. Microsoft Word also has the Track changes option in the Review Tab ever since 2007. It is a great tool for editors making corrections.
But what about PowerPoint? It’s not uncommon to have a presentation done by a whole team. Even if it’s likely that each will work on their own part, there are still slides that are everyone’s responsibility. Even if it’s just the order in which the slides will be going, there still much coordination needed to do a group presentation.

But go slide by slide checking possible changes is extremely burdensome, and a waste of time. And even more, you are most likely doomed to unwillingly skip at least some of them. So how to track your team’s contributions to the document in a more efficient way?
How to track changes in PowerPoint
Even if there is no automatic way to track the changes in PowerPoint (like in Word), it’s still possible to do so. You just need to follow these easy steps. It may seem complicated at first, but if you follow them through and through, you’ll see it’s actually not hard at all.
1. The most important thing is to save a copy of your original presentation. What we’re going to do is to compare 2 versions of the same presentation and track the differences, so it’s vital that you have something to compare the altered document with.
2. Save a copy with another name in a shared location for your teammates to review. For example, you can use OneDrive.
3. Once you have received the reviewed files, you’ll need to merge and compare both versions. So open your original presentation and select the Review tab > Compare.

And, in the browser, select the reviewed version to merge.
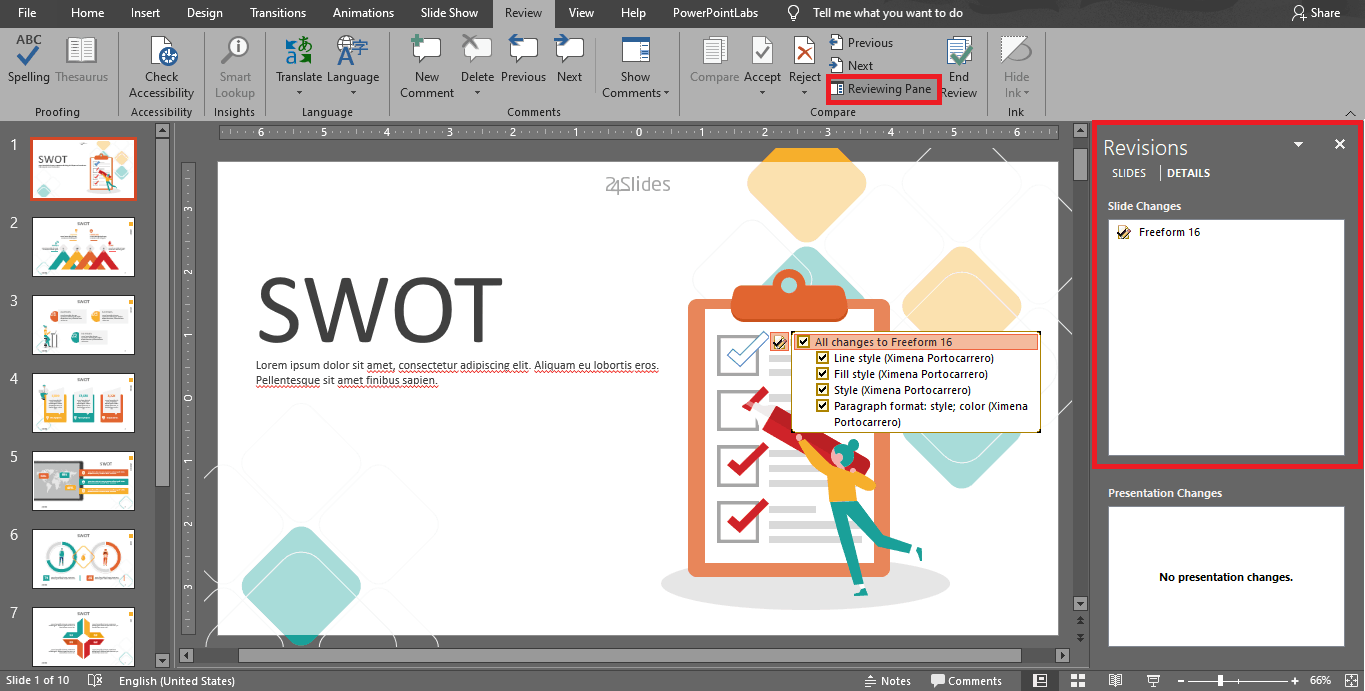
4. Once both versions are merged, you can see the changes in the Review tab. If you click on Reviewing Pane a detailed menu of the changes will appear on the right side.

5. To see the changes suggested, you just need to click on the ticks. Once you have already decided what you’ll keep, you can use the Accept and Reject functions on the Review tab.

6. The
icon will show you where on the slides are changes. And the
icon will show you where on the presentation the comments are.
Now you know how to track changes in PowerPoint. Hopefully, this tutorial will boost your teamwork!
If you liked the presentation used as an example, you can find this Playful SWOT Analysis template (along with many others) completely free in the Templates by 24Slides platform.


