30 Amazing Things You Can Do And Create In PowerPoint

Everyone knows PowerPoint is one of the best – if not THE best – presentation software around. It’s great for making all sorts of presentations. From academic to corporate presentations (and everything in between), PowerPoint can seemingly do it all. But presentations are not all PowerPoint can do. The truth is, it’s a very powerful and versatile software. In this article, I’m going to share with you 30 amazing things you can do and create in PowerPoint. Let’s begin!
- Make social media images
Surprised? Yes, you can indeed use PowerPoint to make social media images. Whether it’s for your Facebook, Instagram, Twitter, Pinterest, and more, PowerPoint can do it all. Now, the first thing you need to do is figure out the image size so you can resize your PowerPoint slides.
You can do a quick Google search for this. Or you can download Louise Myers’ social media images cheat sheet here. Just scroll down the page and you’ll find her table of contents with links to top social media platforms’ image sizes.
So, now that you know the image dimensions, let’s head on over to PowerPoint. Go to the Design > Slide Size > Custom Slide Size. You’ll see this pop-up on your screen:
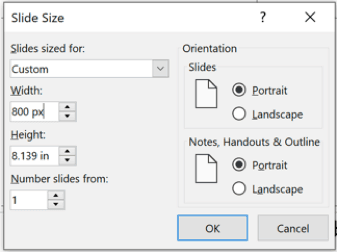
For width and height, the default measurement is either centimeters or inches depending on your location. The good news is you don’t need to do some mathematical calculations to do your conversions. PowerPoint will automatically do it for you. How?
If you look at the screenshot above, you’ll notice that in Width, I typed in “800 px.” (Important note: There’s a space between “800” and “px.”)
The moment I moved my cursor to the next field, “Height,” PowerPoint automatically converted 800 pixels to 4.167 inches. Pretty neat, right? Try it!
This is what my 800 px x 800 px (or 4.167 inch x 4.167 inch) slide size looks like:

With the width and height dimensions set up properly, you can now proceed to designing your social media images. Just use PowerPoint like normal.
Now, here’s a great video with step by step guide to making a viral image quote poster for social media:
- Make YouTube videos
Yep, you read that right – YouTube videos! You don’t need to buy expensive camera gear for your first few YouTube videos. Before you get overexcited though, temper your expectations a bit. As you probably already know, PowerPoint is a slide-based presentation software, so you can’t use it for your vlogs. You can, however, create simple videos like lectures or tutorials.
You can use animations and transitions to make your presentation/video fun. Plus, you can record timings and narrations, and even laser pointer gestures! Here’s how you do it:
Once you’ve saved your file, go to File > Export > Create a video. Alternatively, you can go to the Recording tab and click on the Export to video button. What’s really awesome about making videos on PowerPoint is that you’re not limited to 480p or 720p (regular HD). You can make 4K or ultra HD videos on PowerPoint!
If you’d like to know more, you should watch this short 6-minute tutorial on this very subject:
Oh, and if you’re wondering if you can also create your YouTube intro and outro in PowerPoint, the answer is yes! Check out this tutorial article I wrote about this very topic here: How To Make Amazing YouTube Intros and Outros In PowerPoint.
- Make infographics
Just like social media graphics, infographics dimensions can be all over the place. It can be small or large depending on the information that needs to be conveyed. However, there’s actually a standard size for infographics.
Ideally, an infographic should not exceed 600 px in width and 1800 px in height. But some sites do have infographic size requirements though. So, before you create one, make sure it’s going to make the cut in your target platform.
That said, if you need infographic design inspiration, you should check out this link right here.
- Create eye-catching checklists
You can write down a checklist on a plain piece of paper. Or, you can use your favorite word processor like Microsoft Word. However, what’s really great about using PowerPoint to create your checklists is that you can quickly transform them into beautiful works of art. How? By converting your checklist, a.k.a. bullet point list, into SmartArt!
Here’s how:
First, type your checklist. Then right-click on the list and you’ll see the menu option below. Click on Convert to SmartArt. You can either choose from the default options or you can click on More Smart Art Graphics at the bottom.

Here’s my new and improved checklist after converting it to SmartArt graphic:
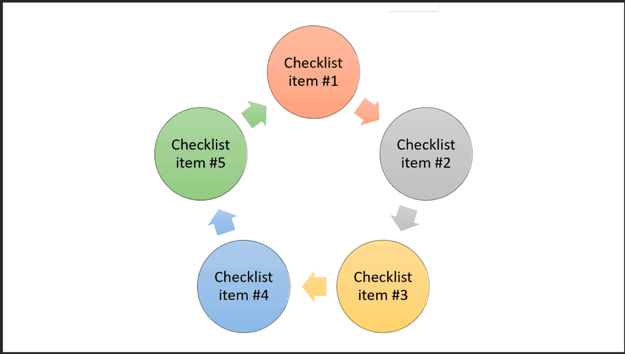
Note that you can format your SmartArt by going into the SmartArt Tools tab in PowerPoint.
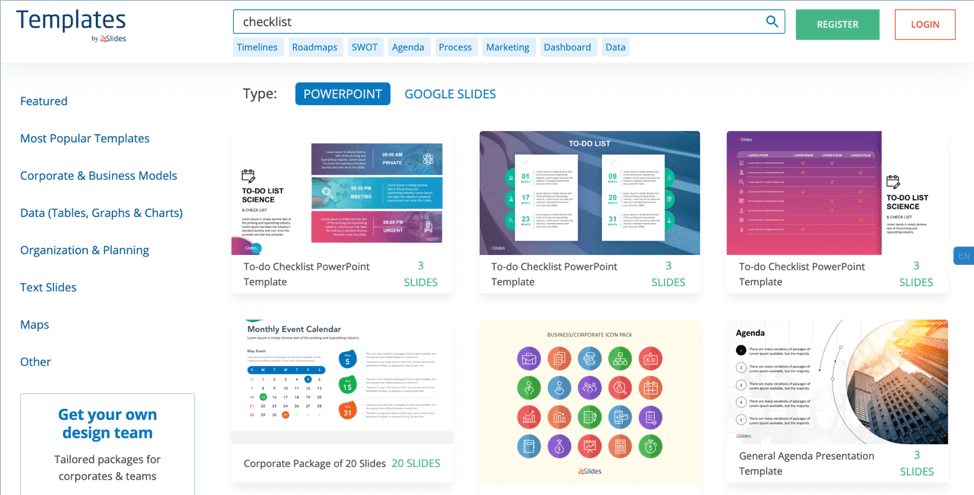
Alternatively, you can download any of our free checklist PowerPoint templates. All you have to do is just replace the placeholder text with your content and you’ll have an eye-catching checklist in no time at all!
Here’s a screenshot of some of our checklist templates:
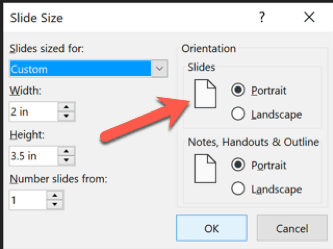
- Design business cards
For business cards, you’d need to set the slide size to 3.5 inches x 2 inches. The usual business card uses a horizontal layout. But if you want your card to stand out and be memorable, then consider using a vertical layout.
To do this, you’d need to use portrait orientation for your card. Go to Design > Slide Size > Custom Slide Size, then click on Orientation. The default option is Landscape, so you’ll need to click on Portrait, like so:
- Make creative visual resumes
Here’s another fun thing you can create in PowerPoint. If the job you’re applying for is fine with a bit of creativity, then submitting a visual resume is the way to go. However, if you’re interested in landing a spot at a more ‘serious’ firm, then Word may be your best bet. Else, you risk being flagged as a non-serious applicant and have your application rejected.
Creating visual resumes obviously will take a lot more time than if you just typed up the same thing in Word. However, if you’re applying for a job that requires – or at least appreciates – creativity, then you should take the time to create a visual resume. PowerPoint can easily help you with this.
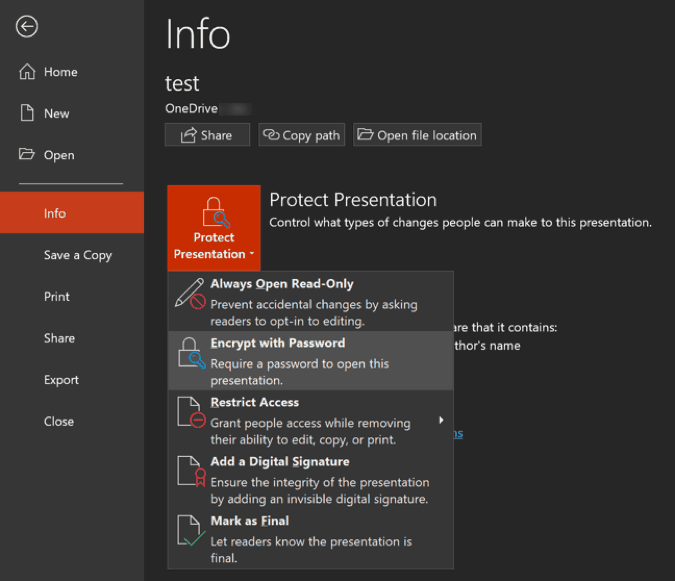
- Use it as a journal
PowerPoint may not be at the top of your list as a journaling tool. But it does have a nifty feature called presentation protection which allows you to encrypt your file with a password. This means you’ve got the liberty to write whatever you want on your PowerPoint slides and be safe in the knowledge that it’s going to be for your eyes only!
At this point, you’re already well aware that PowerPoint is an excellent graphics creation tool. So, in addition to writing down your ideas, thoughts, and feelings, you can also add a variety of elements to make your journal come alive.
To lock your journal, a.k.a. your PowerPoint, go to File > Info > Protect Presentation > Encrypt with Password. Here’s a screenshot:
- Remove photo backgrounds
Removing an image’s background can come in handy in many situations. For example, if you’ve got a photo of a young boy in a park and you want to ‘move’ the boy elsewhere, you can remove the original background first and then insert a new background.
While PowerPoint is no Photoshop, it’s no slouch either when it comes to removing photo backgrounds. Here’s how:
First, you’ll need to click on the photo you want to edit. Then click on Picture Tools > Remove Background. Check out this tutorial for more info:
Just take note that PowerPoint can’t remove backgrounds from vector graphic files such as Adobe Illustrator Graphics (.ai) or Scalable Vector Graphics (.svg). But it works great for editing the more common PNG and JPG files.
- Make logos
A logo is part of a company or brand’s identity. If you’re looking to create a new logo for your business, then you’re in luck. You don’t need to spend any money to have it done for you. You can do it yourself in PowerPoint!
Now, logos don’t need to be complicated. A simple one will often be enough. Your logo creation options in PowerPoint may be a bit limited. But with a bit of creativity, you can create beautiful logos.
You can use a combination of Word Art, shapes, icons, even SmartArt. Then group all the elements together and save it as a picture (choose PNG format from the file type list). And that’s it! You’ve got your brand-new logo.
Now, if you want to add some transparency to your logo (which would be ideal in most cases), then you need to add a shape to the logo and adjust its transparency level accordingly.
If you don’t want to add a shape to your logo, don’t worry. The shape will only serve as a transparent medium, it doesn’t need to be visible in your logo. You can then set the transparency level for the shape before you save your logo. PowerPoint will preserve the shape’s transparency when you save it as a PNG file.
You can follow this short tutorial to give you an idea on how logo transparency works in PowerPoint:
- Make photo collages
Making photo collages on PowerPoint is fun and easy. First off, you’d need to insert your photos onto the slide. You can do this by dragging the pics manually or by going to the Insert > Photos tab. I recommend the following methods to get your collage quickly:
- Use Design Ideas tab
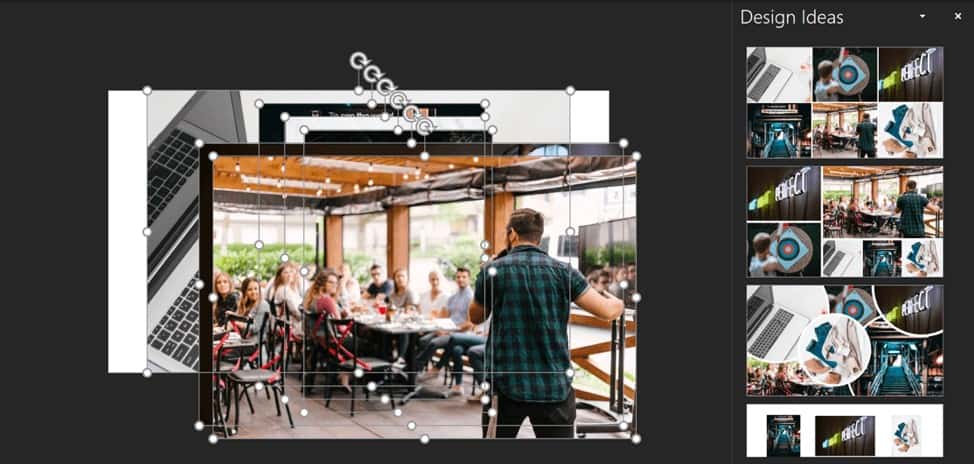
This tab should open up automatically once you add the photos. However, if this doesn’t appear you can just click on Design > Design Ideas. You’ll then see a bunch of recommended layouts for your collage. Click on the layout that catches your fancy and you’re good to go!
- Convert to SmartArt
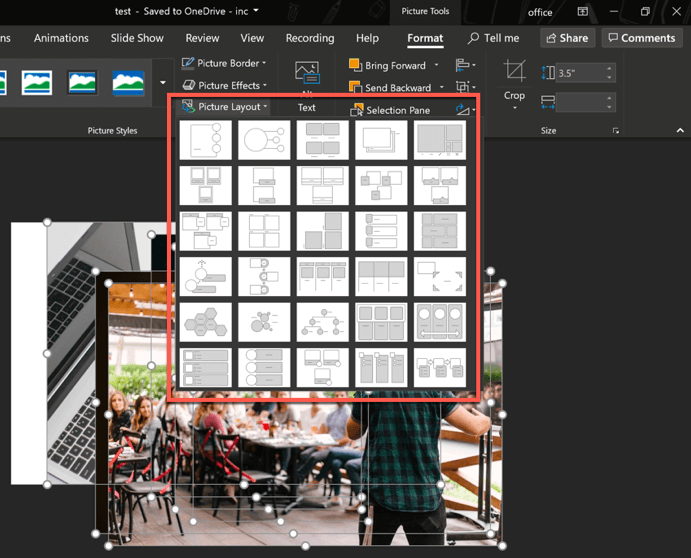
To convert your images to SmartArt, you can press CTRL+A (Windows) or CMD+A (on Mac) to select all images. Then click on Picture Tools > Picture Layout. Select the layout you want to use. The downside to using this method is you’ll likely see text boxes, so if you don’t need those, you’ll need to manually delete them.
Note that both these methods crop the images automatically. If you want to adjust an image’s position in the collage, you can click on that image. Then go to Picture Tools > Crop. You can then drag the image around until you’re happy with the cropped result.
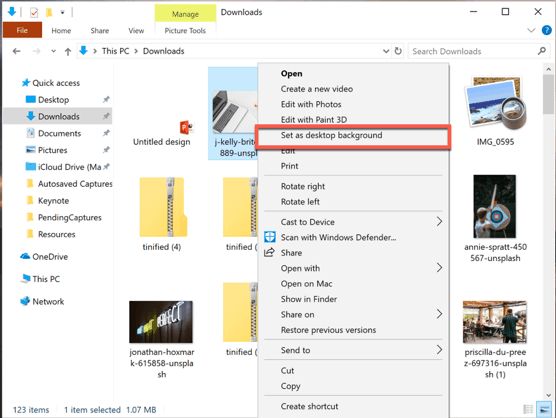
- Create desktop wallpaper
You’re probably wondering why you’d bother using PowerPoint to create a desktop wallpaper for your computer. After all, you can just go to Unsplash.com and download an unlimited number of beautiful images. Well, if you don’t want to do what everyone else is doing, then PowerPoint can help you create 100% unique wallpapers!
You can still download images from Unsplash. But with PowerPoint, you can add graphics, text, and other elements to make the wallpaper truly yours. Just remember to save the PowerPoint slide file as PNG or JPG, so you can see the option to set the image as desktop background. Here’s a screenshot:
- Create calendar
Manually creating a calendar in PowerPoint is doable, but it’s going to take some time. For instance, you’ll need to add a table (6 rows x 7 columns for basic calendars), then add the labels in. You’ll also need to think about the design if you don’t want your calendar to look like the most basic calendar ever created.
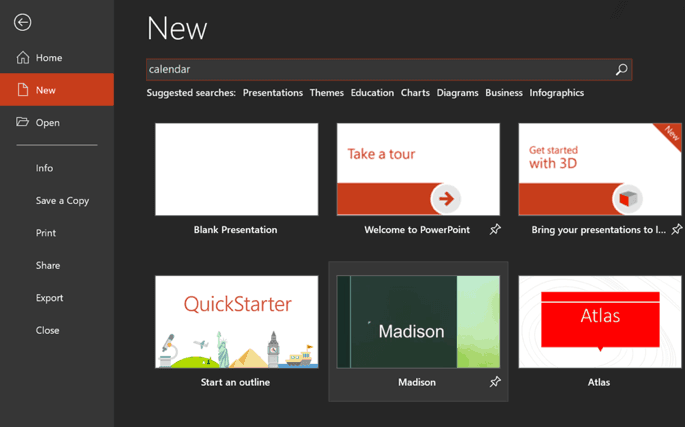
Fortunately, there’s a much easier way to go about adding a calendar to your slides. And that is by downloading a ready-made PowerPoint template.
You can open up a new PowerPoint file and search for free calendar templates, like you see below. However, as you probably already know, the templates you’ll find on Microsoft aren’t exactly lookers.
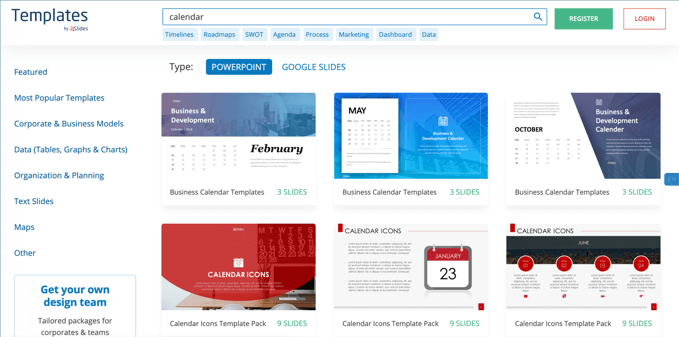
If you want high-quality and eye-catching calendar templates, I highly recommend you visit our Template Hub. You can download our free calendar templates. Here’s an example of what you can expect to see:
- Make brochures and flyers
Many professional designers use apps like Adobe Illustrator, Adobe InDesign, and Microsoft Publisher to create brochures and flyers. If you’re willing to learn how those apps work, you can create great-looking brochures and flyers. However, if you just want to create something basic, then PowerPoint can help.
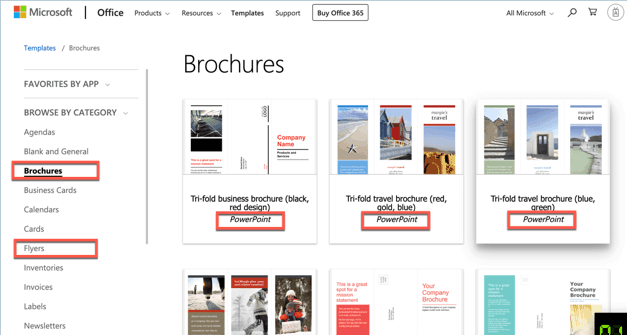
Go to templates.office.com and download a free brochure or flyer. Make sure the file you download is compatible with PowerPoint. Check out the screenshot below:
I downloaded a tri-fold brochure template. Here’s what it looks like:

You can edit all the elements on the slides, so you can truly make it your own brochure or flyer!
- Use PowerPoint in webinars
Webinars are great for maximizing your reach. You can have a live webinar or you can pre-record it. What’s really great about webinars is that people can watch your content 24/7 without you physically needing to be there. The whole world can literally be your audience!
You can upload your webinar to YouTube and Facebook. If you want a more controlled environment, you can use webinar platforms like WebinarJam, GoToWebinar, and more.
If you want more information about this subject, read this article: How To Use PowerPoint For Your Webinar
- Make wedding invitation
Wedding invitations can be fun to make especially if it’s your own! You can go on Pinterest to look for design inspiration, like you see below:
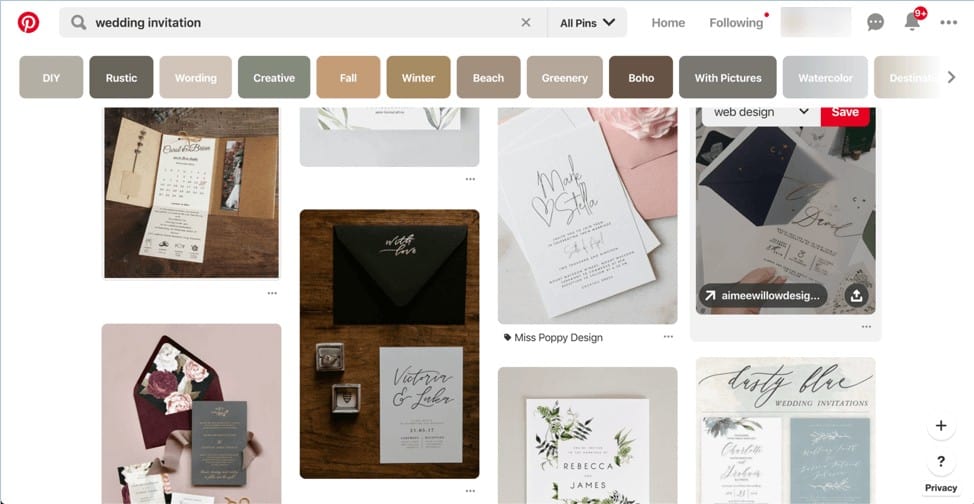
You can choose from a wide variety of designs. You’re also not limited to using a single size or shape; the most common size seems to be 5×7 inches though. Your invitation can be as simple or as extravagant as you like.
Before you create in PowerPoint, just remember that if you’re mailing your invitations to some guests, you may need to consider using a more traditional wedding invitation size.
- Create ad graphics for Facebook
Did you know that over 2 billion people go on Facebook every month? If you want to take advantage of this massive platform, then you should definitely consider advertising on Facebook. It’s relatively more cost-effective than other advertising platforms.
That being said, you want to use ad graphics that will effectively stop people from scrolling down their feeds. As a PowerPoint user, you’ve got a powerful tool at your fingertips. Before you design your ads, however, make sure you check out Facebook’s ad format guidelines.
- Take a screenshot
There are plenty of apps that take screenshots. However, what’s really good about using PowerPoint is that in addition to getting the whole screen, you can also take screen clippings.
In the past, you could only take screenshots of open Microsoft Office files. But now, you can take screenshots of all open applications in your computer! For Office 365 subscribers, there’s a new Recording tab that allows you to take screenshots and screen recordings quickly. Here it is:
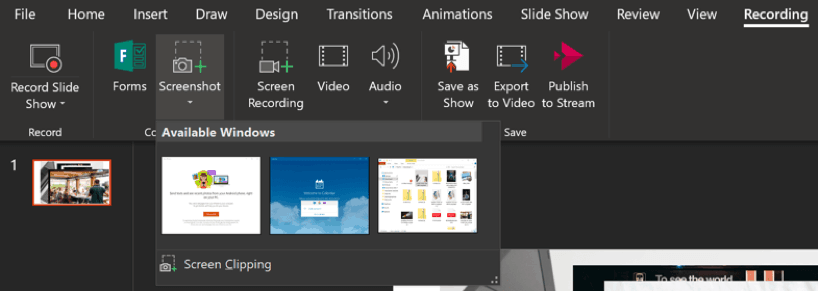
As you can see, I’ve got 3 windows open on my computer. Clicking on any of those thumbnails will add a full screenshot to my current slide.
Now, if you click on Screen Clipping, you will be taken to the app you opened prior to clicking on PowerPoint. An ‘overlay’ will appear on the screen and your mouse cursor will turn into a crosshair pointer. Just drag your mouse until it covers the area you want to screenshot. Your screen clipping will then automatically appear on your current slide.
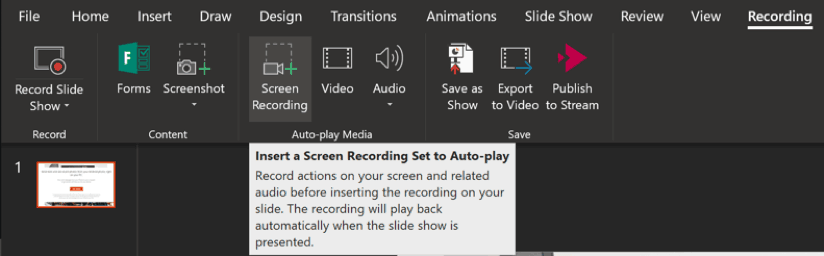
- Do a screen recording
As mentioned in the previous point, you can do a screen recording just by going to the Recording tab in PowerPoint. You can select the area you want to record (great if you don’t want to share everything on your screen). You can also choose whether you want to capture your audio (from your default microphone) or if you wish to record your mouse pointer movement.
- Create a gif
Gifs are especially popular in social media. Go on sites like Reddit and Facebook, and you’ll probably see a gif every 5 seconds. It may be a bit of an exaggeration, but the point is that gifs (especially the animated kind) are extremely popular.
Now, PowerPoint can only make still gifs (non-animated). If you want to make animated gifs, there are a couple of different methods you can check out:
(1) You can add animations to your slide elements, save it as video, and then use an online converter to convert from video to GIF. Check out this video tutorial if you want to use this particular method:
(2) Alternatively, you can save your slides (with animated elements) as images and then go to a site like GIFmaker.me to create your free GIF. This post does a pretty good job explaining the steps of this specific method.
- Make a mind map
Mind maps are great for brainstorming and coming up with new, creative ideas. It helps you visualize your ideas and enables you to think outside the box. There are free mind mapping tools like MindMup which is easy enough to use. But if you want to try out how this works in PowerPoint, then let me tell you it’s actually quite easy.
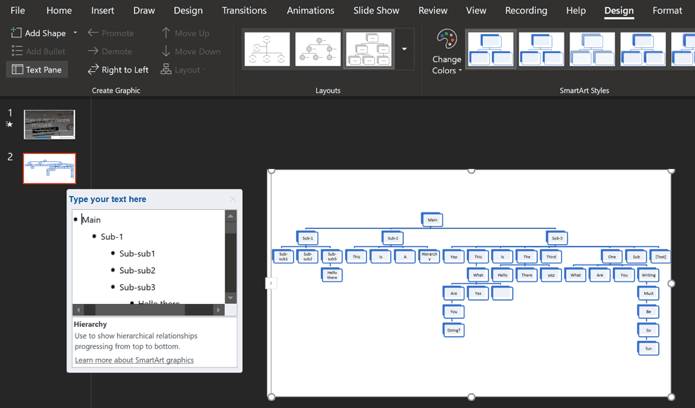
All you have to do is fire up PowerPoint and use SmartArt! SmartArt is extremely flexible and will accommodate all your ideas in a single slide. It will automatically adjust the font size and the graphic size itself.
For mind maps, you can choose from any of SmartArt categories, but I think the best ones to use are in the List, Process, Cycle and Hierarchy categories. Check out this mind map I made using the Hierarchy SmartArt:
Play around with the different options until you find the right SmartArt graphic for your mind map!
- Make your own icons
You can download free icons on the web. But if you want to use something unique in your presentation, then you can actually make your own icons in PowerPoint. Amazed? You should be!
By creating your own icons, you take your brand a step further. You can use your custom icons on your website, your advertisements, your organization’s letterhead, and basically anywhere else you can think of!
This video should help you off to a good start in making your own PPT icons:
- Reshape photos into any shape you like
If you’re tired of using the same old rectangle or square shape for your images, then you may want to use PowerPoint to make your images more exciting. Here are a few tips to reshape your photos into fun, new shapes!
Method 1: Shape fill with pictures option
Go to Insert > Shapes if you want to use this method. The good news is you’re not limited to using only one shape per picture. If you want to make a truly unique shape, you can use the Merge Shapes option. You’d need to select the images you want to merge. Then you can choose from the following merge options: Union, Combine, Fragment, Intersect, and Subtract.
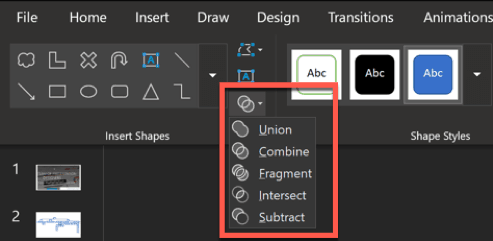
Play around with the different options and you’ll see that you can literally come up with an infinite number of unique shapes!
Method 2: Convert using SmartArt graphics
If you want a more uniform look for your images, then this is the method you should choose. I already gave a rundown on how you can convert photos to SmartArt in #10 (Make photo collages), so you should scroll up if you haven’t read that part yet!
There are plenty of things you can do with your photos on PowerPoint. I wrote a detailed guide on this very topic. If you want to know more about working with multiple images in PowerPoint, check out this article.
- Create photo album
If you want to create a photo album and turn it into a slideshow, then PowerPoint can easily help you out. It just takes a few clicks and you’ll have your album. Go to Insert > Photo Album and you’ll see this menu pop-up:

As you can see in the screenshot, you’ve got a lot of options to choose from. For picture layout, you can have up to 4 pictures per slide. You can select the frame shape as well as the photo album theme. Once you create in PowerPoint, you can then go a step further by going to the Design Ideas tab and switching up your photo album’s look!
- Use video as background
It’s quite easy to embed YouTube videos in PowerPoint and play it during your presentation. But not everyone knows that you can use video as your presentation’s background. Here’s how:
Go to Insert > Media > Video > Video On My PC. Once you’ve added your video, click on it to open up the Video Tools menu. Click on the Playback tab, and set your video to start Automatically. Then tick on the box that says ‘Loop until stopped.’
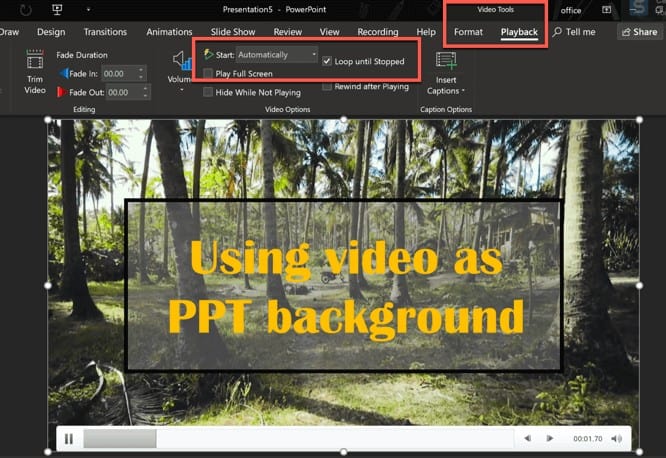
You can resize your video and make it fill the slide. Then you can add text, graphics, and various other elements in the foreground.
You can download free stock video footage on Coverr.co just like I’ve done in the screenshot above. The good thing is their video file sizes are quite small, so it’s not going to make your PowerPoint file too heavy and slow to load. The video file I downloaded and used in the sample above is only 10MB in size.
- Use 3D models for more engaging presentations
Sometimes, the usual 2D graphics just don’t cut it anymore. If you want to bring your presentation up a notch, try using 3D models. You can rotate your 3D graphic and show everyone a 360-degree view. You can even use Morph animation to make your 3D image come to life.
Fortunately, inserting a 3D model to your slide is just as easy as adding images, shapes, videos, icons, charts, etc. Just go to Insert > 3D Models and select whether to add from a file on your computer or from the Remix 3D community.
Check out this demo from Microsoft:
- Use free, high-quality templates
Yes, PowerPoint may have a bunch of free templates, but they’ve been around for ages. Their design hasn’t been updated in years, so if you use their default templates, your presentation will look like it’s a throwback to the 90’s!
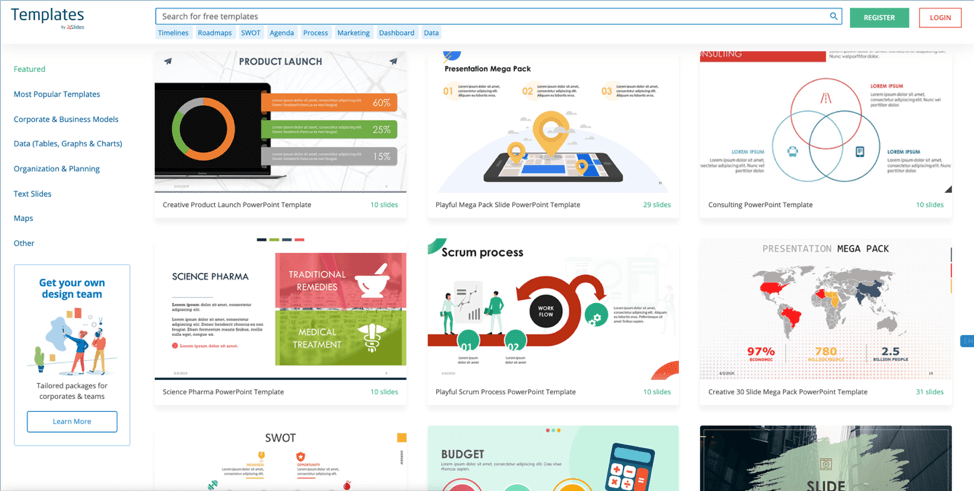
If you’ve been on our website before, then you probably already know we’ve got hundreds of high-quality and professionally-designed free PowerPoint templates. But if this is your first time here, you should definitely check out this link to our Template Hub.
Here’s a screenshot of what you can expect:
Just sign up for a free account and you can download to your heart’s content!
- Save your PowerPoint as PDF
Saving your PPT file as PDF has a lot of advantages. You can keep all your slide elements intact – the text, graphics, shapes, formatting, etc. It will preserve the visual appearance of your slides. The only downside is you can’t export the animations and slide transitions. That said, saving your file as PDF is great if you want to share your presentation file via email or upload it to the web.
- Create Prezi-like effects
PowerPoint uses a linear, slide-based approach to presentations. Prezi, on the other hand, makes use of a single canvas where you put all your ideas together. Since it’s not slide-based, it uses a pan and zoom animation to move from one part of the canvas to another. Now you can do the same with PowerPoint. If you have Office 365, you can use Zoom animation to create Prezi-like effects.
Watch this tutorial if you want to know how this works:
- Embed fonts in your presentation
So, you spent hours choosing the right combination of fonts to make your slides look perfect. But when you finally get to the presentation venue, you realize your beautiful fonts have all been replaced by the default Calibri font. What a disaster! To prevent this from happening, learn how to embed your fonts in your presentation.
- Password-protect your presentation
If you don’t want prying eyes on your presentation, then you better put a password on it. This is a must-have if you’re presenting highly valuable information. Read this article to find out how you can password-protect your file as well as disable the password when it’s no longer necessary.
Final Words
Wouldn’t you agree with me when I say PowerPoint is amazing? It’s really no surprise why it’s still the best presentation software today even with all the competition around. The 30 amazing things you can create in PowerPoint that I shared in this article are just the tip of the iceberg. I’m sure you’ll discover more fun things to do in PowerPoint!