Google Slides Review: Is It Better Than PowerPoint?

PowerPoint has been around for more than 3 decades. For many, it’s still the king of presentation apps. But don’t count out Google Slides yet. As a Google product, its popularity has been steadily increasing amongst Google users. If you’re tired of PowerPoint and want to try out something new, then this Google Slides review article should help you determine if Slides is right for you.
18 Reasons To Use Google Slides As Your Next Presentation Software
There are other great PowerPoint alternatives, but Google Slides surely ranks in the top 5. Check out these reasons why should definitely try out Slides for your next presentation:
- Google Slides is 100% free

Photo by Jules Marchioni on Unsplash
Someone may have told you before that ‘free is not always a good thing’ or that ‘you get what you pay for.’ In many cases, this may be true. Free software may pale in comparison to its premium counterparts. But if you’ve ever used a Google product before, then you may already have an idea that Slides isn’t like other free apps.
With Slides, you only need to use your Google account to use the software. And in this day and age, who doesn’t have a Google account? So, chances are, you already have one (or more)! If not, well, sign-up is quick and easy, and you can then use your Google ID to access all Google products.
That said, if you haven’t tried out Slides yet, you can type slides.google.com on your browser, and start using this free presentation app right away!
- Google Slides is web-based
There are plenty of benefits to using web-based apps. You can access said app anytime of day, anywhere on the planet. There’s no app to download, well, except of course, if the developers made an app especially for mobile users.
The same thing holds true for Google Slides. You can access it on any of these browsers: Chrome, Firefox, Microsoft Edge, Internet Explorer 11, and Safari (for Mac). According to Google, other browsers may work but functionality may be limited.
For mobile users, you will be re-directed to download their mobile app; this is to help maximize the Google Slides experience. So, go ahead and download the Google Slides mobile app on the Apple App Store or Google Play Store, and see how you like it!
- Lots of free Google Slides templates online
Yes, you heard it right! There are plenty of Google Slides themes online. You simply need to know where to look. The good news is we’ve recently published lots of free Google Slides templates on our very own 24Slides.com Template Hub! Here’s a screenshot:
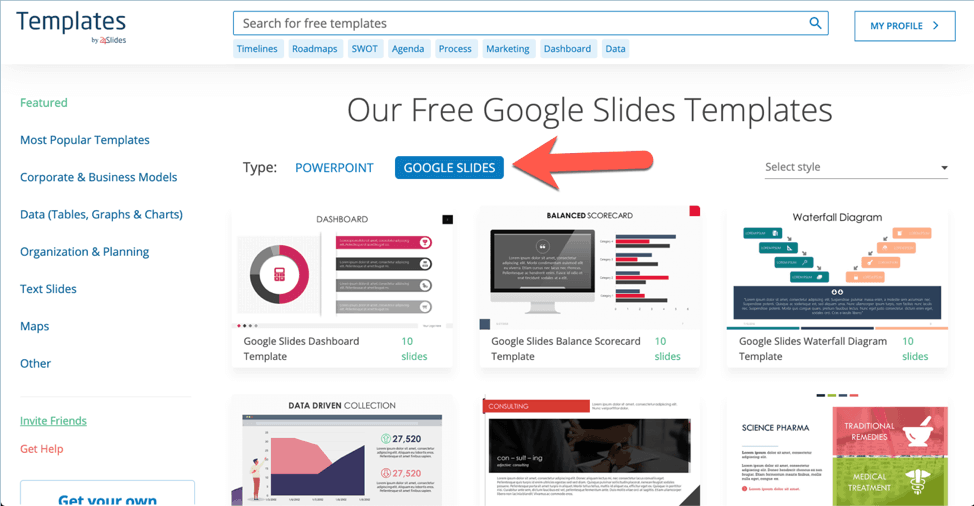
The default view is going to be PowerPoint, so make sure you click on Google Slides like you see in the screenshot above (see red arrow).
Scroll down the list of templates and click on one you’d like to use. If you don’t have an account yet, it’s time to create a free account. Don’t worry, there are absolutely no strings attached if you use our free Google Slides templates!
Once you’re logged in, you’ll see the green ‘Use Google Slides Theme’ button on your screen:

Clicking on the giant green button above will open up a new browser tab. The file is going to be ‘View only’ so if you want to make a copy, you’d need to sign in to your Google account.
Note that the first slide is on our free Google Slides templates will give you instructions on how you can use the file. Here’s how:
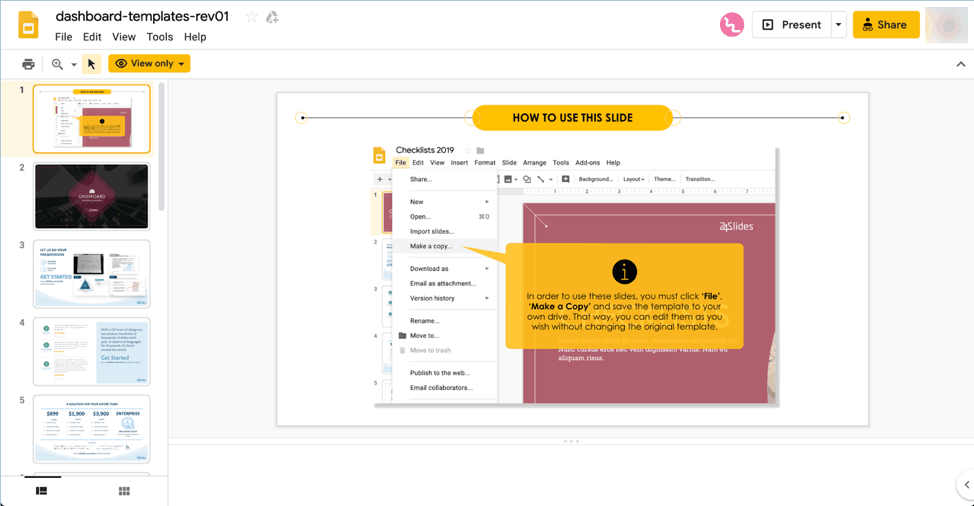
Once you’ve made a copy and saved the file to your Google Drive, you can then edit it as you see fit!
What’s really awesome about using these free Google Slides templates is that you don’t need to download anything. With just a click of a button, you’ll have your free template saved in your Google Drive account!
- Offline access works as advertised!
One of the biggest drawbacks to most web-based apps is the lack of offline access. Fortunately, this feature is now available on Google Slides. However, to enable offline access you’d need to be on the Chrome browser (Mac or PC). You can’t see the option to make the file available offline on non-Chrome browsers. For mobile users, you’d need to use the official Google Slides app.
Before you activate offline access, you need to be connected to the Internet and be logged in to Chrome. Don’t use private or incognito mode. You also need to download and activate the Google Docs Offline Chrome extension for offline access to work.
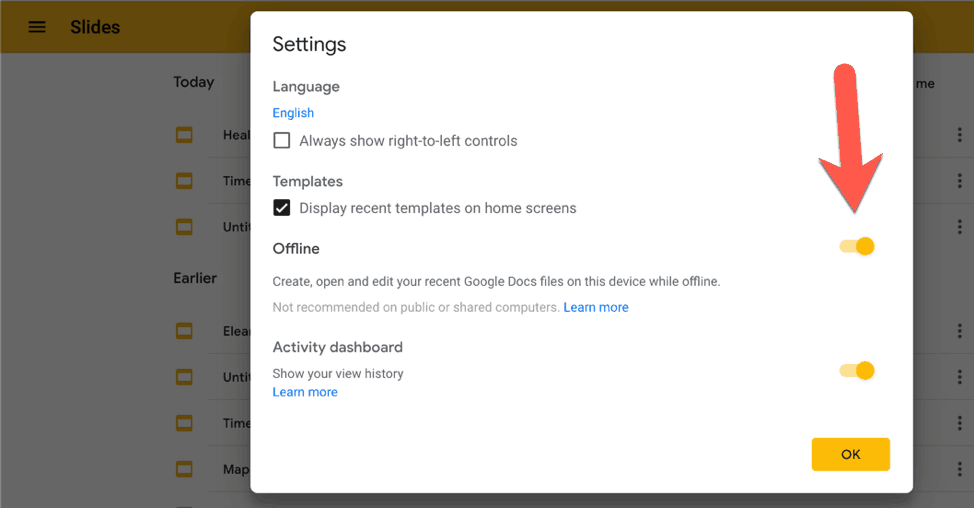
Next, you need to go to the Slides home screen and open the Menu options. Click on Settings and enable Offline access like you see below:
Google Slides will now make your most recent files available offline. Note that this feature will depend on how many presentation files you have and your device’s storage. So, if you want to make sure your earlier files will also be available offline, you can manually select these files. You can do this in Chrome or via mobile app.
Here’s what it looks like in Chrome:
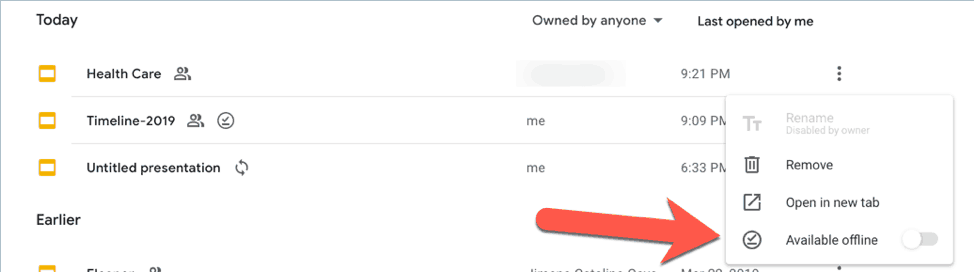
Alternatively, you can also open the individual file and enable offline access there. Just click on File then Make available offline. And that’s it!
- Google Slides works well with PowerPoint
This Google Slides review won’t be complete if I didn’t include this point. This is, after all, probably one of the most frequently asked questions about Google Slides. Does it work with PowerPoint? Fortunately, it does.
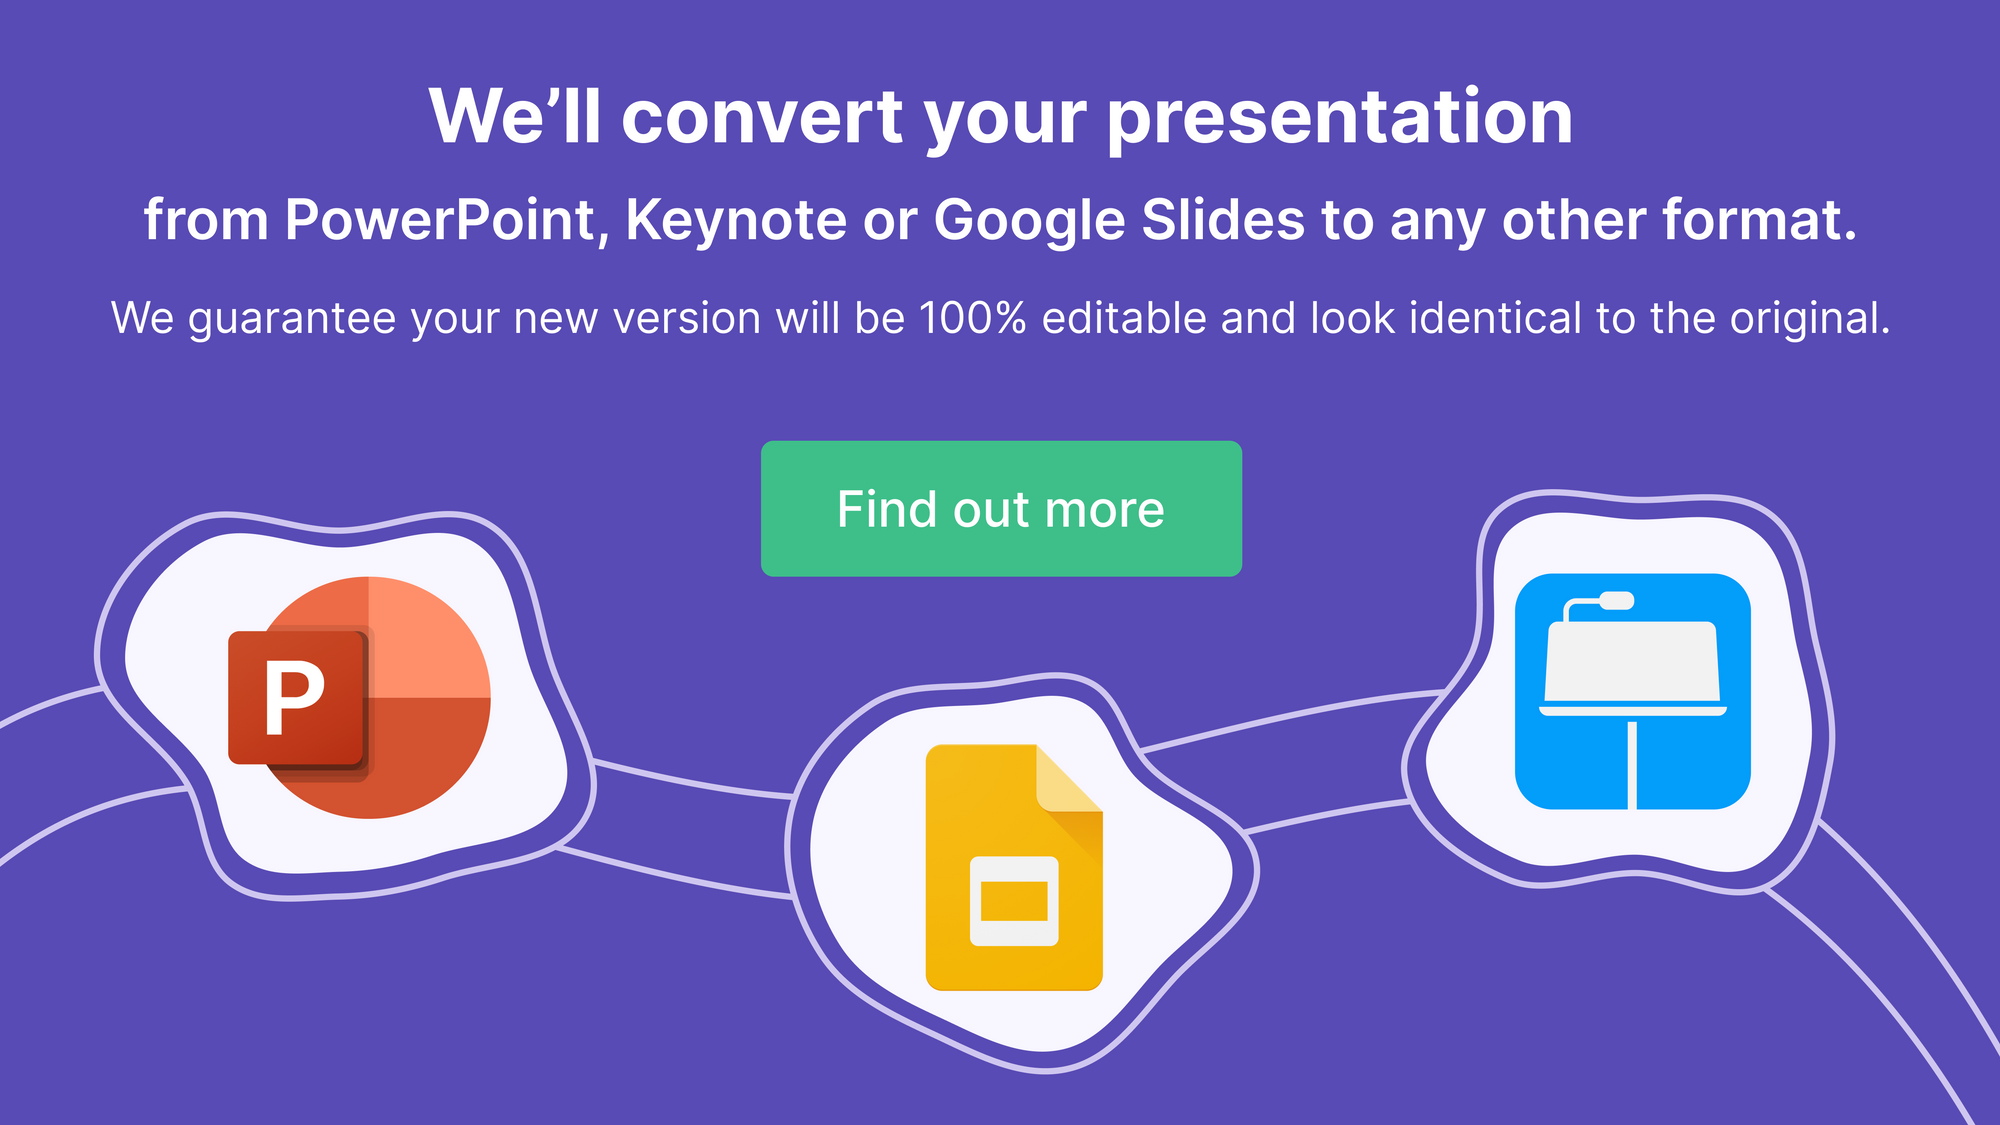
Google Slides presentations can be downloaded in PowerPoint format. And likewise, you can easily open PowerPoint files in Google Slides. Here’s a tutorial that will aid you in the conversion process: How To Convert Google Slides To PowerPoint and Vice Versa.
The caveat is that no matter the conversion direction (from Google Slides to PPT or the other way around), you’re not going to get a 100% perfect conversion. PowerPoint is a literal powerhouse; it’s got several features that are missing in Google Slides.
So, if you use a fancy transition effect in PowerPoint, then chances are, it’s probably not going to be available in Slides. That said, most of your content will convert just fine. So, if you need to make adjustments, they shouldn’t be too consuming (at least not as time consuming as creating the slides from scratch).
- Google Slides is built for collaboration
Google is making the world a much smaller place, one app at a time. And with Slides, they made it so that any user can collaborate with anyone in the world. Once you’ve shared the presentation file with somebody else, you can see the edits they make in real time!
It’s great for accountability too because you can’t lie and say you worked on something when you clearly didn’t. Slides will say who edited what and there’s a timestamp to indicate when the changes were made. It’s an awesome piece of software, really.
Another thing that goes in Slides’ favor is that for browser-based edits, everyone will be using the same version of the software since it’s automatically updated. Remember, there’s no app to download, so the moment you login to Slides, you’re on the latest version. So, the editing and commenting experience is pretty much consistent for all Slides’ users.
- No need to save your Slides… ever!
How many files have you lost due to not being able to give it a name and save it? If you’re clumsy like me, you’ve probably lost a lot. Now, PowerPoint has an auto-save feature too if you save your file on OneDrive. But Google Slides takes it a step further.
With OneDrive, you need to give the file a name first. So, if you’ve been typing away without saving the file once, and your computer unexpectedly shuts down, then you’ve probably lost all your work.
With Slides, however, you can complete your entire presentation without bothering to give it a filename. Google automatically saves unnamed files as ‘Untitled presentation.’ When you shut down your browser and reopen it sometime later, you’ll see the ‘Untitled presentation’ file in your Slides file list. Pretty cool, isn’t it? Now, you don’t need to worry about hitting CTRL+S or CMD+S to save your presentation file!
- It’s relatively simple
When you first open up Google Slides, you’d probably be struck by how similar it looks to PowerPoint. There’s a menu at the top, slide thumbnails on the left, and of course, the slide canvas that takes up majority of screen space. But, you’ll also notice right away that while it looks similar to PPT, it also looks a lot cleaner and simpler.
While there is also a bit of a learning curve involved with Slides, if you’re coming from PowerPoint, you can probably master Google Slides in 30 minutes or less. PowerPoint, of course, has a lot more options than Google Slides which can be quite overwhelming for new users.
If you’re not a fan of complex interfaces, then you’ll love Google Slides for this very reason. Sure, you may miss out on some PPT features, but for simple presentations, Google Slides will do just fine! As you continue reading this Google Slides review, you’ll realize just how uncluttered and simple the interface really is.
- You can use PowerPoint templates
As mentioned in point 4, Google Slides works well with PowerPoint. This means you can also take advantage of the thousands of free and premium PPT templates on the web! The PowerPoint community is so much larger than the Slides community. So, you have developers and designers coming up with cool, new template designs regularly.
This means you’ll never have to run out of templates for any occasion. Using PowerPoint templates in Google Slides is easy. Go to File > Import Slides and choose whether you want to open an existing PPT template or upload a new one from your computer. You can import one or two slides, or all slides for that matter.
For this example, I downloaded the Maps of the World PowerPoint Template and imported all slides to Google Slides. I also opted to keep the original theme of the template. Because if I didn’t, the imported slides will use the default Google Slides theme.
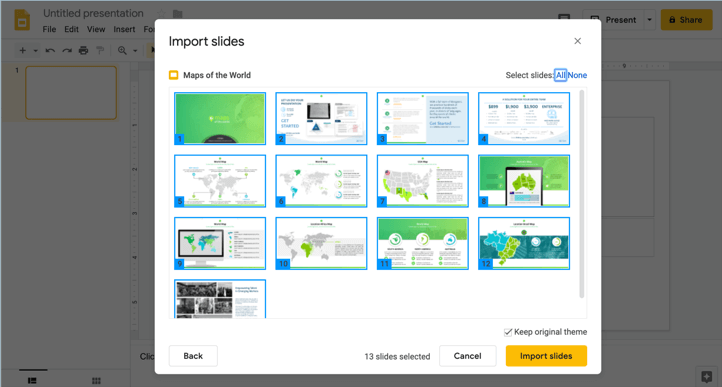
You may encounter some formatting errors on the imported file. For instance, this may happen if the original PPT file uses a font that’s not available or supported in Slides. Always double check the imported file to make sure everything’s to your satisfaction.
- You can save your Slides in .PPT format
Let’s say you created your presentation on Google Slides. But during the actual presentation, you realize the computer at the venue has no Internet access and only has PowerPoint installed.
Here’s what you need to do in advance so you don’t panic – download your Google Slides presentation in PowerPoint format. You can do this by going to File > Download as > Microsoft PowerPoint (.pptx).
Now, I’d like to point out that not everything is going to convert over perfectly. But at least, you can now open your Slides presentation in PowerPoint.
This is why I highly recommend going to the venue early to check out the equipment. Doing so will help ensure you don’t run into technical issues later on. To not look like a total noob in front of your audience, always have a handy PowerPoint version on a flash drive.
- Seamless integration with Google Fonts
The default font on Slides is Arial. Now don’t get me wrong, Arial is a good font. But not so much when it comes to presentations. It’s been used on countless presentations, so using it is not going to make your presentation standout or be memorable to your audience.
This is where Google Fonts come in. With over 900 font families to choose from, your presentation font needs are all covered. You can choose from serif, sans serif, handwriting, display and monospace fonts. If you’re using a language other than English, you’ll be pleased to know that Google Fonts supports languages like Arabic, Chinese, Japanese, Korean, Greek, Thai, and more!
To use a Google Font in your presentation, click on a text box and click on the font dropdown. The very first item on the list says “More fonts.” Click that and you’ll be taken directly to the Google Fonts directory. There’s no need to leave, you can add a new font directly on your slides! Here’s a screenshot:
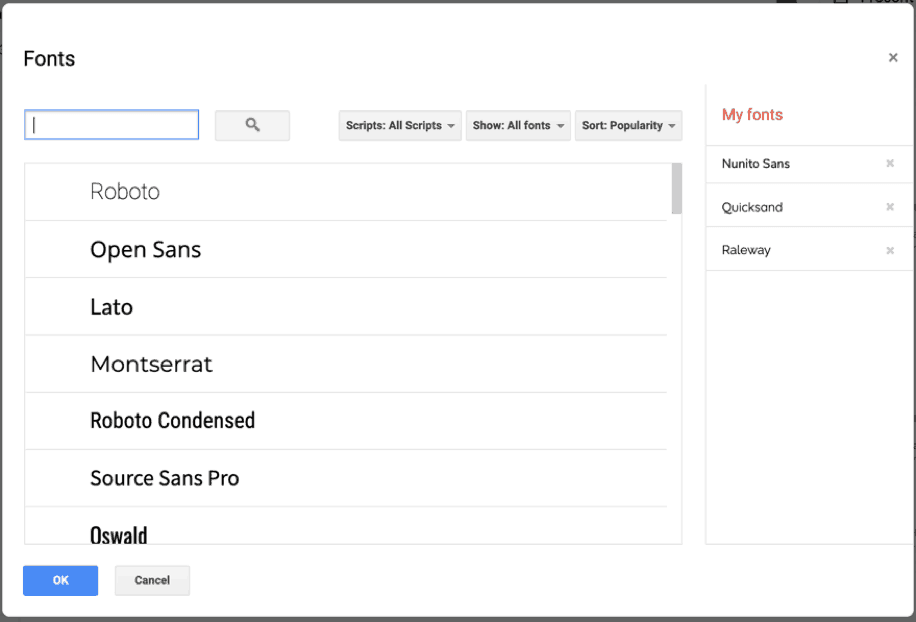
If you already know what font you want to use, just type it on the search box. Otherwise, you can filter fonts by font category and then sort it by popularity, alphabetically, date added or trending.
- Publish to the web in 1-click
Google Slides makes it so easy for you to share your presentations to the worldwide web. Unlike PowerPoint, you don’t need to jump through several hoops. With Slides, all you have to do is go to File > Publish to the web. You’ll then see the dialog box below:
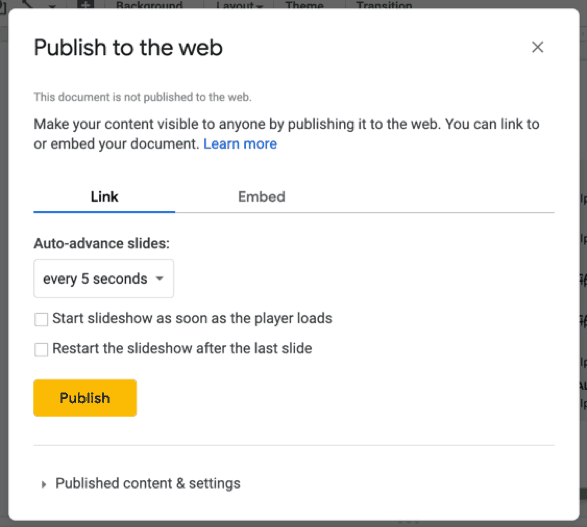
As you can see, you’ve got two publishing options. You can either publish it as a standalone presentation (you’ll get a link which you can send to friends) or you can embed the presentation in your website or blog.
Now, let’s look at each option closely:
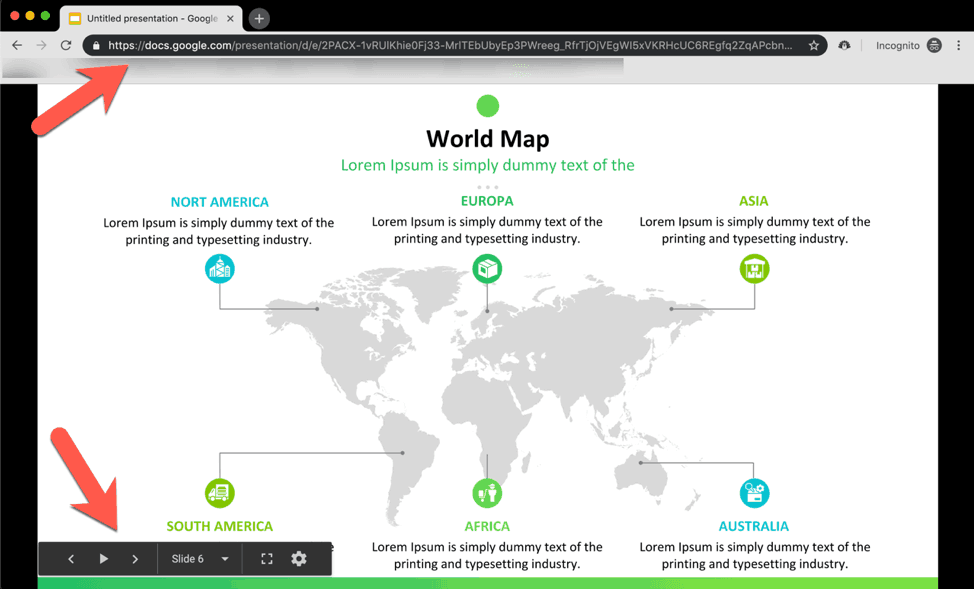
- Publish your Google Slides presentation as a link
When you choose this option, your audience will see your slides in presentation mode. This means they’ll get full-screen slides on their browsers. In the screenshot below, you can see the full (unsightly) link on the address bar at the top. You can use a link shortener to not scare your viewers away. At the bottom, you have the slide navigation menu. Your users can go back or forward, or go directly to a specific slide.
- Embed your Google Slides presentation on your website
Embedding presentations, on the other hand, are great if you have your own website or blog. You can choose the slide size and the auto-advance timing. But again, your audience can manually advance the slides themselves. Here is an example of an embedded Google Slides presentation (this is the Waterfall Diagram Template):
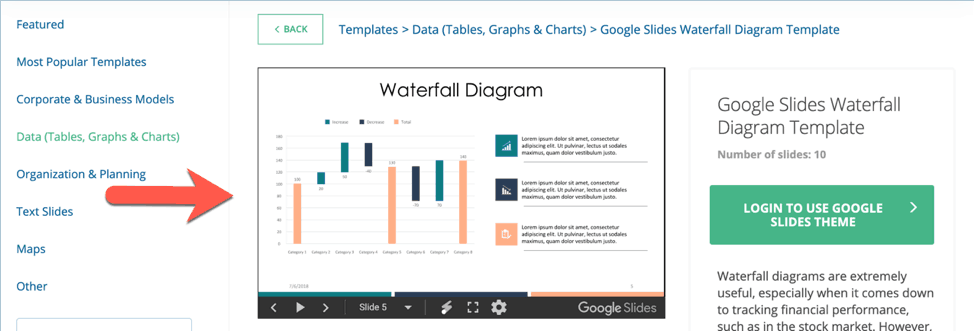
As you can see, the presentation file perfectly fits the layout of the site. This is because when you embed, you have complete control over where you want to put the presentation. In this case, our web designers chose to embed the presentation file on the very center of the page.
Automatic push updates to published presentations
What’s really great about either option is that all updates you make to the original presentation file will automatically update on your audience’s end. So, there’s no need to send them a new link or re-embed the Slides file.
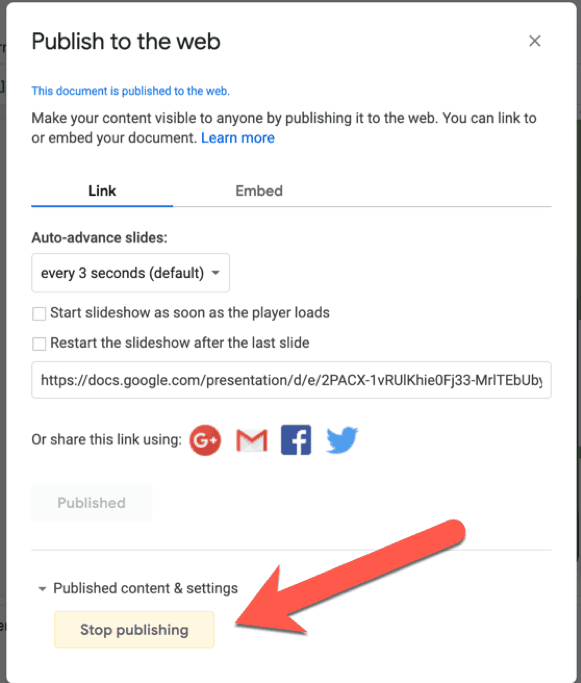
Unpublishing is just as quick and easy
If you no longer wish to share the file, you can unpublish it in one click. Just go to Published content and settings and click on Stop publishing. Here’s a screenshot:
- Extremely easy to share your presentation with others
This Google Slides review won’t be complete if I didn’t include this point. Google Slides’ sharing option is so much more robust than PowerPoint’s. In PowerPoint, you need to save the file first to OneDrive, OneDrive for Business, or SharePoint. Only then can you share the file with others.
For Google Slides, however, you just need to click on the yellow Share button on the upper right-hand corner, and you can start sharing right away. You can type in your contacts’ name or email address. Or get a shareable link and send it via email or whatever your preferred communication channel is. You can also specify what you want your viewers to do, such as view, edit, or comment.
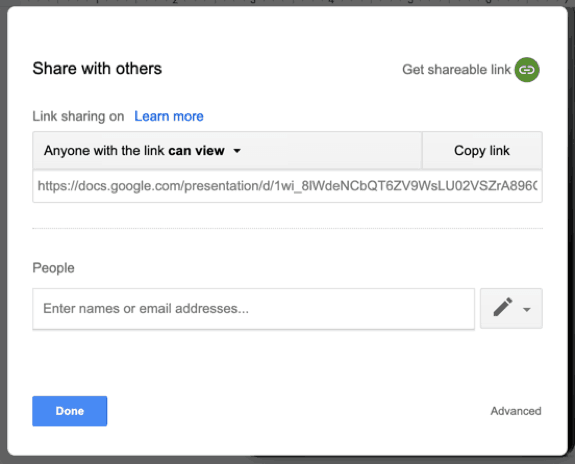
If you go to Advanced settings, there’s an Owner settings at the bottom. This option gives you the power to prevent editors from changing access and adding new people to the file. You can also disallow commenters and viewers from downloading, printing and copying your presentation file.
- Voice type speaker notes
Sometimes you just don’t want to bother typing your speech notes. It’s fine to feel lazy every once in a while. After all, designing slides is not a particularly easy job. Fortunately, there’s voice typing on Google Slides. Just dictate your speaker notes and Slides will automatically transcribe your speech into text.
Now, the thing about voice typing technology is that it isn’t there yet, that is, it’s far from perfect. Voice typing accuracy depends on your accent, your Internet connection, the speed with which you dictate, your volume, as well as your microphone. But the good thing is, it’s there if you need it.
To get started, go to Tools > Voice type speaker notes. A microphone dialog box will then appear on your screen. See the screenshot below:
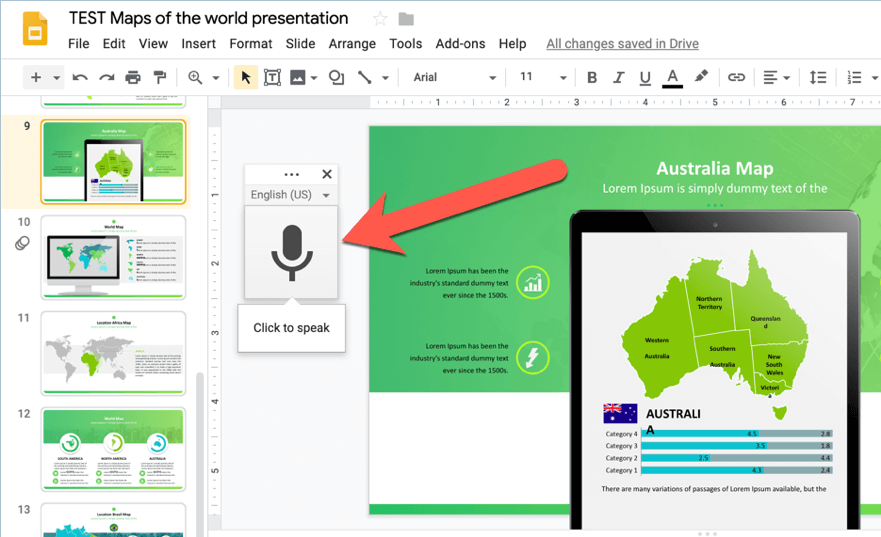
Click on the microphone icon when you’re ready to record. Note that you’re not limited to using English to voice type. You can, in fact, choose from over 100 languages and dialects! Just click on the dropdown above the microphone (which currently shows English (US)). Click the dropdown and select your preferred language.
Note that for this feature to work, you need to use Google Chrome. And if it’s your first time using this feature, make sure you grant Chrome the permission to use your microphone. Now you’re all set to start your first voice typing experience on Google Slides!
- Insert media quickly
Inserting media in Google Slides is quick and easy. With just a few clicks, you can insert pictures, videos and audio files from a variety of sources.
For photos, you can upload straight from your computer, from the web, from Google Photos, Google Drive, and even from a connected camera (like your computer’s webcam).
For audio files, you can select from your Google Drive. Or, if anyone shared an audio file with you, it will show up in the Shared with me tab.
For video, you can search for YouTube videos directly on Google Slides, or you can quickly paste a YouTube URL. Alternatively, you can also browse and insert video files stored in your Google Drive account.
- Automatic version history
Along with the auto-save feature, Google Slides also keeps a handy version history. This means you can roll back any changes you’ve made to your presentation. For example, if you’re unhappy with the changes you’ve made today, and you want to undo everything and go back to yesterday’s version, you can do so.
Go to File > Version history > See version history. The version history panel will show up on the right side of your screen. Check out this screenshot:
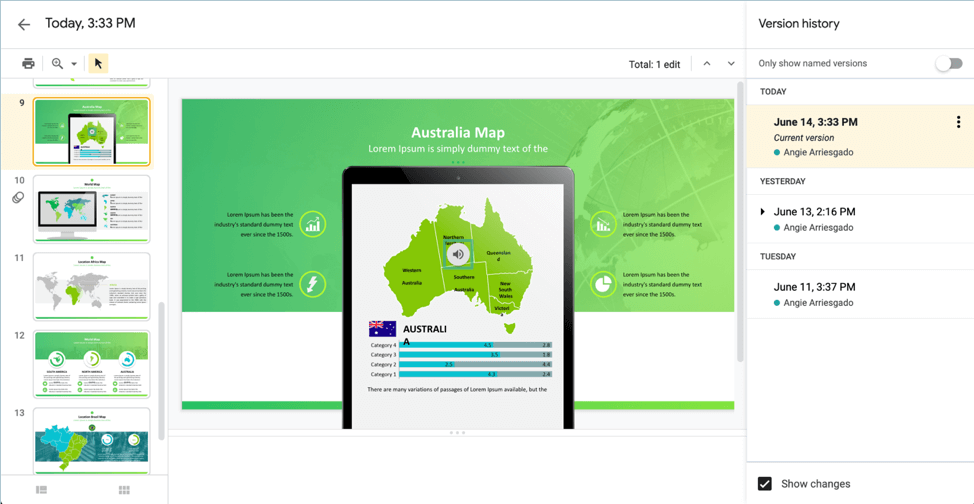
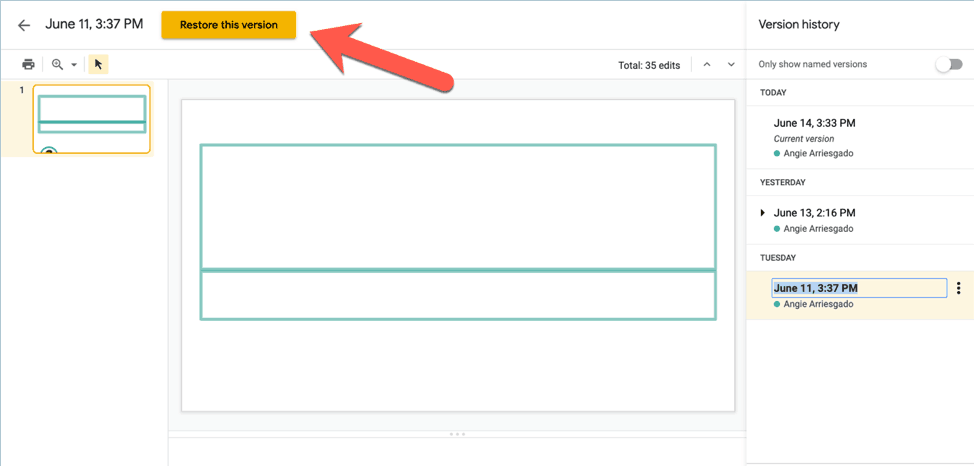
As you can see, I’ve been working on this particular file for 3 days. If I wanted to undo the changes I’ve made today and go back to the June 11th version, I can simply click on that particular version. Google Slides will then ask me if I want to restore that version. A yellow ‘Restore this version’ button will appear on the screen, like so:
To manage your versions easily, I highly recommend naming each version you make. For instance, every time you make a significant addition or change your slide’s design, you can name that version. This will make it easy for you to identify the right version if you need to go back to an earlier version.
Here’s how you do this:
Go to File > Version history > Name current version. Then type in the version name, like you see below:
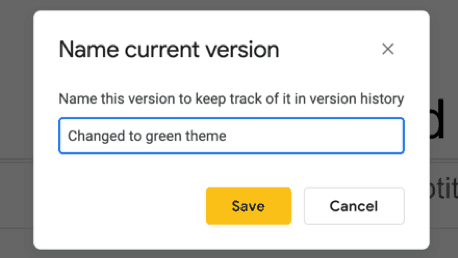
Here’s a pro tip: don’t just use a generic version number. Instead, try to come up with something specific to make the version easy for you to remember. According to Google, you can add up to 40 named versions per presentation.
- Present via Google Chromecast
Chromecast is a popular streaming device from Google. And with a few clicks here and there, you’ll have your Slides projected to a TV via Chromecast. You can stream from an iOS or Android device, or from a Windows or Mac computer.
First, you’ll need to connect your Chromecast to your TV’s HDMI port. Then connect Chromecast to your WiFi network.
If you’re connecting via computer, you’d need to use the Chrome browser. Click the Chrome settings menu and click on Cast.
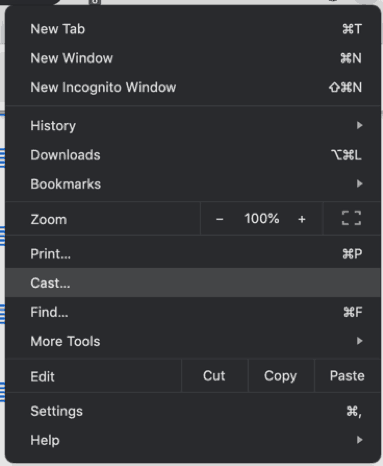
Chrome will then look for – and connect to – your Chromecast device. Your Google Slides presentation will then appear on your TV screen and you can present like you normally would.
If you’re presenting on a mobile device, you’d need to download the Google Slides app. Select the presentation you want to show. Then click on the Play button at the top of the screen.
The app will then ask you whether you want to present on this device or present to a new meeting. Since you want to cast your slides on TV, select present on this device. Look up and you’ll see your slides magically appear on your screen! Navigate the slides by swiping on your phone like usual.
- Present to anyone in the world via Google Hangouts
And last but not least in this Google Slides review article – this is absolutely one of my favorite features. If you work with a global team, then you’ll absolutely love sharing your Google Slides presentation via Hangouts. It’s extremely easy to do so as well, but you’d need either an Android or iOS device (iPhone or iPad). Unfortunately, you can’t present on Hangouts via desktop computer yet.
Open Google Slides on your device and click on the Play button. Then click on present to a new meeting to start a new Google Hangouts meeting. Invite your audience via email, SMS, chat, etc. You can alternate between your slides and yourself via your phone’s front-facing camera for a good, old face-to-face conversation. You can also toggle your microphone on and off. Plus, you can even draw and scribble on your slides if you want to highlight something.
You can also use Hangouts to share your PowerPoint presentation, but it’s nowhere near as ‘painless’ as Google Slides. This is because you’d need to jump through several hoops (or rather, clicks) before you can screenshare your PowerPoint with a bunch of people.

Final Thoughts on this Google Slides Review
I personally find Google Slides to be more than a capable presentation app. Sure, it’s not as robust as PowerPoint in terms of features, but for the job it’s meant to do, it’s great! At the end of the day, it’s not the number of features that makes a presentation app useful. Remember, both Google Slides and PowerPoint are mere presentation tools. It’s your message that will make your presentation special. So, work on your message and make sure it adds value and enriches your audience’s lives.
You might also find this interesting: 15 Popular PowerPoint Alternatives (Full Comparison Guide)