PowerPoint AI News: How to Edit Pictures with PowerPoint AI (The Definitive Guide)

TL;DR
Quick Answer:
Yes, you can now edit images directly inside PowerPoint for the web, Windows, and Mac. This new feature provides a dedicated workspace to edit images without leaving your slide canvas. Key features include Remove background to isolate subjects, Erase to remove unwanted elements, Move to relocate subjects, and Upscale to improve low-resolution graphics. To access it, select any image, open the Picture Format tab, and click the Edit Image button (first button on the left).
According to Microsoft, presentation creators can now enhance, refine, and perfect slide visuals directly inside PowerPoint for the web, Windows (Version 2510 or later), and Mac (Version 16.104 or later). This update removes the constant friction of switching between your presentation and external image-editing apps.
In this guide, we will show you exactly how to edit pictures with PowerPoint AI using Microsoft's new built-in workspace to maintain your design flow.
What Can PowerPoint's New Image Editor Do?
According to Microsoft, you can select an image and use the new PowerPoint edit picture tool to execute the following actions in real time:
- Remove background: Instantly clean up and remove distracting backgrounds before placing photos into layouts.
- Erase: Easily erase unwanted objects, background clutter, or visual artifacts.
- Move: Shift or relocate specific elements and subjects to different parts of the image.
- Upscale: Improve clarity and upscale the resolution of pixelated web images or scanned documents.
- Auto enhance: Automatically optimize contrast and lighting with a single click to make images slide-ready.
- Edit text & Add text: Add annotations with custom effects, or edit flat text that appears directly on an image.
- Effects: Apply stylish visual effects to customize your assets.
How to Edit Photos Directly in PowerPoint
According to Microsoft, accessing the new feature involves three simple steps:
- Select the Image: Click on any photo, screenshot, or online image on your active PowerPoint slide.
- Open the Editor: Click the Edit Image button on the far left of the Picture Format tab, or right-click the image and select Edit Image from the menu.
- Apply and Update: Modify the asset using the AI toolbar, preview the changes in real time, and click Update to save and fix images in PowerPoint instantly.
How to Save a Picture with Edits in PowerPoint
- According to Microsoft, all changes made inside the editor are non-destructive and can be previewed live.
- Once you are satisfied with your edits (such as erasing an object or upscaling resolution), clicking the Update button automatically replaces the original asset on your slide.
- This seamless integration completely eliminates the traditional need to figure out how to save a picture with edits in PowerPoint through external export/import loops.

Does PowerPoint Have an AI Tool? (The Tech Behind the "Edit Picture" Ribbon Option)
Yes, PowerPoint features a built-in, native AI image editor that operates independently of standard Microsoft Copilot. According to Microsoft, this tool provides advanced capabilities—such as Remove background, Erase, Move, and resolution Upscale—directly on your slide canvas. It is designed to let you clean up, refine, and perfect your visuals without the hassle of exporting your slides to external editing software.
The Power of Native Image Editing
For presentation professionals, the core benefit of the built-in powerpoint ai workspace is simple: workflow momentum.
- No App-Switching: You no longer need to export slides, open heavy external photo editors, edit, and re-import. According to Microsoft, everything occurs inside a unified workspace that updates your slide canvas in real time.
- Precision AI Engines: Rather than relying on clunky, manual cropping and legacy background removal, the does PowerPoint have an AI tool search intent is fully answered by advanced, cloud-backed neural engines that detect subjects and cleanly erase or move objects while automatically reconstructing background pixels.
How to Edit Photos Directly in PowerPoint: Navigating the New Workspace
According to Microsoft, switching back and forth between design platforms is officially a thing of the past. The newly introduced image editing workspace allows you to execute professional-grade modifications on your graphics without ever leaving your slides.
To optimize your presentation workflow, utilize the PowerPoint edit picture tool to access this native editor:
Step-by-Step Access to the AI Editor
According to Microsoft, opening the dedicated editor takes just three clicks:
- Insert Your Visual Asset: Place any image—whether it is a local photo file, a screenshot, or a stock graphic—onto your active slide canvas.
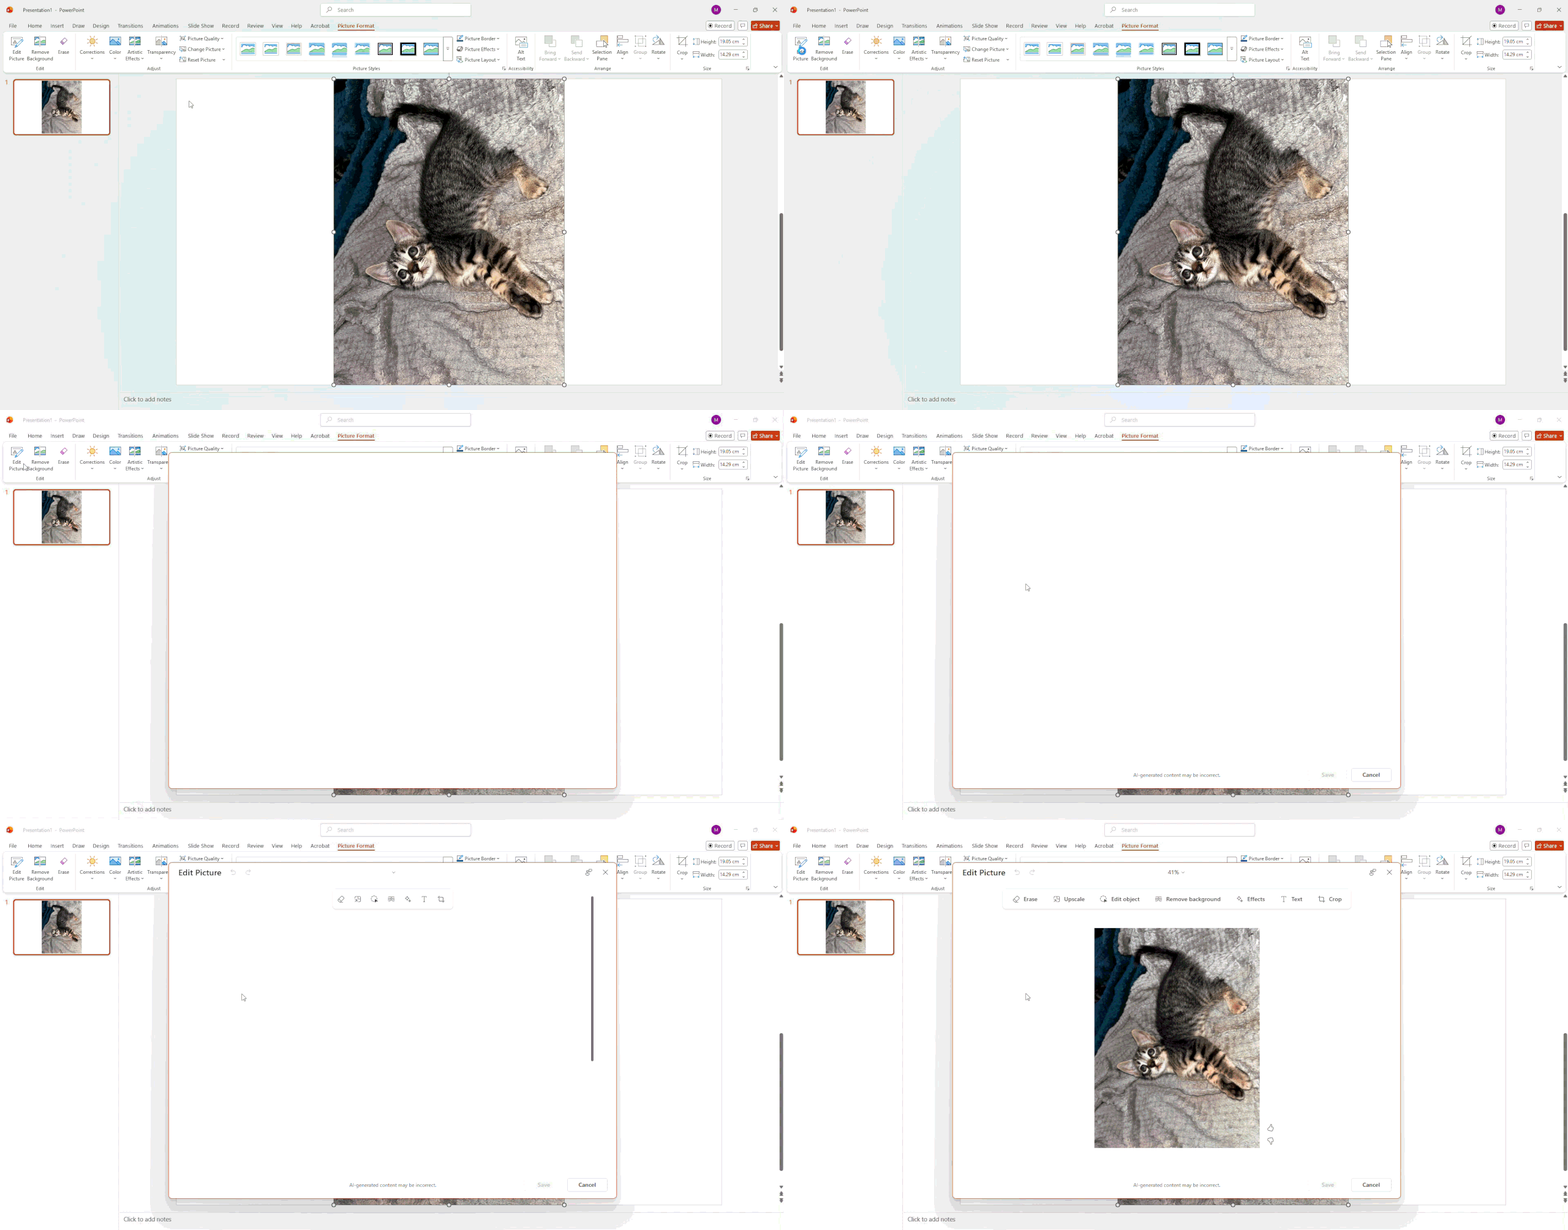
- Trigger the Ribbon: Click on the image to select it. This will automatically reveal the contextual Picture Format tab at the top of your PowerPoint interface.
- Launch the Workspace: Navigate to the far left of the ribbon and click the brand-new Edit Image (or Edit Picture) button. Alternatively, you can right-click the image and select Edit Image from the dropdown context menu.
The UI Transition: What Happens Next?
Once clicked, your standard PowerPoint slide view transitions into a focused, distraction-free photo editing workspace:
- Darkened Canvas: The presentation slides fade out, replaced by a dark backdrop that isolates your selected image for detailed visual focus.
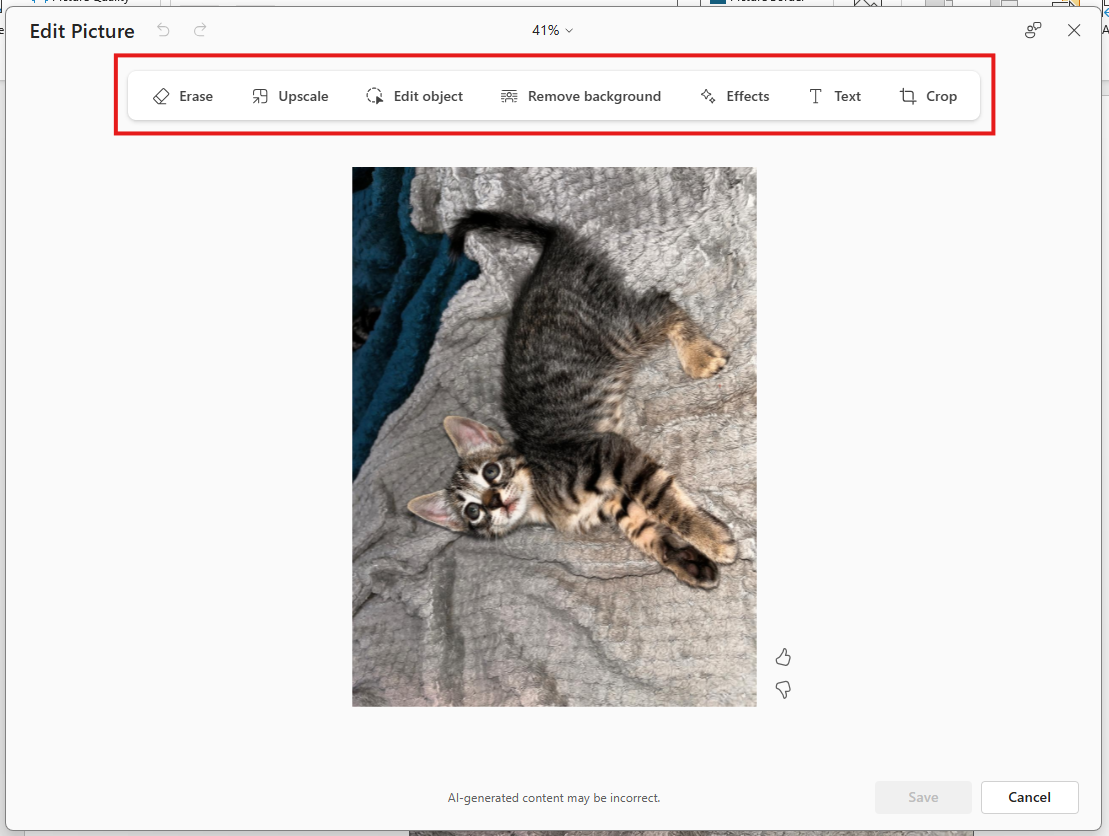
- Dedicated AI Toolbar: A specialized toolbar appears at the top of this window. This contains your core controls: Remove background, Erase, Move, Upscale, Auto enhance, Add text, and Effects.
- Non-Destructive Workspace: According to Microsoft, any edit you perform within this workspace renders in real time. If a generative fill isn't perfect, you can instantly discard or undo the changes before committing them to your slide design.
How to Erase Objects in PowerPoint and Re-Position Subjects
Stock photos and event photography rarely come framed perfectly for corporate presentation slides. Whether an image features distracting background clutter, an ill-timed photobomber, or a subject positioned right where your bullet points need to go, attempting to clean up raster assets used to require high-end photo editing software like Adobe Photoshop.
PowerPoint’s native AI image editing suite allows you to seamlessly modify image elements, erasing distractions and repositioning subjects directly within your presentation canvas.
Using the Erase Tool to Remove Unwanted Clutter
If you need to clean up a busy stock graphic or learn how to erase objects in PowerPoint (such as power lines, stray equipment, or background pedestrians), the Erase tool provides context-aware object removal in just a few clicks.
- Open the Edit Picture Workspace: Click your target image on the slide, navigate to the Picture Format tab on the top ribbon, and select Edit Picture on the far-left side.
- Select the Erase Tool: From the top AI toolbar, choose Erase.
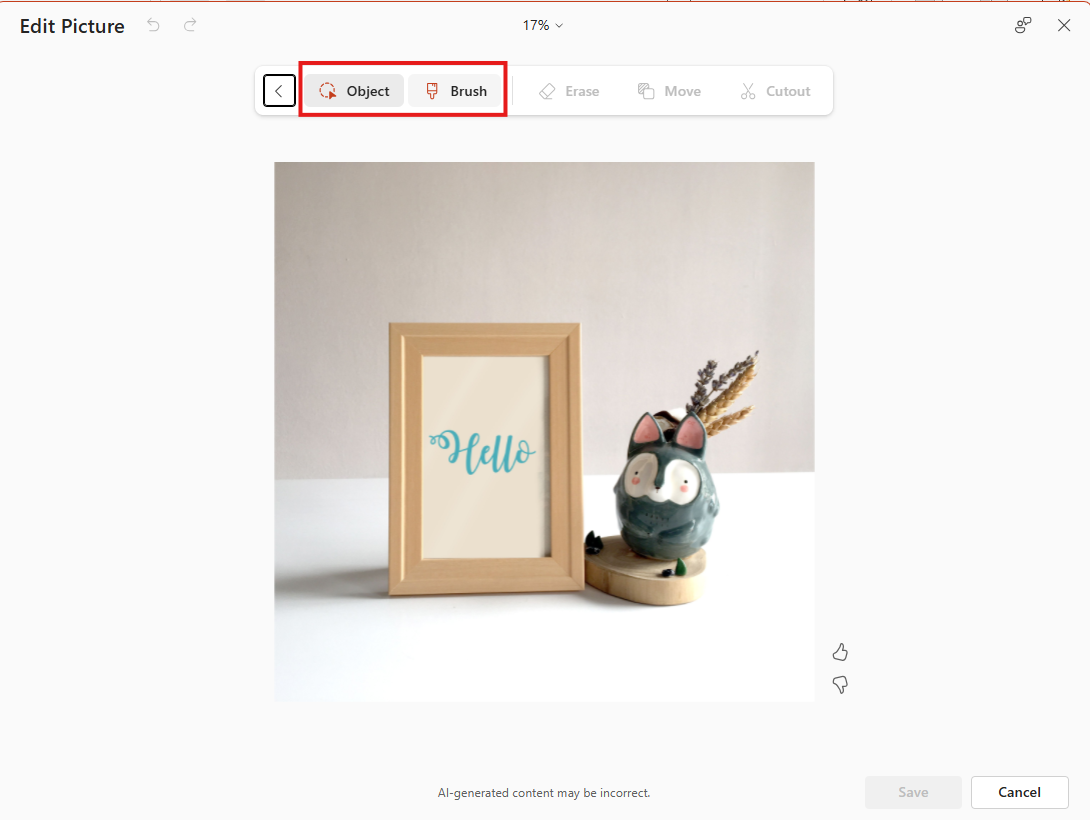
- Choose Your Selection Method:
- Select Mode: Draw a quick bounding box or tile around isolated background items for fast automatic targeting.
- Brush Mode: Paint freehand over irregular shapes, adjusting the brush size slider to ensure precise coverage over complex or layered details.
- Execute Generative Fill: Click Erase. Powered by underlying generative AI (utilizing DALL-E 3 architecture), the engine analyzes surrounding pixels and automatically reconstructs the empty area, regenerating matching textures like wood grain, stage lighting, or sky backgrounds as if the object was never there.
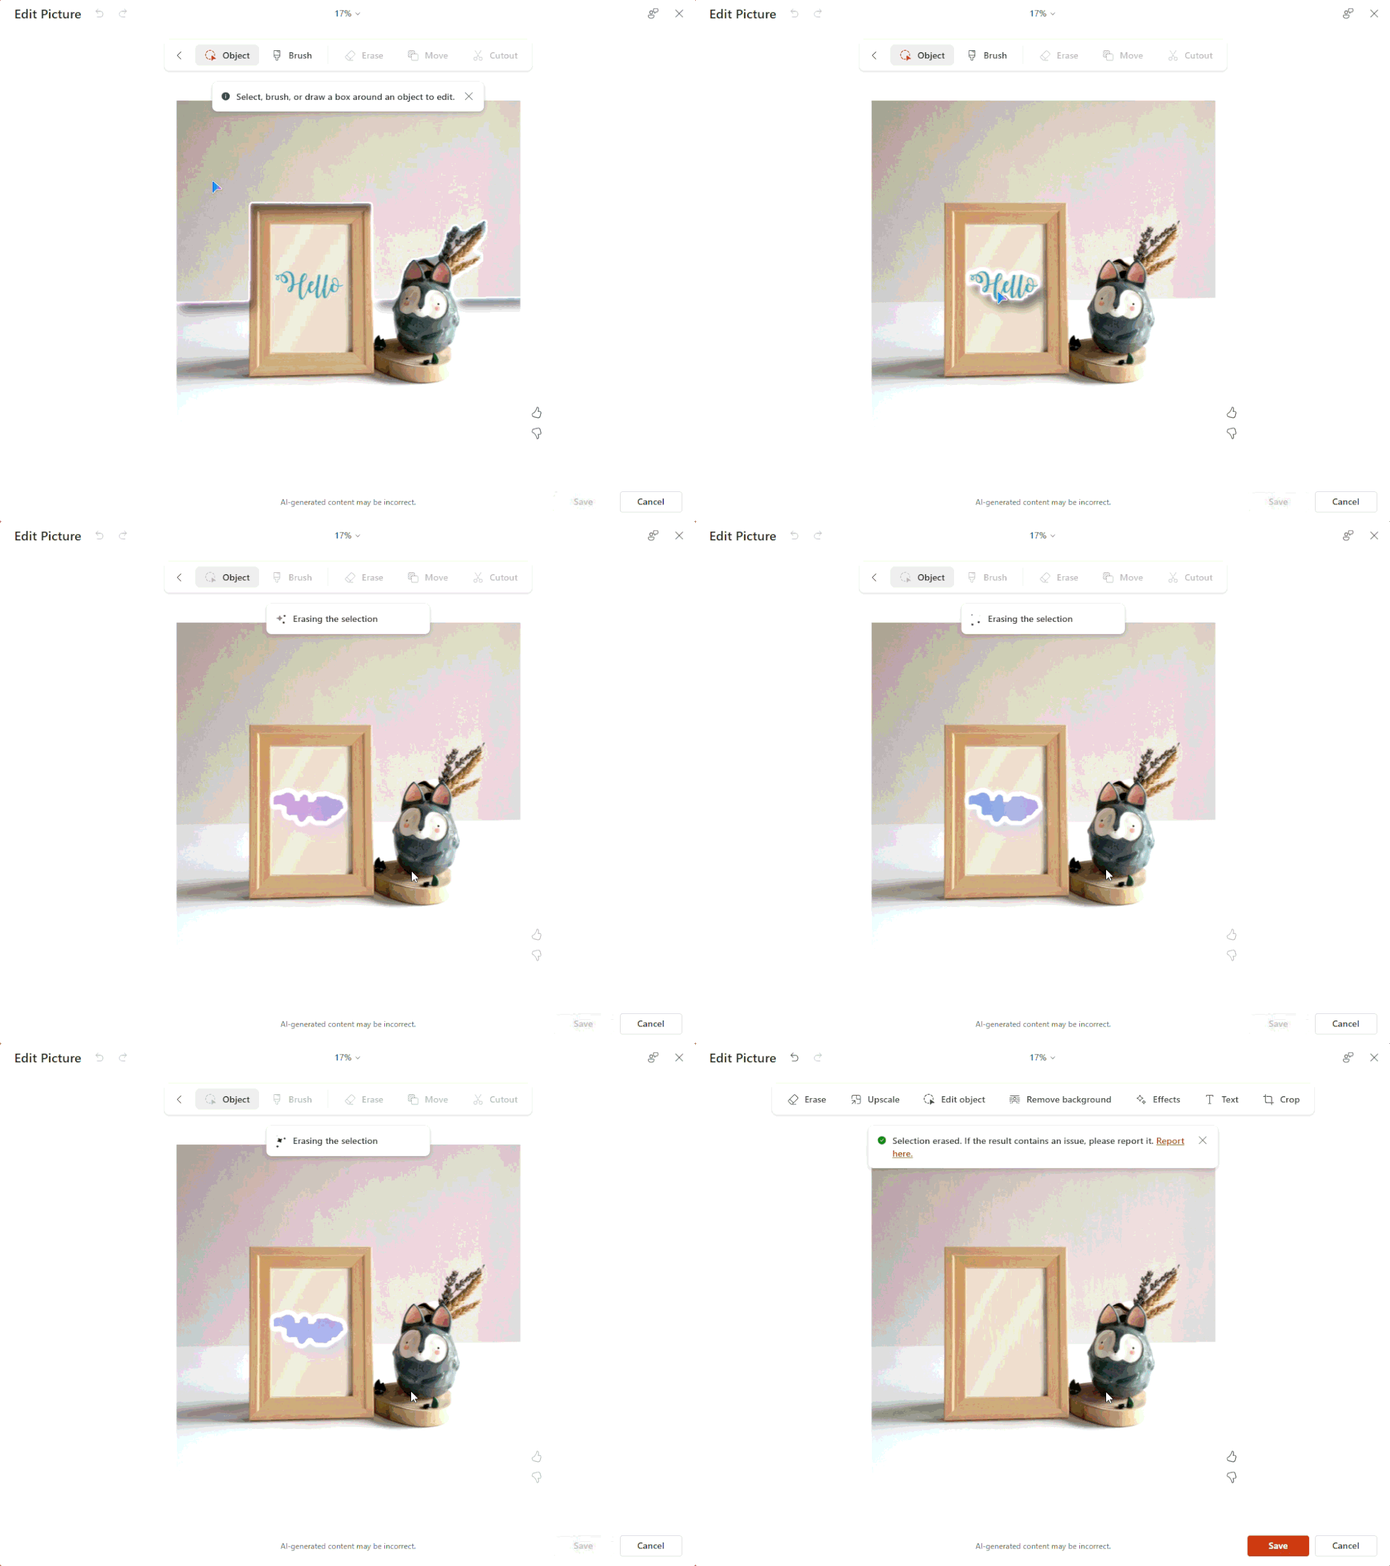
- Apply Changes: Review the result, then click Update to commit the cleaned graphic to your slide canvas.

Using the Move Tool to Re-Position Objects
When an otherwise perfect photo has its main subject dead-center or on the wrong side of the frame, the Move tool lets you re-architect photo composition without cropping out valuable background context.
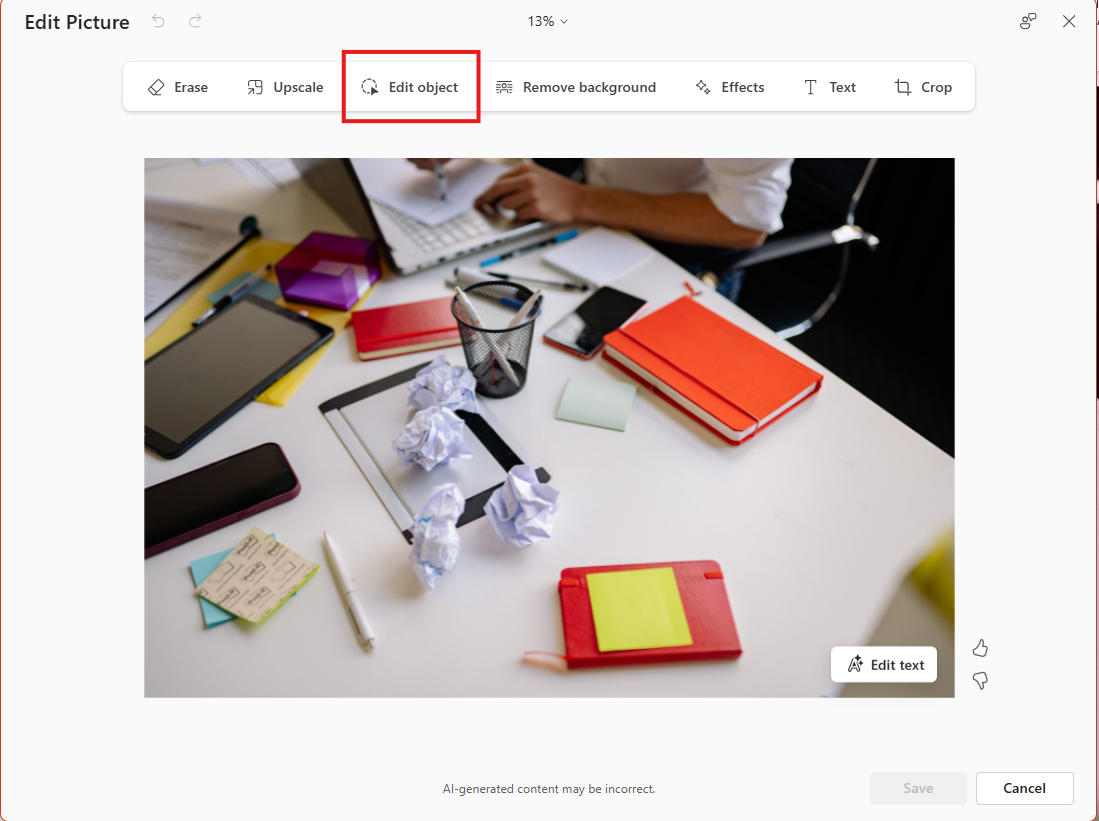
- Isolate the Subject: Within the Edit Picture workspace, select the Edit object tool from the toolbar.
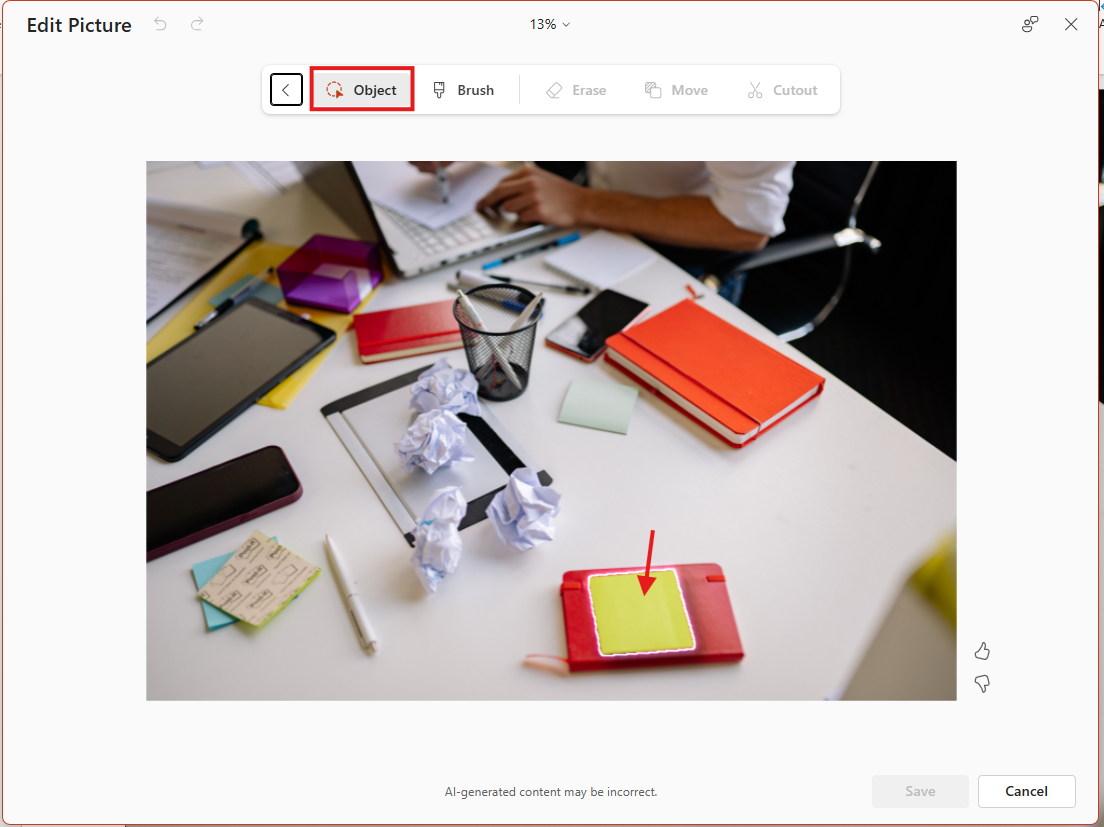
- Define the Subject Area: Select or draw a box or use the brush tool to highlight the subject or object you wish to relocate.
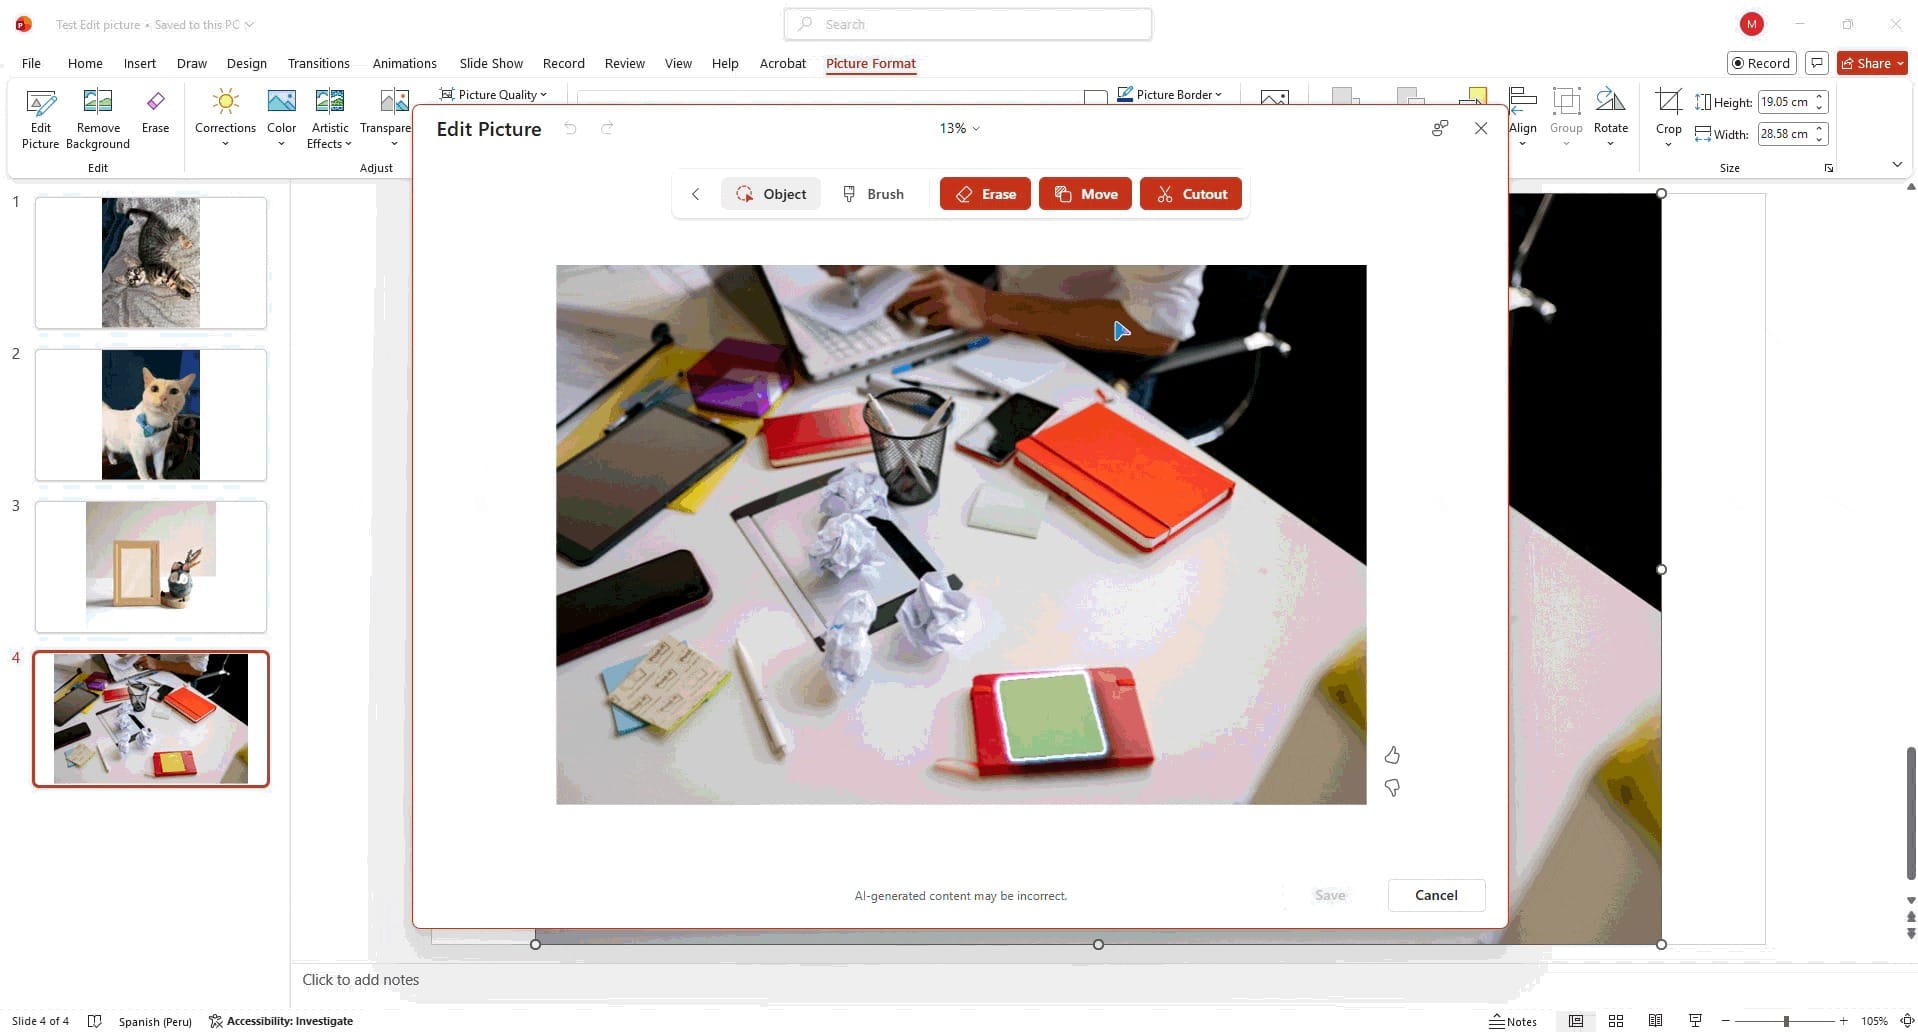
- Shift and Re-Position: Click and drag the selected subject to a new position within the image frame (for instance, sliding a featured presenter from the center of the photo to the far-right edge).
- Intelligent Inpainting: Once dropped into position, the generative AI engine automatically fills in the subject’s original location, synthesizing background patterns and textures to blend the empty space smoothly.
- Commit to Canvas: Click Save to lock the new composition onto your presentation slide.
How to Upscale Low-Resolution Images inside PowerPoint
Dealing with low-resolution assets downloaded from the web or legacy presentation decks is a constant friction point for professional designers. Historically, modifying flat graphic components or sharpening blurry images meant breaking your presentation workflow to open external editors like Adobe Photoshop.
With PowerPoint's modern integrated AI toolsets, you can execute complex visual overrides, including upscaling pixels and changing flat image typography, completely within the native application.
The AI-Powered Resolution Rescue
When dealing with legacy graphics or low-res web exports that look pixelated on modern displays, the native Upscale feature uses generative pixel modeling to sharpen edges and restore clarity. To rescue a low-resolution graphic, follow these steps:
- Access the Focused Workspace: Click on the target low-resolution image, navigate to the Picture Format tab on the ribbon, and select the Edit Picture button on the far left. Alternatively, right-click the asset and select Edit Picture from the context menu.
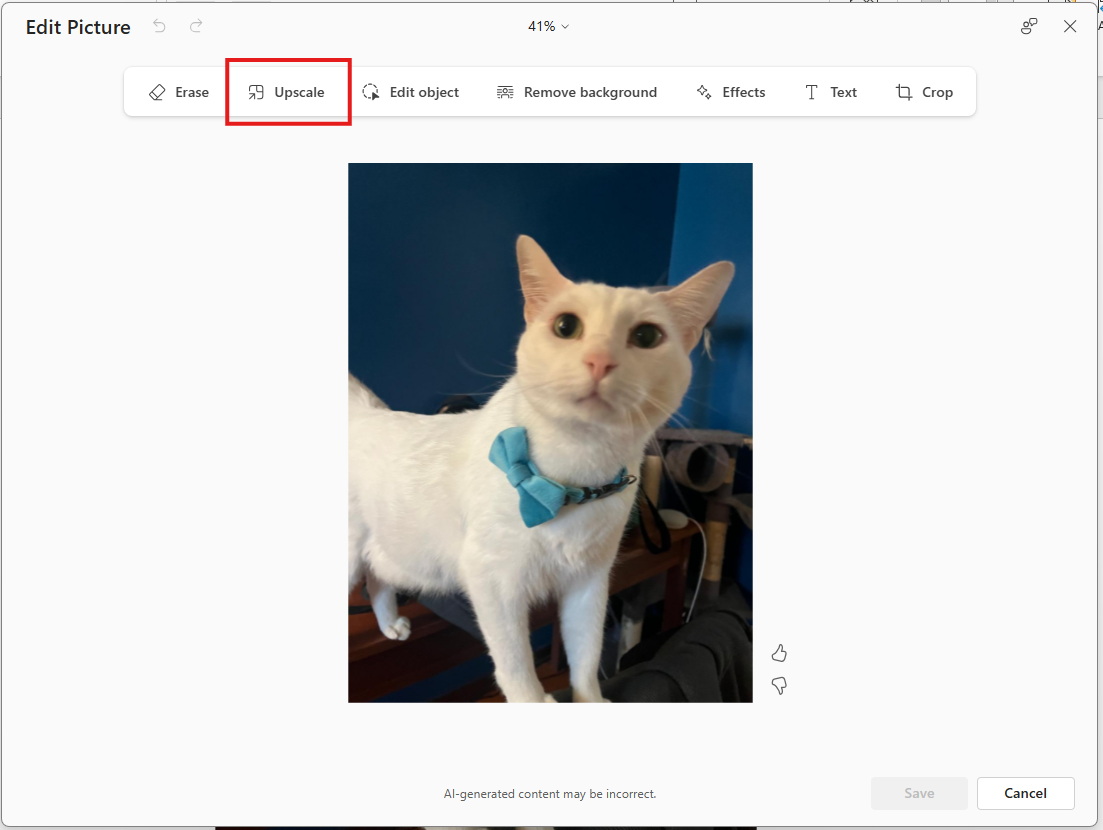
- Trigger the Upscaler: From the dedicated AI toolbar that appears, select Upscale. The engine will instantly begin its pixel regeneration script.
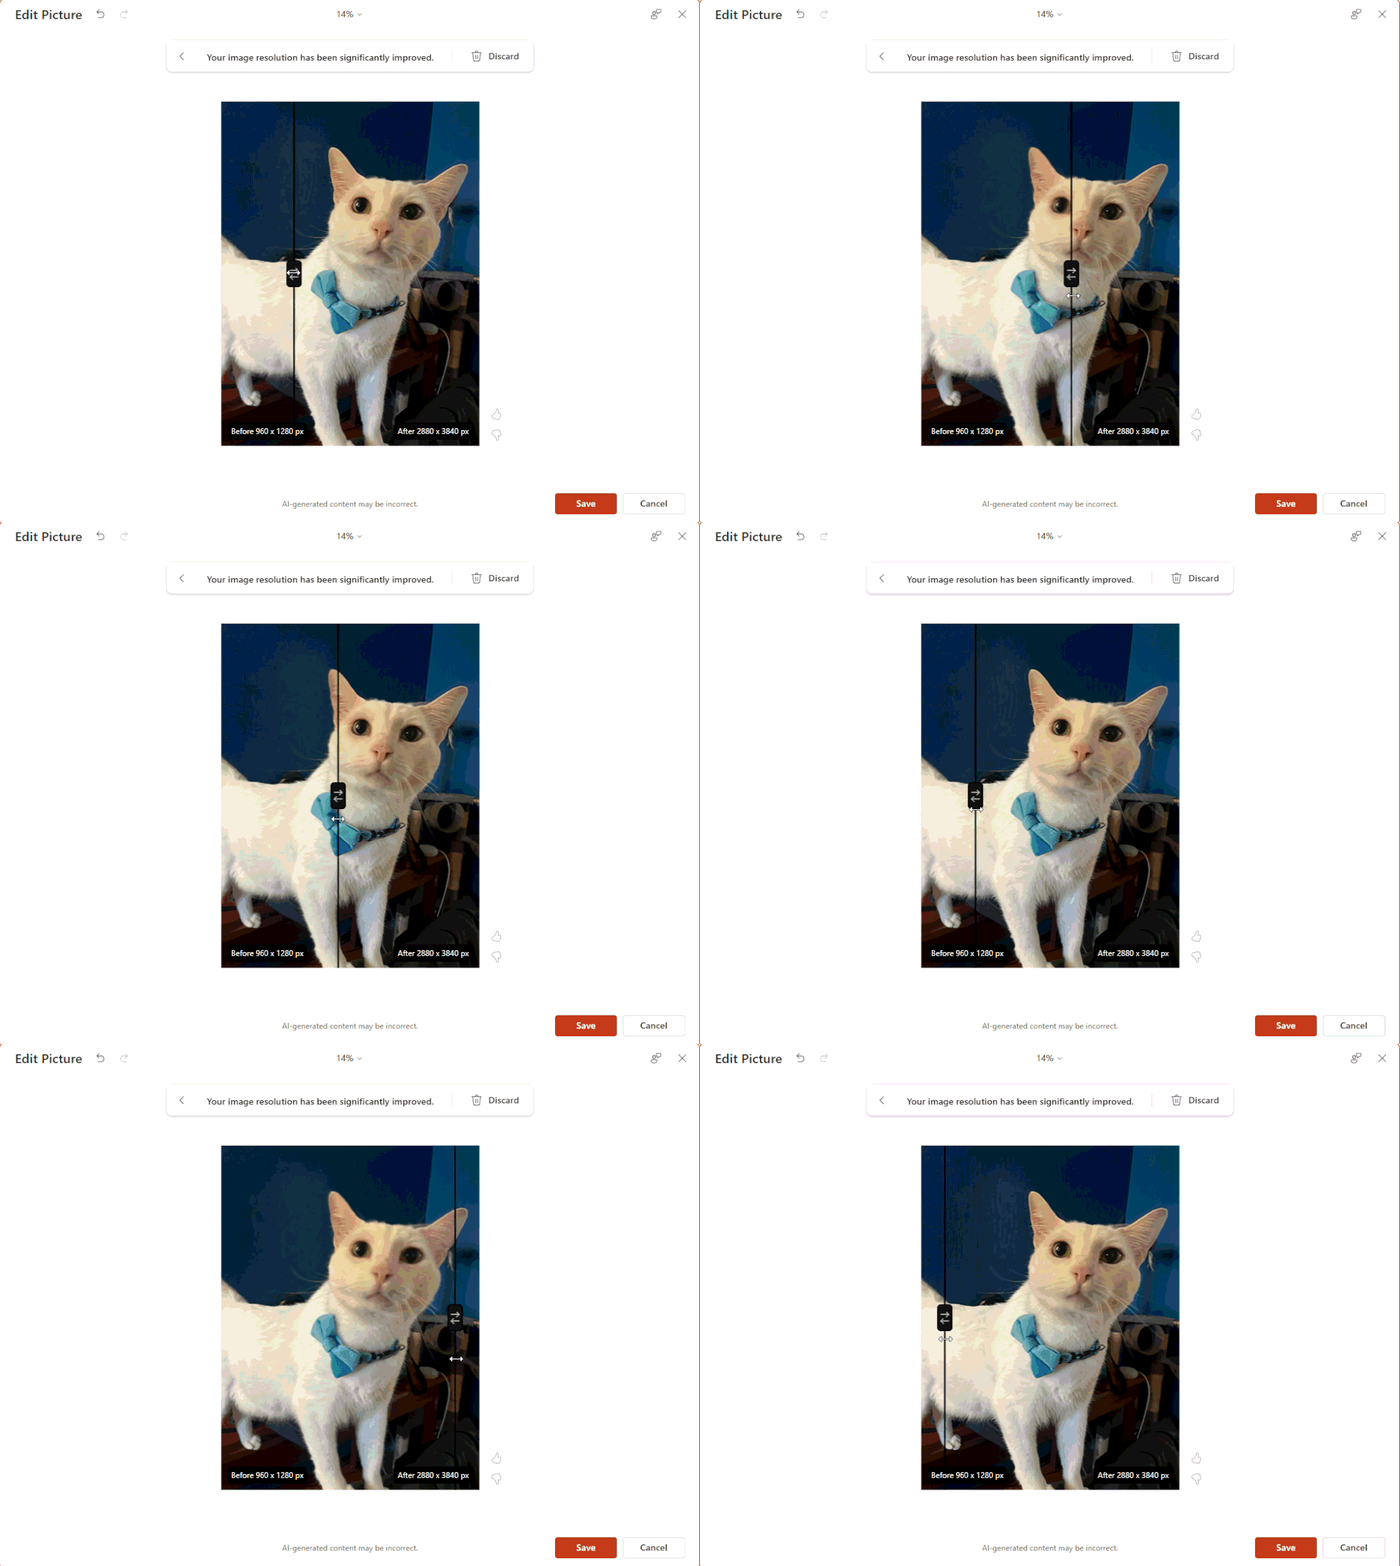
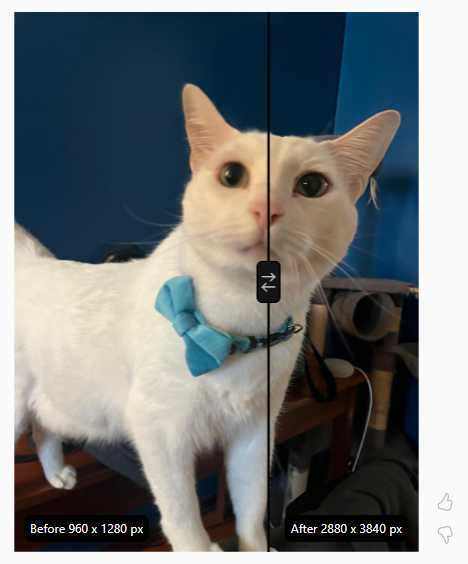
- Evaluate the Enhancements: PowerPoint will generate a side-by-side preview window featuring an interactive before-and-after slider. Drag the slider to the left to see your original low-res visual, and slide it to the right to verify that the AI has sharpened blurred boundaries without introducing unwanted noise or distortion.
- Commit the Changes: Click Accept to approve the enhanced resolution, and select Update to push the crisp, upscaled asset back onto your presentation slide canvas.
Designer Tip: Optimizing for Large-Format Displays
A graphic that looks perfectly acceptable on a compact 13-inch laptop screen can completely fall apart when projected onto a 4K client-facing display, exposing messy artifacts and blocky compression lines.
To maintain an elite, executive-level finish, implement a strategic Large-Format Optimization Rule:
Prioritize upscaling for any imported corporate logos, rasterized charts, or legacy client assets that cannot be sourced as vector .SVG files. Running these components through the native upscaling pipeline eliminates standard web-compression blurriness. This forces clean, crisp edge alignment across any display medium, giving your presentation assets a premium, vector-like finish regardless of how large the screen is.
How to Save a Picture with Edits in PowerPoint
When working with PowerPoint’s cloud-connected AI workspace, traditional saving mechanisms like Ctrl+S or File > Save As do not govern how modified visuals are stored. Because generative image editing happens inside a dynamic web-connected workspace, understanding how to save a picture with edits in PowerPoint comes down to how the application manages canvas updating and non-destructive image versioning.
Applying the Edits
Once you have completed your AI modifications, whether erasing background clutter, moving subjects, or upscaling pixels, you must explicitly commit the changes to your slide:
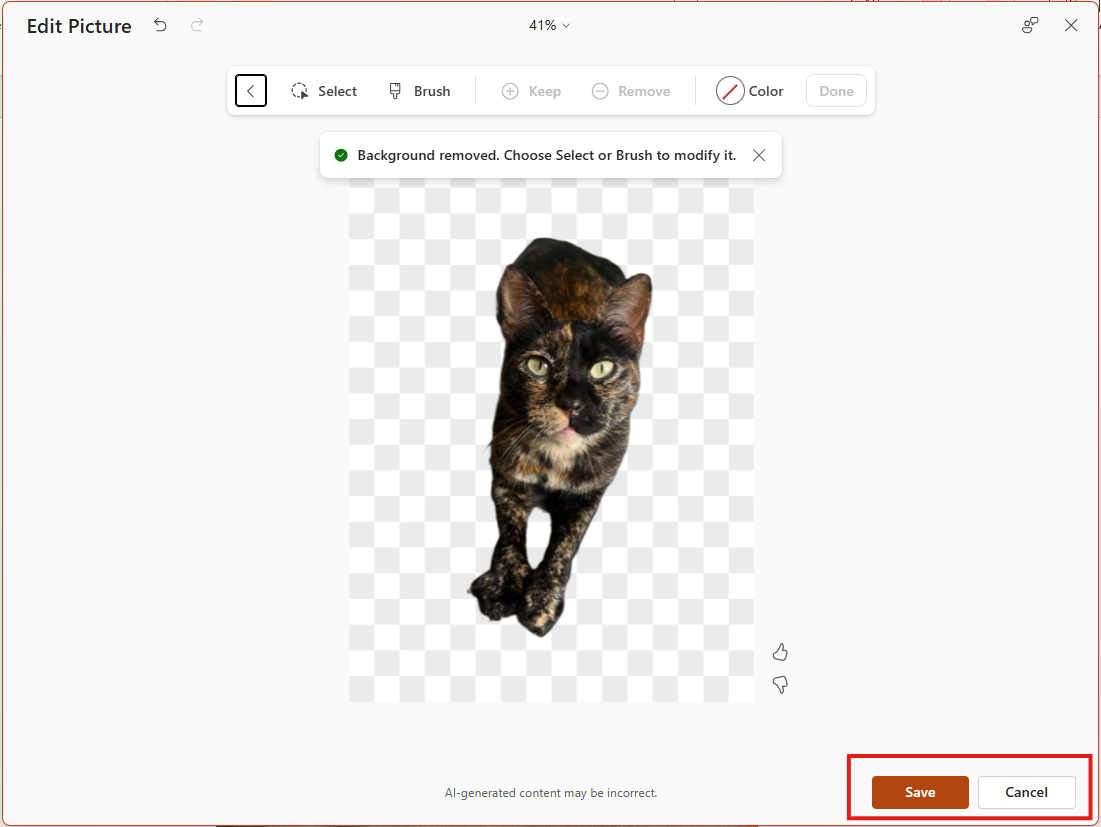
- Locate the Save button (accented in orange) at the bottom right corner of the AI Edit Picture workspace.
- Click Save to send the final render call to the server.
- If you decide to abandon your changes without consuming processing bandwidth, click Cancel right next to it to exit the workspace without altering your original image asset.
The Non-Destructive Workflow
Clicking the orange Update button automatically replaces the old image frame on your active presentation slide with the newly generated asset. However, this process is entirely non-destructive:
- Canvas-Level Replacement: PowerPoint swaps the visual file directly on your slide canvas while maintaining your original image dimensions, rotation, and slide positioning.
- Embedded Asset Preservation: The edited image is stored within the .pptx container file, meaning you do not need to manually export or re-import external .png or .jpg files to keep your changes intact.
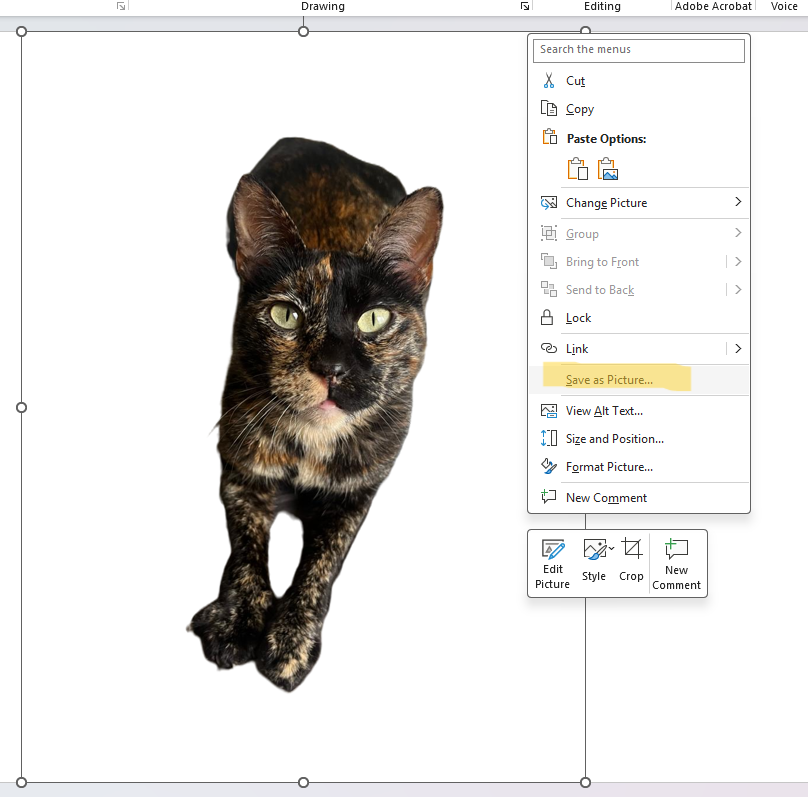
- Exporting Externally: If you want to extract the AI-edited picture for use outside of PowerPoint, simply right-click the updated asset on your slide and select Save as Picture... to export it as a standalone high-resolution file.
How to Add Text Annotations & Overlay Text in PowerPoint AI (Step-by-Step)
Adding custom text overlays or annotations directly onto presentation graphics used to require third-party image editors. With Microsoft’s built-in Edit Picture workspace in PowerPoint, you can now insert stylized text annotations directly on your image files.
Follow this step-by-step workflow to use the Add text tool:
1. Launch the Image Editing Workspace
- Select any photo, screenshot, or online graphic on your active slide canvas.
- Open the Picture Format tab on the top ribbon and click the Edit Image button (located on the far left).
- Alternative method: Right-click the image and select Edit Image from the context dropdown menu.
2. Select the "Add Text" Tool
- From the specialized toolbar at the top of the dark workspace canvas, click Add text.
- Click anywhere on your image where you want to place the annotation box.
3. Customize Your Typography and Text Effects
- Type your desired annotation, label, or headline inside the text bounding box.
- Use the text options menu to adjust font styles, sizing, colors, and styling effects (such as background fills, text shadows, or high-contrast overlays) to keep text legible over busy image backgrounds.
.gif)
Here is a detailed reference table outlining the native tools available inside PowerPoint’s new Edit Picture workspace:
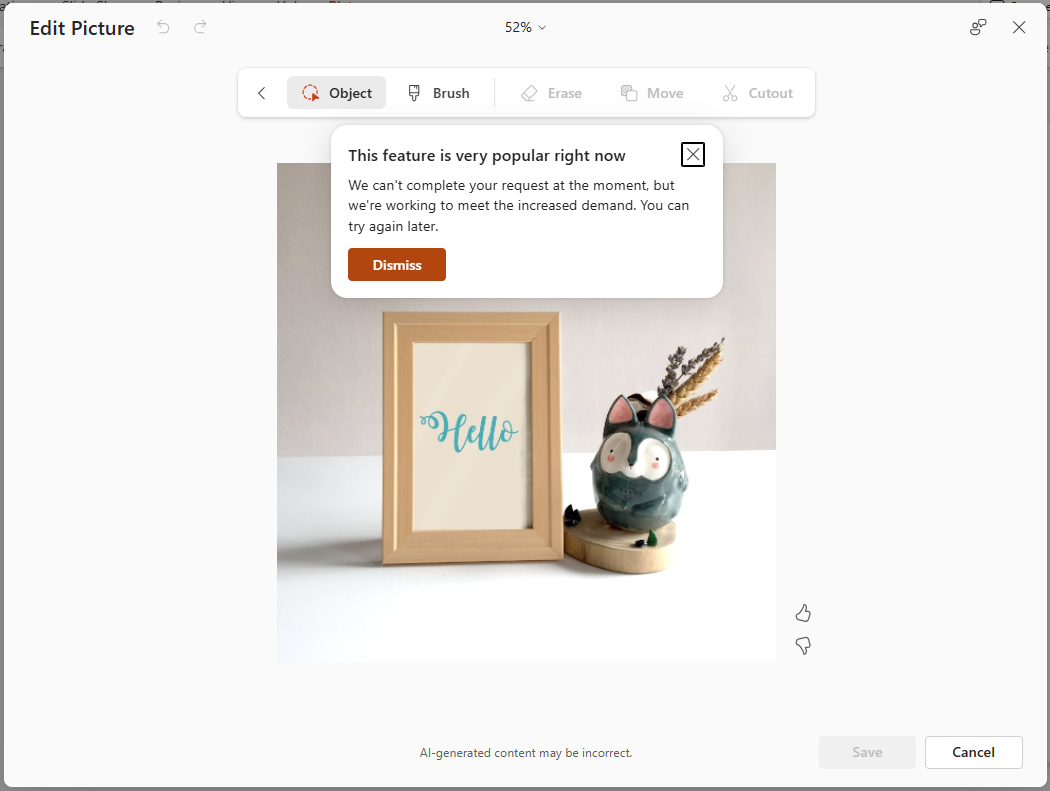
Troubleshooting: Resolving the "Feature Is Very Popular Right Now" Error
When leveraging PowerPoint’s cloud-connected AI editing capabilities, such as Erase, Move, Edit Text, or Upscale, you may occasionally encounter an inline pop-up notification stating:
"This feature is very popular right now. We can't complete your request at the moment, but we're working to meet the increased demand. You can try again later."
While this error can briefly interrupt your presentation workflow, understanding its underlying infrastructure allows you to navigate server bottlenecks efficiently and keep your deck delivery on schedule.
Why This Happens (And Why App or Account Toggles Won't Fix It)
Unlike traditional PowerPoint layout tools that execute locally on your computer's processor, modern generative photo tools rely entirely on cloud-based processing pipelines.
- High Traffic Volume: A massive volume of global users are attempting to access the generative image engine simultaneously.
- Server Throttling: Microsoft dynamically queues and limits requests during peak demand hours to preserve core cloud stability and avoid system-wide outages.
- App & Account Insensitivity: Testing this feature across different environments, such as switching from the PowerPoint Desktop app to PowerPoint for the Web (browser), or switching between different Microsoft 365 user accounts, will not resolve or bypass the issue. Because the request originates from the same upstream Azure and AI rendering server pool, the limitation is cloud-side rather than tied to your local software installation or user profile.
What You Can Do
When cloud throttling pauses your AI visual edits, use these practical workarounds to regain momentum:
- Wait 2 to 5 Minutes: Cloud rendering queues clear rapidly. Click Dismiss on the pop-up window and give the server a brief pause before attempting the action again.
- Avoid Peak Working Hours: Server demand hits its highest spikes during standard corporate business and school hours. In our hands-on testing, the tool performed seamlessly at 9:00 AM CST, but we began encountering error messages around 12:30 PM as global traffic ramped up. Scheduling complex AI image edits for early morning or late evening windows helps bypass these high-demand server bottlenecks.
- Verify Your Internet Connection: A laggy or intermittent connection can cause API calls to time out prematurely, triggering the high-demand warning even when server queues are clearing.
- Fallback to Native Offline Tools: If you are under a tight deadline and cannot wait for cloud servers to clear, switch back to PowerPoint’s standard offline image formatting options on the ribbon:
- Remove Background: Use the built-in, local masking tool to isolate key subjects without cloud rendering.
- Crop & Mask: Manually trim away unwanted background clutter or frame out subjects without relying on generative fill.
24Slides Testing Insight & Hands-On Review: During our internal testing across active deck design workflows, we found this feature set to be unreliable roughly 50% of the time, repeatedly returning the exact same high-demand message.
Crucially, our testing confirmed that changing environments, such as switching from the PowerPoint Desktop application to PowerPoint for the Web (browser), or testing across different Microsoft 365 enterprise and personal accounts, does not bypass or resolve the error. Because every request routes to the same cloud rendering server pool, client-side troubleshooting will not force the process through until server capacity frees up.
Frequently Asked Questions (FAQ)
Can I use PowerPoint’s AI image editor on both desktop and web?
Yes. The native AI image editing feature is available in PowerPoint for the web, Windows (Version 2510 or later), and Mac (Version 16.104 or later).
Does PowerPoint's AI image editor require Microsoft Copilot?
No. The built-in native AI image editor operates independently of standard Microsoft Copilot.
How do I access the new AI editing workspace?
You can launch the dedicated workspace using these steps:
- Click on any photo, screenshot, or online image on your active slide canvas.
- Open the Picture Format tab on the top ribbon.
- Click the Edit Image (or Edit Picture) button on the far left, or right-click the image and select Edit Image from the dropdown menu.
How do I save my AI edits back to the presentation?
All edits made within the workspace are non-destructive. Once you are satisfied with your modifications, click the orange Save button at the bottom right corner of the AI editor workspace to instantly replace the original asset on your slide canvas.
Why am I seeing the "Feature Is Very Popular Right Now" error, and how do I fix it?
This error is triggered by cloud-side server throttling and high traffic volume on the shared Microsoft Azure and AI rendering server pool. Because the restriction is server-side, switching between the desktop app, browser, or different user accounts will not bypass the issue. To work around it, you can:
- Wait 2 to 5 minutes for rendering queues to clear.
- Avoid peak corporate business and school hours.
- Verify your internet connection stability to prevent premature API timeouts.
- Fall back to native offline PowerPoint tools such as standard Remove Background and Crop & Mask.
What is the main difference between "Cut Out" and "Erase" in PowerPoint?
The primary difference between Cut Out and Erase in PowerPoint lies in whether you want to isolate a subject or remove unwanted background elements:
- Cut Out (Isolate Subject): Keeps only your selected subject or object while completely deleting or making transparent the entire surrounding background. Use Cut Out when you want to extract a person, product, or logo so you can place it onto a new slide background, custom shape, or high-contrast corporate layout.
- Erase (Generative Object Removal): Removes only the selected subject or object while preserving the rest of your image intact. Powered by generative AI inpainting, Erase automatically reconstructs the empty space by synthesizing surrounding pixels (such as matching textures, wall colors, or stage lighting) to make the object vanish seamlessly.
.gif)
PowerPoint AI vs. Professional Slide Design: When to Outsource
Microsoft’s native AI photo editor is undoubtedly a massive leap forward for presentation workflows. The ability to remove background clutter, reposition subjects, and upscale web assets directly on your slide canvas eliminates constant app switching and keeps your creative momentum alive.
However, while AI excels at rapid, on-the-fly image touch-ups, it is not a complete replacement for comprehensive presentation design. Knowing where AI reaches its ceiling, and where human design expertise takes over, is key to delivering executive-ready slide decks.
The Technical Limitations of PowerPoint AI
For all its convenience, PowerPoint’s generative picture editing workspace operates within strict functional boundaries:
- Lack of Fine-Tuned Manual Controls: Features like Auto enhance operate as automated, one-click adjustments without custom sliders for exposure, shadow depth, color grading, or specific temperature tuning. PDF
- No Holistic Layout Intelligence: AI image editing operates on isolated graphics, isolated objects, or single slides. It does not understand macro-level presentation hierarchy, visual storytelling flow, data typography balance, or multi-slide pacing.
- Server Dependency & Reliability Limits: As cloud-based AI tools face peak traffic bottlenecks, server throttling can periodically block processing when you need to finish a deck under a tight client deadline.
The Human Touch: Why High-Stakes Decks Still Need Professional Designers
AI is ideal for quick visual fixes during draft iterations. But when you are building an enterprise sales presentation, a C-suite board deck, or a multi-million dollar investor pitch, automated image fixes are only a tiny piece of the presentation puzzle.
High-stakes corporate presentations require a cohesive, strategic design eye:
- Strict Corporate Brand Compliance: Ensuring every graphic, chart, icon, and custom layout adheres strictly to brand identity guidelines across dozens of slides.
- Complex Data Visualization: Translating dense financial tables, unstructured spreadsheets, and multi-layered processes into clean, instantly understandable visual graphics.
- Flawless Spatial Architecture: Aligning complex graphic elements, vector overlays, typographic scales, and negative space to guide the viewer’s eye effortlessly.
The Bottom Line: AI image tools keep you in the flow for daily slide maintenance. Professional designers ensure your presentation closes the deal.
Get Executive-Ready, Brand-Accurate Slides with 24Slides
Don't let presentation formatting bottlenecks, server downtime, or layout struggles slow down your business goals.
Whether you need a complete deck redesign, custom branded templates, or complex data visualization, 24Slides acts as a seamless extension of your marketing and sales team.
- Dedicated Design Specialists: Work with brand-trained corporate presentation designers who refine every slide layout, image, and graphic.
- Rapid 24-Hour Turnaround: Receive polished, executive-ready decks in as little as 24 hours (with 10-hour express options for urgent deadlines).
- 100% Brand Consistency: Eliminate visual errors and ensure every presentation strictly aligns with your corporate guidelines.
Ready to elevate your slides? Discover how 24Slides can transform your raw presentation drafts into high-impact, professional slide decks today.