45 Tips To Speed Up Your PowerPoint Design Workflow

Add life to your presentations by designing visually attractive slides. I know this is easier said than done, but as a presenter, it’s best to know how to design your slides. That said, here are 45 PowerPoint tips to help you speed up your PowerPoint design workflow. Let’s begin!
- Use a PowerPoint template
If you think all PPT templates still look like they were made in the 90s, you need to get out from under your rock. Plenty of sites now offer high-quality templates for free. Don’t believe me? Here, let me show you a couple of screenshots from our very own 24Slides.com Template Hub:
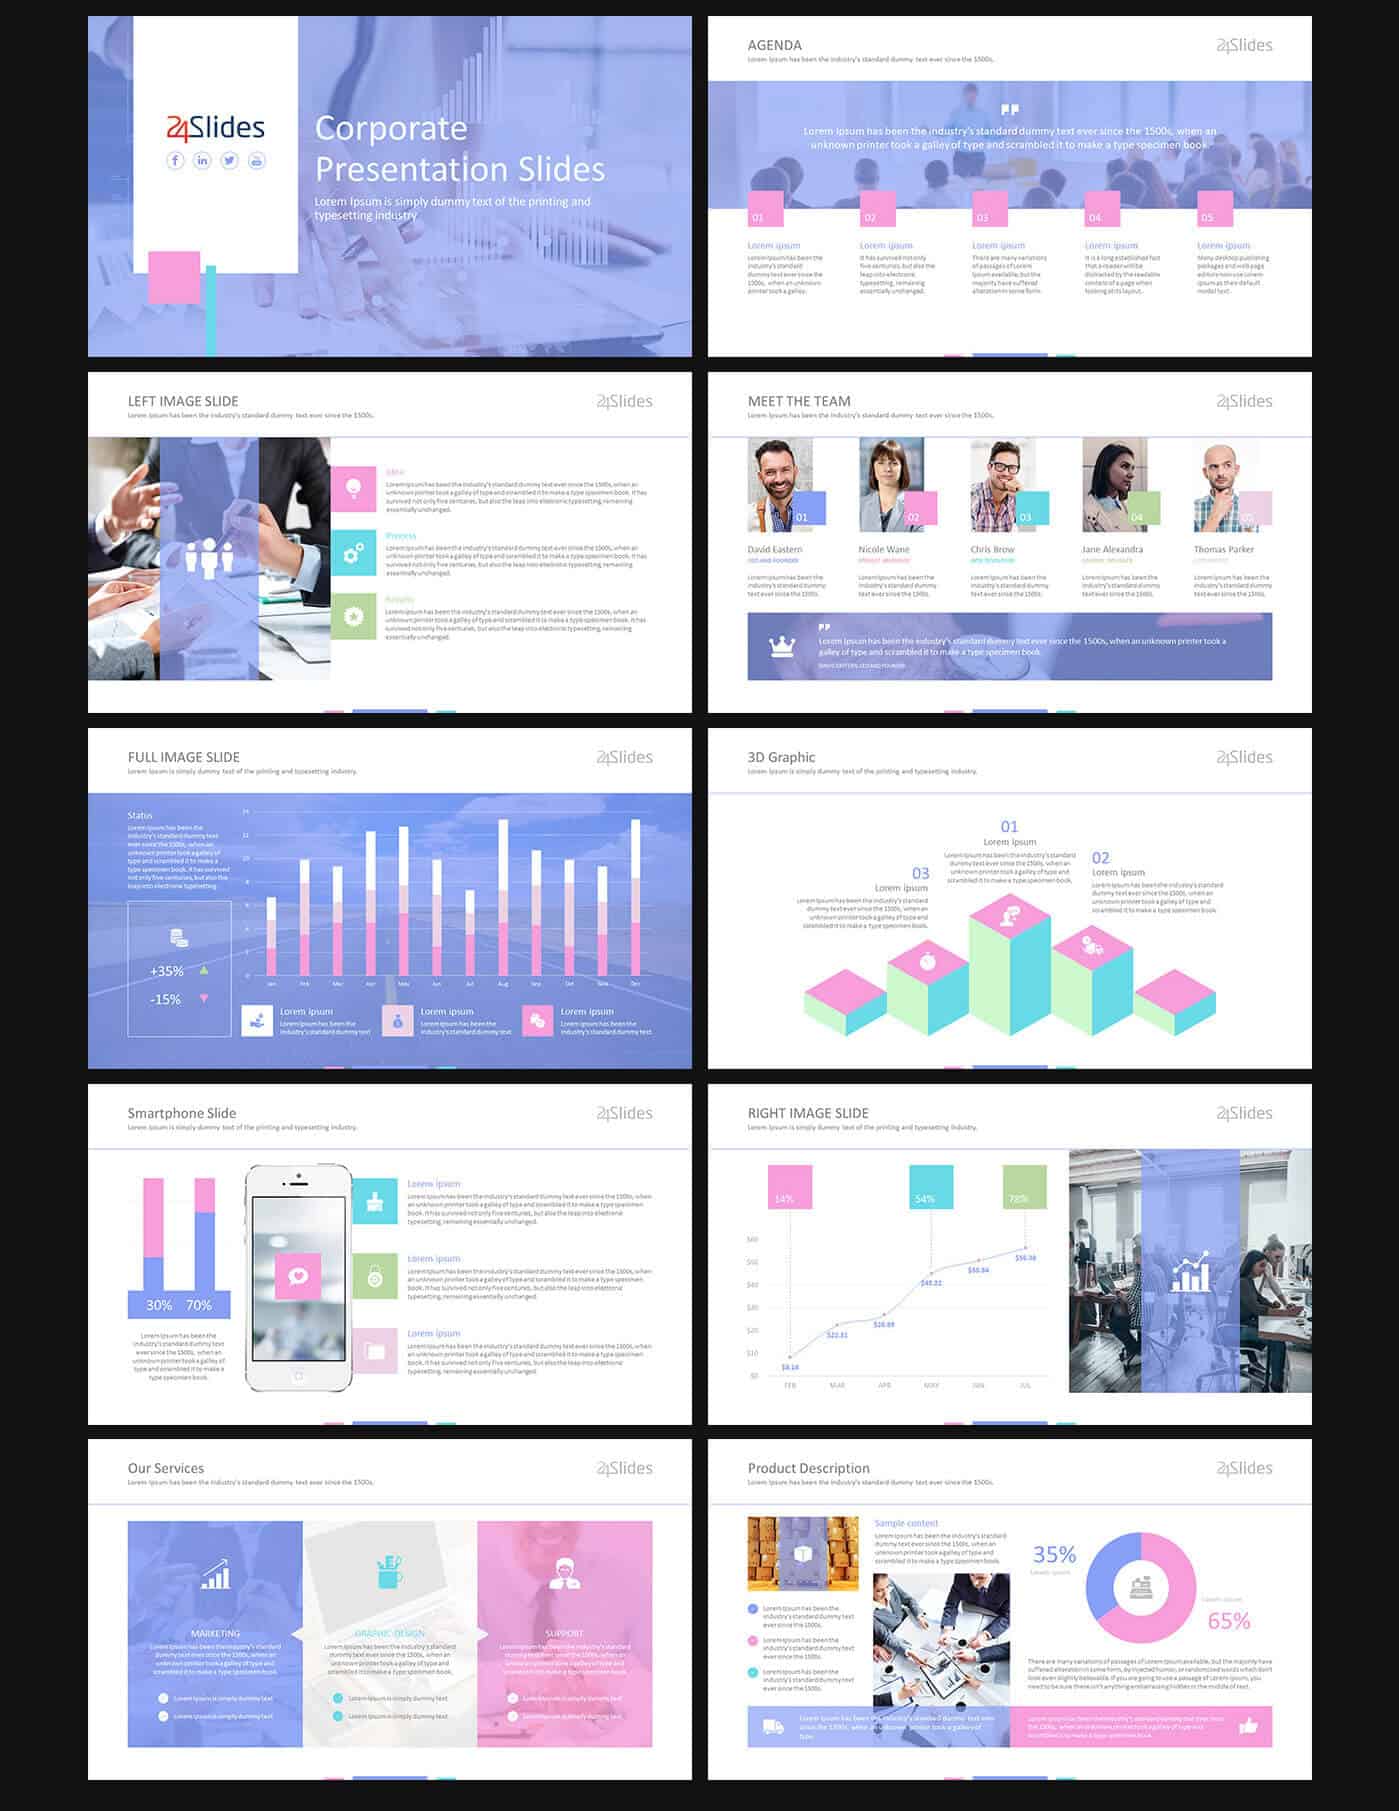
To begin using any of our free templates, simply register an account. And you can then start downloading all the templates you like!
- Have a clear message in mind
You don’t want to open up PowerPoint if you don’t even have an inkling on what your presentation is going to be all about. Remember, content always comes first over design.
What you need to do first is you need to have an outline or a list of points you want to discuss in your presentation. Once you’ve got all that written down, only then should you start designing your slides.
- Try minimalistic design
In presentations, the less is more principle truly applies. Don’t spam your slides by adding all the elements or objects you can think of. It’s only going to make your slides look crowded. And that will lead to nothing but confusion for your viewers.
Your slides are your visual aids. Use it to guide your audience to where you actually want them to look. A minimalistic slide design will help you achieve that because you’re essentially limited to using what’s only absolutely necessary on your slides.
- Use the PowerPoint designer tool
This is one of Microsoft’s recent innovations which I really love. If you’re in a hurry and don’t want to bother with designing tons of slides, you can let PowerPoint’s Design Ideas tool help you out.
Note, however, that you need an Office 365 subscription to see this tool in your copy of PowerPoint. So, if you don’t have a subscription yet, consider getting one especially if you’re always strapped for time. Or, you don’t see yourself as a competent designer!
- Choose the right color theme
The right color theme can bring your presentation to life, literally. And there are so many possible colors to choose from. I know it’s a lot to learn, especially if you’ve never been interested in learning about color theory.
But, if you’re going to be presenting regularly, and you’re not looking to outsource your presentation design, then you better start studying. Here’s a good guide to help you pick the right colors for your presentations.
- Use eyedropper tool to match colors
PowerPoint’s eyedropper tool can be pretty useful, however, it only works with whatever is on the slide and the canvas itself. That means, if you like a color on another slide, you’d need to copy it first to the slide you’re working on, so you can use the eyedropper tool.
So, for example, if you want to use a color palette, you can place it just outside your slide, but inside the canvas. Take a look at this:
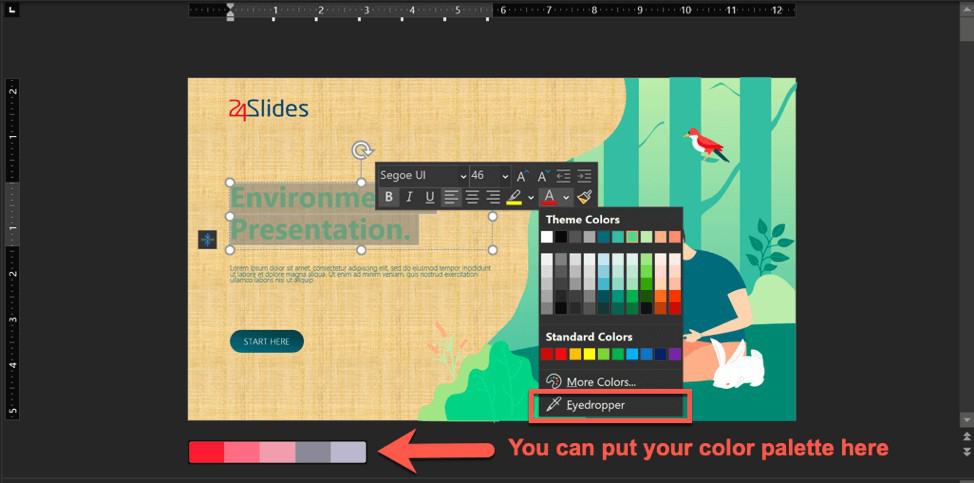
With this method, the eyedropper tool will still be able to grab the colors you want to use!
- Choose quality over quantity of slides
It’s easy to get carried away with designing slides if you love creating them. However, it’s better to have higher quality slides which actually drives your message home, than to have a bunch of extra and unnecessary slides which don’t add any value to your presentation.
Before you add a slide, ask yourself if it adds value. If yes, go ahead and add it. If not, get rid of it. Just think of all the time you’ll get to save if you only work on what’s absolutely necessary!
- Customize the Quick Access Toolbar
That’s right – there’s a reason why the quick access toolbar is on PowerPoint’s toolbar menu. It’s supposed to be customized, so you can quickly access your most commonly used design tools.
PowerPoint is so powerful and so complex you sometimes need to go hunting for the right tool to use. While navigating through different sub-menus and options is fine once or twice, it can get pretty annoying if you need to do it more often!
- Familiarize keyboard shortcuts
Keyboard shortcuts aren’t overrated. There’s a reason why shortcuts were invented – it’s to help users save time.
Now, you don’t need to know each and every single keyboard shortcut obviously. But at least try to memorize those that you use frequently.
For instance, if you’re frequently formatting text, then I highly recommend memorizing the following commands:
CTRL+B = make selected text bold
CTRL+I = italicize selected text
CTRL+U = underline selected text
And so on. Check out this helpful guide from Office.com.
- Use format painter
If you want to achieve a consistent look in your slides (and you’ve got a ton of slides to work on), then you’ll surely benefit from using the Format Painter tool.
Just like the name implies, this tool will help you ‘paint’ one object’s format onto the next object. It can be one object or many different objects.
Manually copying and pasting an object’s format into several other objects can be extremely time-consuming. So, use the format painter tool to speed up your PowerPoint design workflow!
- Apply same background to all slides
Instead of manually right-clicking on each slide and clicking on Format Background, you can apply the same background to all slides with just a single click. Here’s what you need to do:
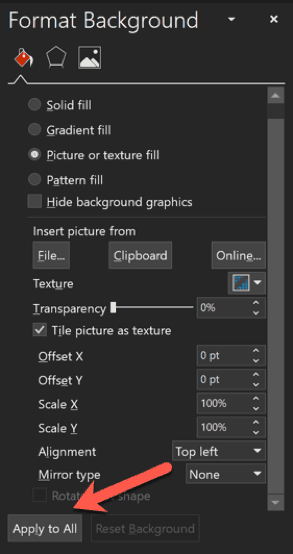
Once you’ve formatted a background for an individual slide, scroll down the Format Background pane and you’ll see a button that says ‘Apply to All.’ Click this button to apply the same background to all your slides.
If you want to undo the changes, just click on the ‘Reset Background’ button.
- Animation painter
The animation painter tool works pretty much the same way as the format painter tool. The only difference is that instead of copying and pasting an object’s format, it’s copying and pasting an object’s animation.
To use this tool, add an animation to an existing object (choose an animation from the Animations tab). Then click on Animation Painter to copy the animation. To paste it, click on a second object you want to apply the animation to.
- Know PowerPoint’s hidden menu system
The PowerPoint ribbon is full of secrets. You can click on any object or element on your slide and a new tab will magically appear on the ribbon!
For example, if you click on a picture, the Picture Format tab will appear. If you click on a table, the Table Design and Layout tabs will appear.
Try adding different objects to your slide and find out what kind of new menu tabs will appear on your screen.
- Choose your fonts beforehand
Don’t settle for the default PowerPoint font, Calibri. There’s nothing wrong with it, per se, but it’s the default font, so it’s very likely that it’s been used on countless presentations.
If you want your presentation to stand out, use different fonts. There are plenty of free fonts on the web, the top one that comes to mind is Google Fonts.
Check out these tips on how to pick the best font for your presentation!
- Organize objects in Selection Pane
The Selection Pane (go to Home > Editing group > Select > Selection Pane) is a powerful tool in its own right. Especially if you’ve got a significant number of elements on your slide. Sometimes, you just want to hide some of the elements because it slows down your workflow.
Without the Selection Pane, you’d probably need to delete them or move those objects to another slide. But with Selection Pane, all you have to do is just click on the little eye icon to show or hide an object, like you see below:

If you’re working with plenty of objects on a slide, you can also rename the objects in the Selection Pane. This makes it easier for you to ascertain which objects you’re currently working on at the moment.
- Learn how the master slide works
Take the time to learn how the master slide works in PowerPoint. Doing so will allow you to make global changes to your slides later on. This is because whatever is on your master slide appears on all your slides as well.
So, for example, if you add your logo to the bottom-right corner of your master slide, then you’re going to see that logo on ALL your slides. You no longer need to manually add the logo to each of your slides.
Think of how much time you will get to save with this tool! If you’re not sure how you can go about editing your master slide, here’s a detailed tutorial.
- Create master layouts
If you don’t want to make global changes to your entire presentation, but want some of your changes to take effect on selected layouts, then you can edit master layouts.
For example, if you only want your logo to appear on all slides that use the Title Slide Layout, then you can add your logo to that slide. If you use other layouts, then your logo isn’t going to appear on those slides.
Also, instead of editing an existing master layout, you can just create a new one!
- Create your own templates
In some cases, using a third-party template isn’t going to be of any help especially if you use company-mandated colors, text, etc.
In this case, you’d be better off creating your own PowerPoint templates. This way, you can control every single aspect of your slides and you can quickly draw up a presentation from scratch.
Here’s how you create your own templates: Create and save a PowerPoint template.
- Create your own icons
While inserting icons in your PPT slides is now easier than ever (just go to Insert > Icons and choose from hundreds of free icons), you sometimes want to create something from scratch.
Fortunately for you, you can easily create your own icons in PowerPoint. How?
By using the Merge Shapes function! You can do this by clicking on the shapes you want to merge, then clicking on the Shape Format tab. You’ll find the Merge Shapes button in the Insert Shapes group, like you see below:
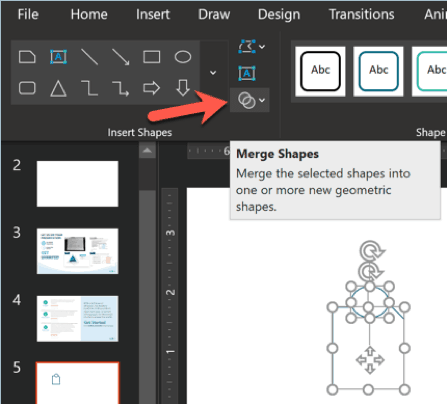
You’ve got 5 different options to merge your shapes: union, combine, fragment, intersect, and subtract.
Play around with the different options until you arrive at the icon you want to create!
- Quickly work with multiple images in PowerPoint
Sometimes you just want a quick way of getting multiple images to look good on your slide. You don’t want to manually click on each image and then format each one individually. That can take up a large chunk of time especially if you’ve got several images on a slide.
Probably one of the quickest ways to go about this is to use the SmartArt tool. What you need to do is click on the images you want to resize and/or reshape.
Then click on Picture Tools > Format > Picture Layout. Select the layout you want to use. You’ll notice right away that the pictures will have all been formatted uniformly.
You can adjust the crop by clicking on the photo, clicking on Crop, and moving the image around until you get the subject you want in focus.
- Stop putting too much text in your slides!
Seriously, folks, if you’re still adding tons of text to your slide, you’re doing it wrong. Text is great, but you need to keep it to a minimum. There are so many other visual elements you can use to replace text.
Use images, video, graphics, charts, etc. to make your presentation come alive. You don’t want to be labelled as ‘that presenter’ who ‘killed’ them with PowerPoint!
- Turn bulleted lists into SmartArt graphic
You probably know this tip already, but if not, then you can try typing out a short bullet point list on a slide. Try writing maybe 5 items. Then head on over to the Home tab, go to the Paragraph group, and then click on the Convert to SmartArt Graphic icon. Here’s a screenshot:
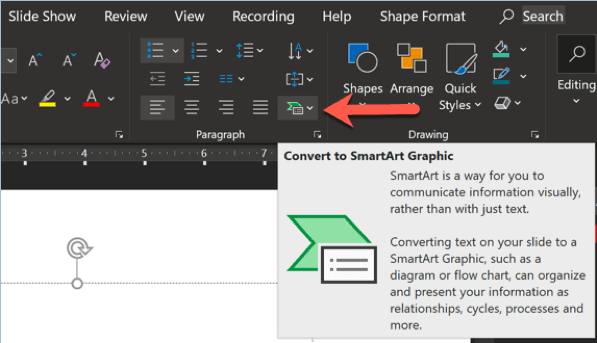
Hover over the different SmartArt layouts and click on the one you like best. The awesome thing is that you can always add to your list later on. Plus, you also have the freedom to change the graphic’s look anytime you please!
- Use arrow keys to move objects
Instead of using your mouse to move around objects on your slide, use your arrow keys instead. It’s so easy – just click on the object you want to move. Then, tap the arrow buttons (up, down, left, right) to move the object one pixel at a time.
- Create unique picture shapes
Pictures are commonly in square or rectangle format. If you want to frame your pictures in fun, unique shapes, you can easily do so in PowerPoint.
First, you need to insert the shape you want. Then click on the shape again to open up the Shape Format tab. In the Shape Styles group, you’ll see an option for Shape Fill.
Click Shape Fill and then Picture. Then look for the picture you want to use to fill the shape. That’s it!
- Stick to simple animations
One of the best ways to speed up your PowerPoint design workflow is to stick to simple animations. It’s quite easy to get distracted with so many options at your fingertips! You can make the objects fly in or wheel in from the top-left corner, etc.
But you know what? Most of those animations don’t add value to your presentation. The truth is that most of them can give your audience a headache.
So, save some time and stick to proven, simple animations. Here are my suggestions for the best slide transitions and animations for business presentations.
- Use dark mode when working in dark environments
If you’ve never used dark mode in PowerPoint, check it out right now. Go to File > Options > General.
Under Office Theme, you can choose Dark Gray or Black (I personally love the Black theme).
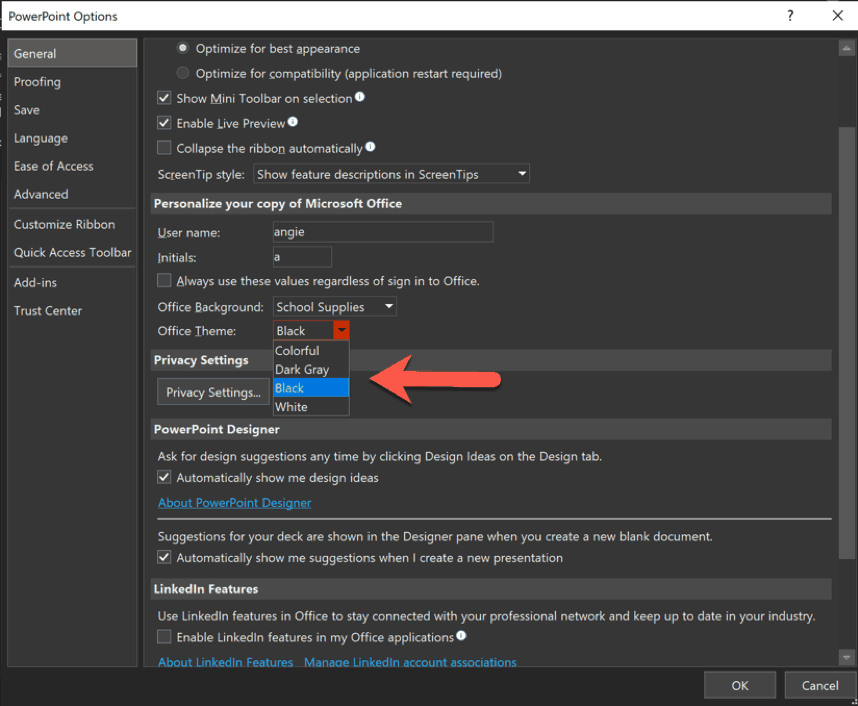
Both of these themes are great for working in low-light environments. Instead of squinting at your screen in the dark, you can continue comfortably working on your PowerPoint slides even with all the lights off.
- Add notes to your slides
Sure, you may have a bunch of handwritten notes on your notebook, or perhaps you’ve typed out your speech on a Word document. And that’s fine. But PowerPoint does have a feature called Presenter View. It allows you to simultaneously view your notes while you’re giving your presentation!
To make this feature work, you’d need to have two screens – one for your audience and one for you. Your audience only gets to see your slides, but you get to see your notes on your screen. This feature is great for making yourself look like a confident speaker!
- Use the new Zoom feature
If you want to achieve a Prezi-like feel for your presentation, try using the new Zoom feature. This will allow you to create a non-linear presentation, meaning you’re no longer limited to going from slide 1 to 2 to 3, and so on.
You can go from slide 1 to 5, to 3 then 6, and so on. It can get quite confusing if you’re new to this feature, so you better head on over to my tutorial on how to use Zoom in PowerPoint.
- Make an interesting cover slide
Your cover slide is basically the first slide that everyone sees in your presentation. You don’t need to overthink your cover slide design. Just make sure it’s something that will help people understand what your presentation is all about.
You can create your own design in PowerPoint, or you can use a tool like Canva which offers thousands of free templates for you to choose from!
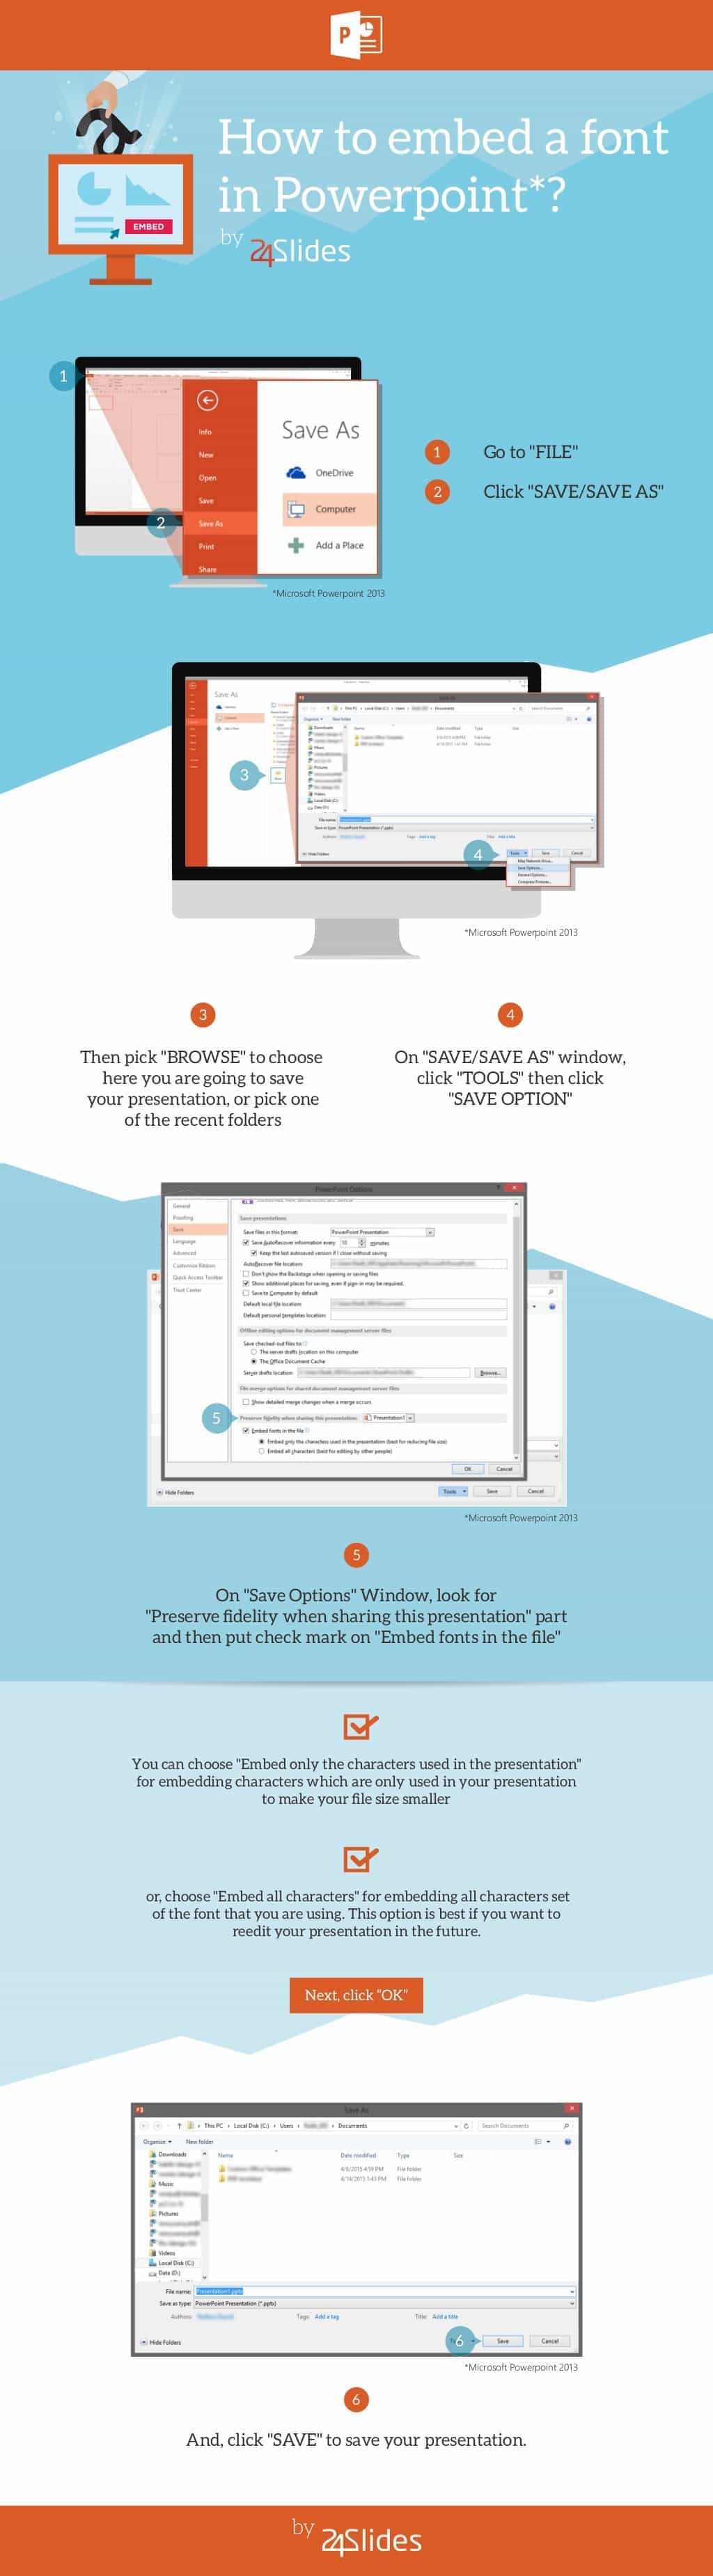
- Embed fonts in your presentation
You don’t want your hard work to go to waste by not embedding your fonts in your presentation.
You can spend hours looking for the perfect fonts, but if you forget to embed it in your presentation file, then you’ll most likely end up using Calibri in your actual presentation!
Fortunately, embedding a font isn’t exactly rocket science. Check out the infographic on how embedding fonts work in PowerPoint:
- Insert screenshots quickly
Instead of manually capturing screenshots or screen clippings, and then inserting these to your slides, you can simply use the Screenshot tool in PowerPoint. Just go to Insert > Screenshot.
On PowerPoint for Mac, you can take full screenshots of non-Microsoft Office apps. However, on PowerPoint for Windows, you can only take screenshots of open Office apps. You’d need to select the Screen Clipping option for other apps.
- Align objects in PowerPoint
Oftentimes, when inserting various elements on the slide, you’ll realize some of them aren’t exactly where you want them to be. Or some just look a bit off. If you don’t want to manually move each object one at a time, you can use the Align tool. You’ll find it in Home > Arrange > Align.
You can align objects left, center, right, top, middle, or bottom. If you want to align multiple objects at the same time, you can distribute them vertically or horizontally.
You’ll probably use the Align tool lots of times and it can get annoying navigating to that button as it’s so many levels deep in the menu! So, I highly recommend adding the Align tool in your Quick Access Toolbar.
- Remove background from images
You don’t need Photoshop to remove background from your images. You can just use PowerPoint for that. Here’s a nice tutorial which you can follow at your own pace:
- Create a photo album
Want to share your holiday pictures with family and friends? Then use PowerPoint’s photo album feature! Go to Insert > Photo Album, and upload your pictures to the slides.
You can add frames, captions, and you can even convert all your pictures to black and white! You’ve also got a few different picture layouts to choose from – you can have up to a maximum of 4 pictures per slide. The good thing is you can quickly convert your photo album slideshow to video, so you can definitely upload it to YouTube!
- Use high quality images
One of the most important aspects of presentation design is the use of images. But not just any old image; for best results, you want to use high-quality images. This is important because when you’re showing your slides on a large screen, people can easily get turned off if you use low resolution or pixelated images.
There are so many resources for high-quality free images on the web. If you’re using your own, don’t go for low resolution ones. If you’re concerned about your PPT file size, you can always compress your images first before you add it to your slides.
- Practice makes perfect
The more you design presentation slides, the faster you’ll eventually get. In the beginning, you may be frustrated with your slowness. But over time, you’ll become familiar with PowerPoint, and you’ll learn to spot what looks good and what doesn’t.
So, don’t fret if your peers are way ahead of you at designing slides today! Work on your craft, get inspiration from others, check out tutorials on the web (we’ve got plenty on the Present Better blog!). And before you know it, you’ll be an expert presentation designer!
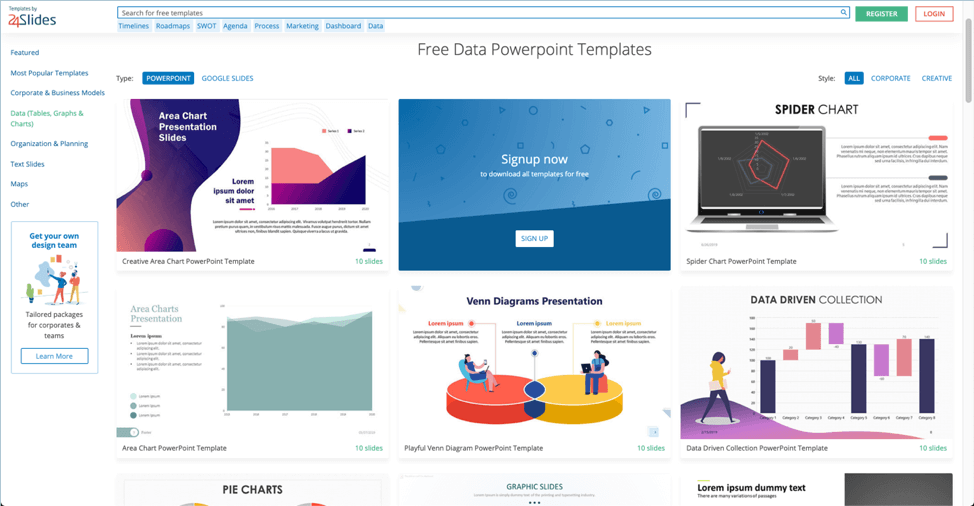
- Add charts and graphs
Charts and graphs make your presentation look a whole lot smarter. It lends it an air of seriousness that normal photos can’t usually achieve. It’s especially useful for business presentations where you need to present data and analysis, make progress reports, etc.
But even non-business presentations can benefit from charts and graphs. You just need to use the right kind of chart for your presentation.
Here, have a look at some of our free data templates which has all sorts of tables, charts, and graphs:
- Quickly change slide size
Figure out the slide size you need to use before you even start designing your slides. It’s true you can always adjust it later on by going to Design > Slide Size. But your slides may not look like what you originally designed.
You’ve got two options when resizing the slide: maximize or ensure fit. Play around with either option. You can always undo your changes by pressing CTRL + Z on your keyboard.
- Add watermark to your slides
If you plan on sharing your slides online, then it’s good practice to add a watermark to your slides. This is because online theft is so rampant nowadays. You’d hate to find out your hard work has been stolen by some thief on the Internet.
Your watermark can be your name, a company logo, or anything else that will identify you as the owner of the presentation.
- Use Continuity camera (Mac and iPhone users)
If you’ve got an iPhone and a Mac computer, then one of the best tips I can give you to speed up your PowerPoint design workflow is to use the Continuity Camera. Here are the requirements:
- Both your Mac and your iPhone needs to be signed in to the same iCloud account and it should have two-factor authentication turned on.
- Both Mac and iPhone need to have Wi-Fi and Bluetooth on.
- Your Mac should be on Mojave and your iPhone should be using iOS 12.
Using this feature is very easy. Just right-click anywhere on your slide and you’ll see something like this on your screen:
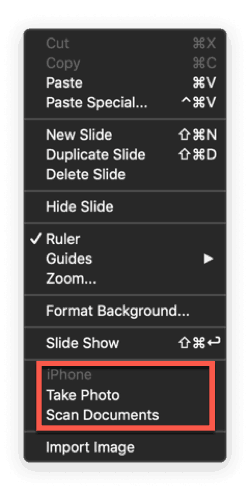
As you can see, you’ve got two options. You can either take a photo using your iPhone’s front or back camera, or you can use it to scan a document.
This feature saves you a ton of time as you no longer need to manually transfer your files from your phone to your computer. It’s a pretty handy method of speeding up your PowerPoint (for Mac) design workflow!
- Use video as slide background
To use video as background, you’d need to insert a video like normal. Go to Insert > Video and choose where your file is saved.
You may need to stretch out the video to fill the entire slide. So, it’s best to use a video that’s roughly going to be the same size as the slide to avoid distorting the video.
Once you’ve positioned your video nicely, you can start adding other elements on top of it.
- Save your PPT file to OneDrive
Saving your PPT to OneDrive means you never have to worry about losing any work on your slides. That’s because autosave is turned on, so every little change you make is automatically saved to the cloud.
Another benefit is you can access your PowerPoint files from anywhere – on your desktop computer, your tablet and mobile phone, and even on the web!
- Collaborate with other users
If you’re working with another person or team, then you’ll be happy to know that PowerPoint makes it easy for you to collaborate with others. You can either send your PPT as an email attachment (you can choose between PPT format or PDF).
For real-time collaboration, however, you should upload your PPT to OneDrive so you can just send a link to your colleagues. You can also specify whether you want people with editing or viewing rights.
Basically, you have a lot more options for collaboration if you upload the file to OneDrive or SharePoint.
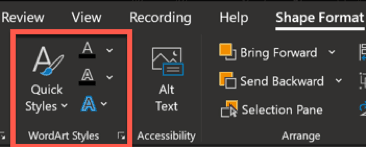
- Use WordArt
WordArt is one of the quickest ways to change your text’s appearance. Text on its own can be a bit basic, but with WordArt you can turn your text into art.
You can add a shadow, reflection, glow, bevel, 3d rotation, and transform your text into something totally cool-looking!
To access your WordArt menu options, highlight the text you want to design, then click on Shape Format, and look for the WordArt Styles group. Here’s a screenshot:
- Get design inspiration
If you wait for inspiration to strike while you procrastinate, then you’re going to be very disappointed. So, go on Google and search for design inspiration. You can search for both free and premium templates on the web to see how other designers’ design their slides.
Go on YouTube for tutorials on how to design slides, and read blogs and forums dedicated to design communities. There are so many places where you can get inspired, so you can create a truly one-of-a-kind presentation!
Did these tips help you improve your PowerPoint design workflow?
I sincerely hope it did! PowerPoint is such a robust software, you’ll find plenty of uses for it. Don’t be afraid to explore and play around with the app – you’ll only improve as time goes on!
You might also find this interesting: 36 Fun Icebreakers For Your Next Presentation