PowerPoint’s Morph And Zoom: Everything You Need To Know
If you’re an Office 365 subscriber, and you’ve got the latest version of PowerPoint, then congratulations! You have access to the Morph and Zoom transitions that regular PowerPoint users don’t. These new features bring PowerPoint to a whole new level and makes it more competitive with more recent presentation software like Prezi.
I will divide this tutorial into two sections. First, I’ll cover Morph transition, then I’ll show you how the Zoom feature works. By the end of this article, you just might be convinced to subscribe to Office 365 – these features are THAT awesome!
The Morph Transition in PowerPoint
If you don’t know what morph means, here’s a quick definition from Oxford Dictionaries:
Morph – change smoothly from one image to another by small gradual steps using computer animation techniques.
PowerPoint’s morph transition fits right into this very definition. Objects transition from one slide to another very smoothly! The great thing is you can basically morph any element on your slides – the possibilities are nearly endless.
From texts, shapes, colors, pictures, icons, SmartArt, WordArt, even tables and charts, you can animate it all just by clicking on that nifty Morph transition button!
Here’s a great example of a presentation made 100% with PowerPoint’s new morph feature:
With Morph, you no longer need to use complicated animation sequences which would have been pretty daunting to a non-PowerPoint expert. Morph allows you to create animations which gives off a vibe of seamless continuity. It makes your viewers think you created your presentation with advanced video-editing software, and not PowerPoint.
The point is that when you plan how your slide objects are going to morph from one form or position to another, then you can effectively capture your audience’s attention. It’s such a simple idea to implement, yet the effects can be truly amazing.
If you’re willing to think outside the box a little bit, you can create the most magical PowerPoint presentations, and your audience will never think it was done on PowerPoint!
Getting Started With The Morph Transition Effect
To get started with morphing transition effects, you’re going to create a base slide first. This is where you add the objects you want to morph. Once you’re done with your base slide, you’re going to need to duplicate it.
On the duplicated slide, you can move around the objects, you can change the colors, sizes, etc. Basically, what you want your base objects to morph into, that’s what you need to do on the duplicated slide. Once you’ve got your second slide set up, then you can click on Morph and preview the effects.
This is quite literally all you need to remember – create a base slide, duplicate it, move/format the duplicate objects, hit Morph and preview.
Now, imagining all these steps is hard work, so let me show you in detail what all those steps mean, so it’s easier for you to understand.
Step 1. Create a base slide
This is the slide where all the pre-morph objects are in place. I created a sample slide as you can see below.
Also, I downloaded a free image from Unsplash.com, and added the word ‘DESK’ (it’s important to note I added a text box for each letter – this information will come in handy in step 3) to the right of the slide. I also added a gradient background. This will be the base slide.

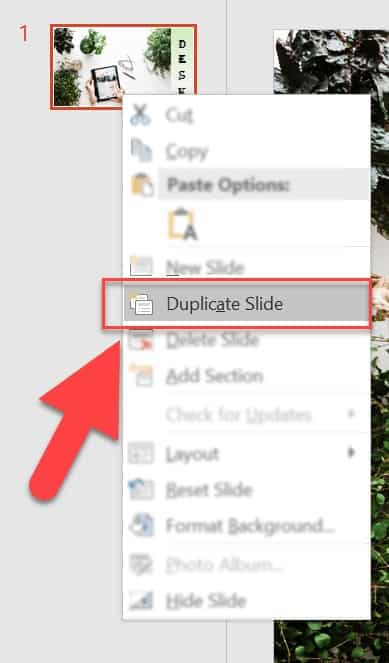
Step 2. Duplicate the base slide
To duplicate the base slide, go to the left side of the screen, right click on the slide’s thumbnail and click on ‘Duplicate slide.’
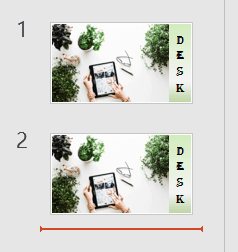
You will then see two thumbnails on the left side of your screen:
Step 3. Get to work on the duplicate slide
On the duplicate slide, you can move around any of the objects. Since our sample base slide has 3 elements – image, text, gradient background – we will move around these elements to make the morph transition look more pronounced.
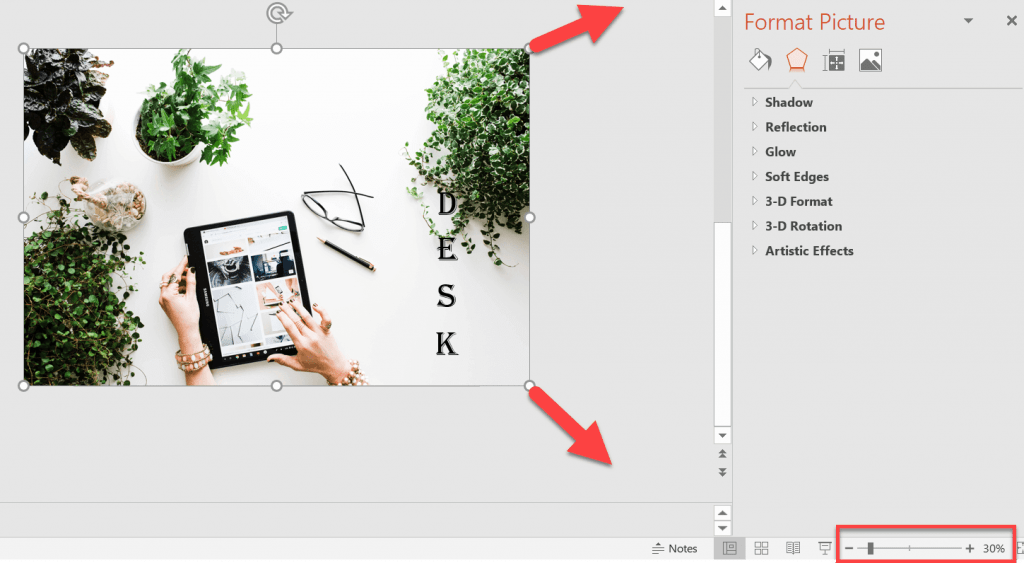
To begin with, we will zoom on the image and make the tablet appear bigger on the duplicate slide. To do this, I just click on the image and drag out the edges (check the two red arrows in the screenshot).
You may need to zoom out of the slides so you can see precisely which part of the image still covers the slide canvas (I zoomed to 30% as you can see in the screenshot):
Then I moved the four letters ‘DESK’ to the top left corner and changed the color from black to orange. I also updated the font size of the letter ‘D’ from size 80 to size 200.

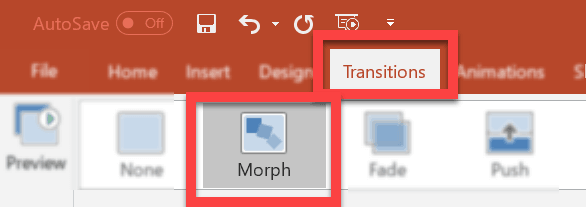
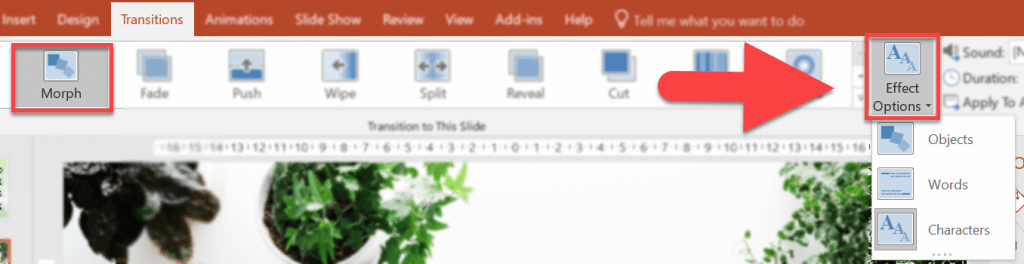
Step 4. Click on the Morph button!
When you’re happy with how your duplicated slide looks like, and you’re ready to view the morphing effect, head on to the Transitions tab and click on Morph. Again, the Morph button will only appear if you’ve got an Office 365 subscription and you’ve got the latest version of PowerPoint.
It’s important to mention here that you should hit the Morph button while you are on the duplicate slide, not on the base slide. If you hit Morph while on the base slide, you’re not going to see any morphing effect simply because there’s nothing to morph from.
When you click on the Morph button, you will be able to change its effect options too. In this case, you have 3 options: you can choose to morph objects, words, or characters. I chose to use the default option (Objects).
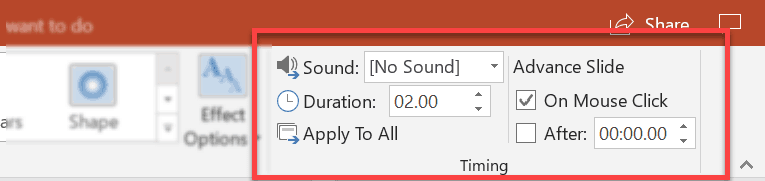
If you want to change the morph transition’s timing, you can also do this by changing the duration. The default is 2 seconds. If you want to drag out the transition, you’re free to adjust as you see fit. You can also add a sound effect to the transition.
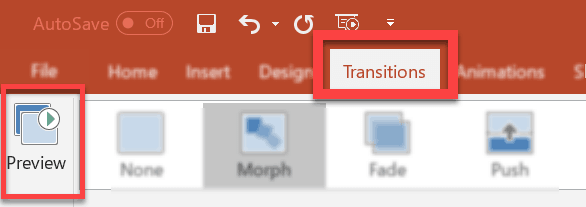
Step 5. Hit the Preview button
To make sure your presentation is showing your desired effect, you have to click on the Preview button in the Transitions tab.
Alternatively, if you want to preview your entire presentation, you can go to the Slide Show tab, then choose either From Beginning or From Current Slide.
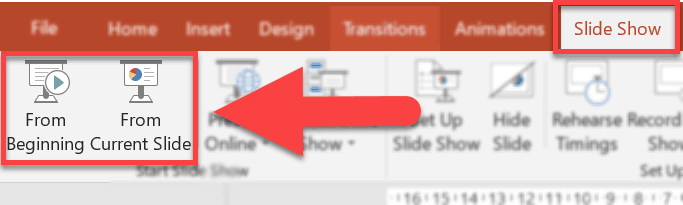
Since I only have two slides in my presentation file, I chose to view my slide from the beginning. Here’s a 2-second GIF of what it looks like:

Basically, that’s it! As you can see, using this Transition is really very easy. There’s no need to draw individual motion paths or animations. If you’re not happy with anything, or if you want to change something in the duplicate slide, you can do so at any time.
PowerPoint will simply follow the objects from the base slide to the duplicate slide. If you’ve changed anything, PowerPoint will do the magic on its own. No need for you to do anything extra!
There are plenty of other effects you can do with the Morph transition, such as animating words, creating an anagram effect, adding motion and emphasis animations, applying entrance and exit animations, creating a 3D rotation effect, morphing a shape into another shape, and so much more!
Play around with the different Morph options, but remember not to overdo transitions – no matter how cool it looks – as that could distract your audience from the message you’re trying to convey.
As with any transitions and animations in PowerPoint, use this new and exciting transition effect to only emphasize important points. Otherwise, your audience may get dizzy from all the effects they see on the screen!
The Zoom Feature in PowerPoint
While the morph transition helps create seamless animation between consecutive slides, the Zoom feature allows a presenter to link different sections of a presentation.
In a regular PowerPoint presentation, you normally go from slide to slide. If you have 20 slides in your presentation, then you begin at slide 1 and then end at slide 20. If you want to skip a slide or go back to a previous slide, you can do so, but you’re going to have to cycle through the previous or subsequent slides.
With the Zoom feature, you can navigate your slides in a non-linear fashion. This means, you can go from section 1 straight to section 5 or section 10, or whatever you choose to create in your Zoom menu.
Here’s a nice video from Office 365 which gives you a quick peek into what this feature can do for your presentation:
The key takeaway here is that with the new Zoom feature, you can easily create an interactive Table of Contents and place it either in the beginning of your presentation, or you can add an index of slides at the end of your presentation. You can create highly engaging and very fluid presentations just by using this awesome feature!
Getting started with PowerPoint’s Zoom feature
There are 3 different types of Zoom you can use for your PowerPoint presentations. These are (1) summary zoom, (2) section zoom, and (3) slide zoom. I will divide this section of the article into 3 sub-headings, one for each Zoom type, so you can easily understand how each feature works.
For this example, I used several slides from the premium Start Up X PowerPoint template from Graphic River. I then put 3 to 4 slides within each section, and created a total of 6 sections. Here’s a screenshot:
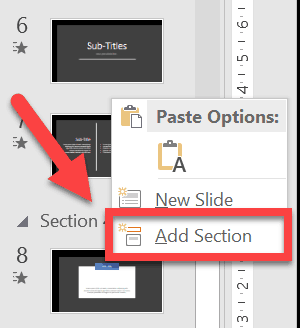
If you’re not sure how to go about adding sections to your presentation, you simply head over to the slide thumbnails on the left side of the screen. Right-click on a blank space and click ‘Add Section.’ You’ll see this option pop-up on your screen:
Alternatively, you can also click on any of the slide thumbnails, and you’ll get these options:
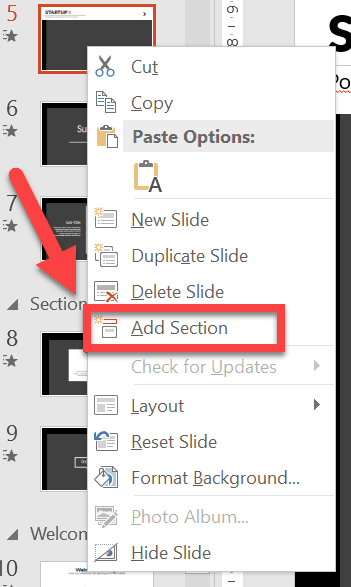
You can then drag and drop any of your slides to any section you want. You can also add new slides within each section.
With that said, let’s proceed to the first kind of Zoom effect you can make on PowerPoint 2016 (with your Office 365 subscription, of course).
The Summary Zoom
Summary Zooms are perfect for creating a standalone slide which serves as a landing page or a ‘table of contents’ to access different sections in your presentation.
By default, the Summary Zoom slide is inserted as the first slide, but you can move it around to a different position if you want. This is great if you want your title slide and sub-title slides to appear first before you show your Summary Zoom slide.
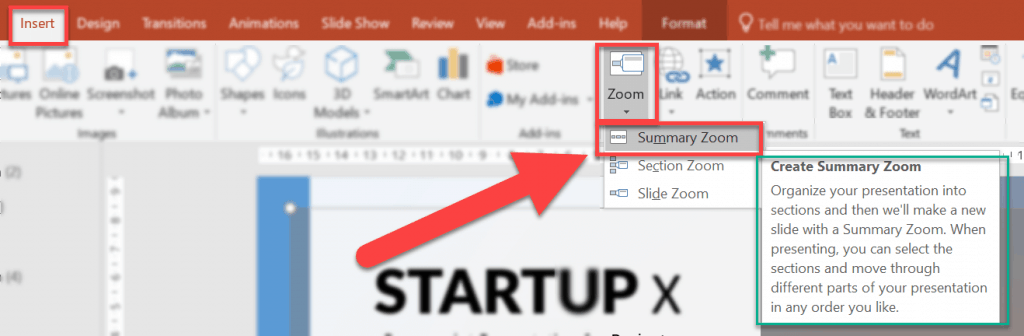
To create a Summary Zoom, go to Insert > Zoom > Summary Zoom.
Once you click on ‘Summary Zoom,’ you’ll get a pop-up like the screenshot below. You need to tick the slides you want to appear on the Summary Zoom slide which PowerPoint will create automatically for you.
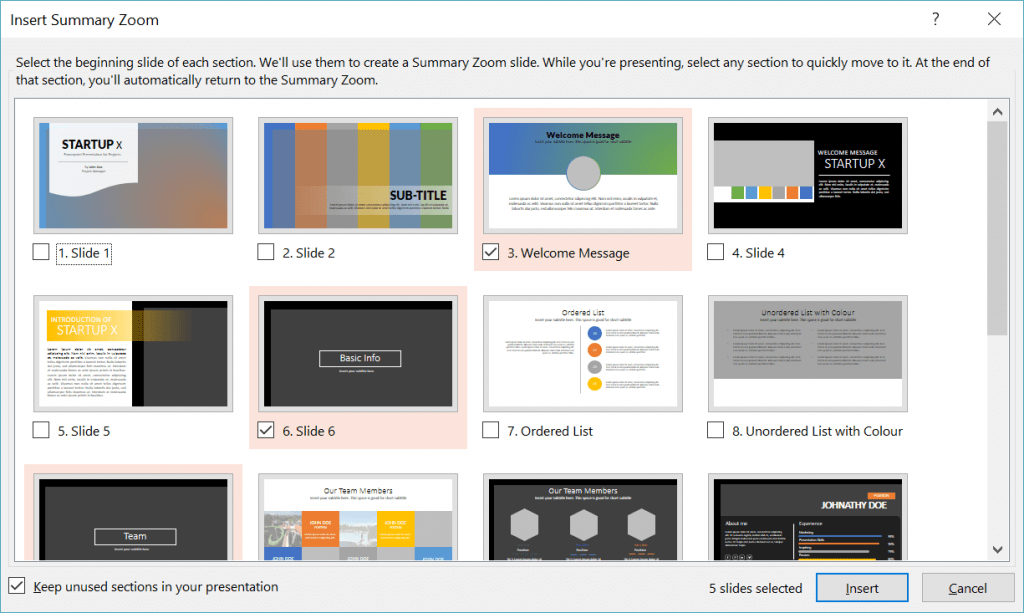
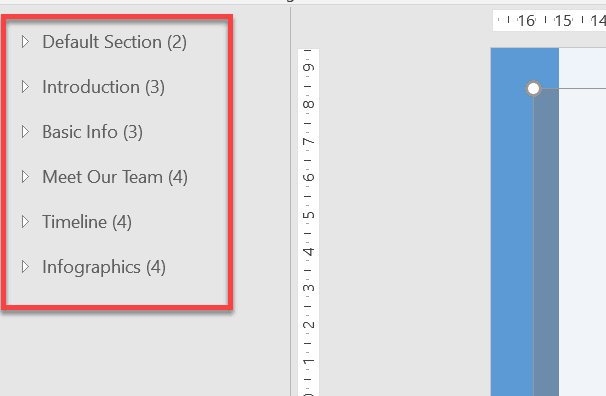
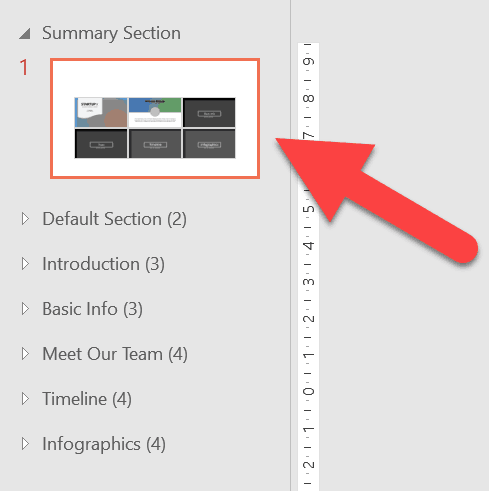
For this example, I chose 6 slides – one for each section in my PowerPoint presentation. Once you click on the Insert button, PowerPoint will automatically create a new ‘Summary Section’ in your presentation.
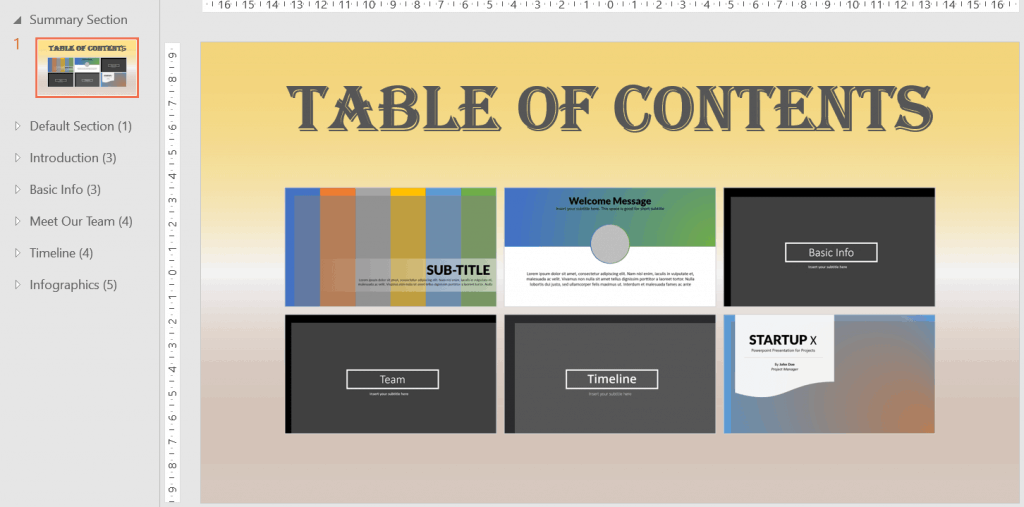
You can rearrange how your summary slide looks, and you can format the background if you want (I added a gradient background). You can also add a title such as “Table of Contents” like I did with my sample file.
Here’s what my edited Summary Zoom slide looks like:
When you give your presentation, you can click on any of the summary slides, and you’ll be taken directly to that section.
So, for example, in your presentation, you want to skip the title and sub-title slides, and you want to introduce your team first, then all you need to do is click on the Team slide summary (it’s the bottom left black slide that says Team).
As you can see on the left side of the screen, there are 4 slides in the Meet Our Team section. If you click on the Team summary, PowerPoint will go directly to that section, and all 4 slides will be presented to your audience.
Once the 4 slides are done, PowerPoint will show you the Summary Zoom slide again where you can choose to go to another section again if you like.
Note that if you were to do this the non-Zoom way, you would need to pass through 7 slides before you go to the Meet Our Team section! Summary Zoom allows you to skip all those slides effortlessly while helping you save time in the process.
If you want to edit and format your Zoom slide by adding new slides to the summary, all you have to do is click on the summary slides thumbnails so you can access the hidden Zoom Tools menu. You can also reset the layout, change the thumbnail image, adjust the duration of the transition, add a zoom border, zoom effects, and so much more.

Play around with the different Summary Zoom settings until you get yourself familiar with this cool new feature from PowerPoint!
The Section Zoom
Section zooms are handy if you’re giving a lengthy presentation and you want to remind your audience of a section you covered a few minutes ago. This is a perfect way to emphasize a point you’re currently making.
Alternatively, you can also use a section zoom to give your audience a preview of a future section which you’ll be covering later on in the presentation.
To use a section zoom, you need to have sections in your presentation file. As I’ve mentioned earlier, I already added sections to my sample presentation file, so it’s easier for me to navigate my presentation.
To insert a section zoom, all you have to do is go to the Insert tab, then click on Zoom, and choose Section Zoom from the options like you see in the screenshot below.
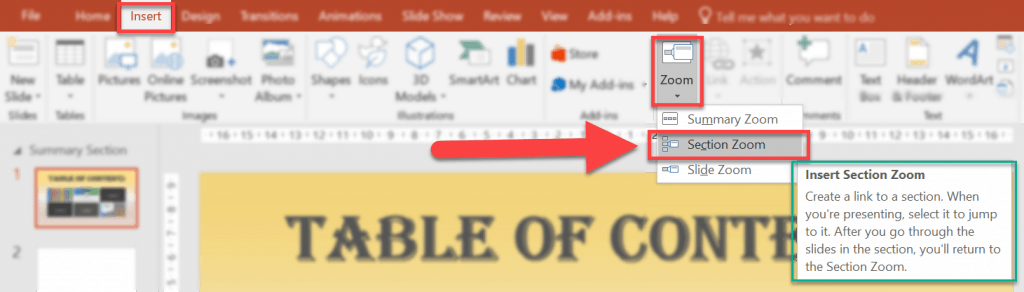
You can choose to insert your Section Zoom on a blank slide, or you can choose to add it to an existing slide. When you click on Section Zoom, this dialog box will pop-up on your screen. Tick the section or sections you want to insert:
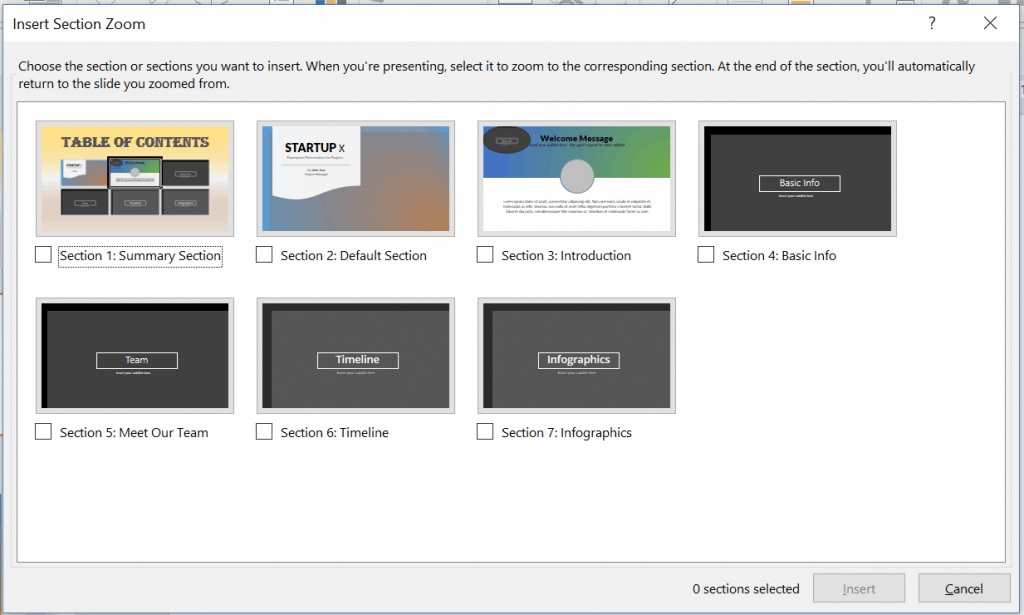
Here’s what it looks like when I chose to insert the ‘Section 4: Basic Info’ section to my ‘Welcome Message’ slide.
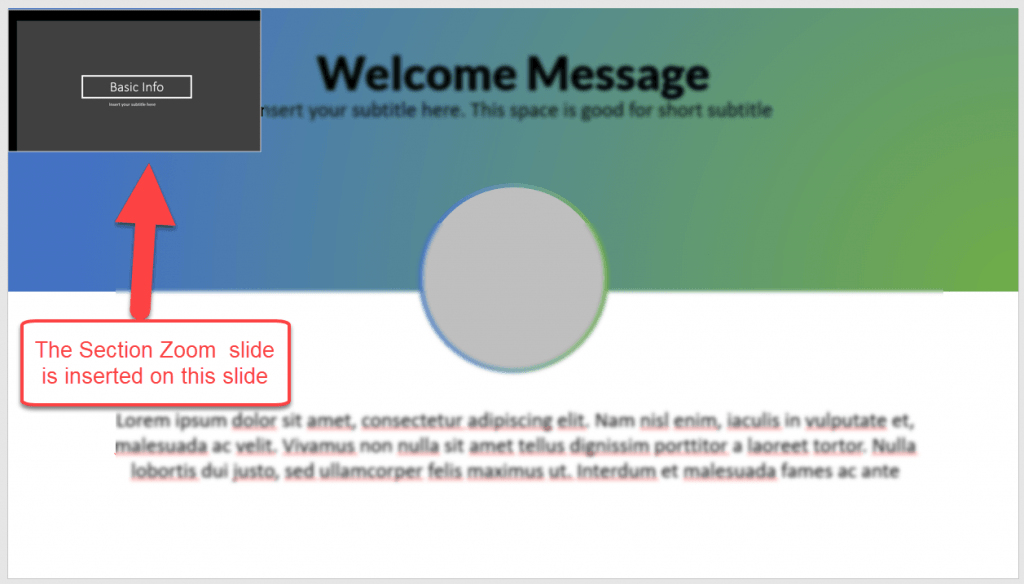
As you can see, the Section Zoom slide takes up significant space on my Welcome Message slide. To resize the zoom slide, simply click on it and drag the edges to resize as necessary.
When you’re giving your presentation, the Section Zoom slide will appear just like an ordinary image or thumbnail on your slide. If you want to jump or zoom into that particular section, you’re going to have to click on it while presenting. Otherwise, PowerPoint won’t do anything with it.
Once you’ve clicked on the inserted section zoom slide while presenting, PowerPoint will then do its magic and jump to that section. When all the slides in that section have been presented, you will then be directed back to the original slide where you inserted the section zoom. In my case, that would be the Welcome Message slide.
If you want to edit or format how your section zoom slide looks like, simply click on the thumbnail image so you can access the Zoom Tools menu on your PowerPoint ribbon.
The Slide Zoom
Just like the name implies, the Slide Zoom allows you to jump to any slide in your presentation. While the Section Zoom allows you to jump to entire sections, the Slide Zoom takes it down a notch by letting you jump to a single slide only.
The Slide Zoom is a good option if your presentation is relatively short, and you don’t have any sections on it. However, if you do have sections, the Slide Zoom is still a handy option if you only want to revisit a specific slide, out of, say, 100 slides.
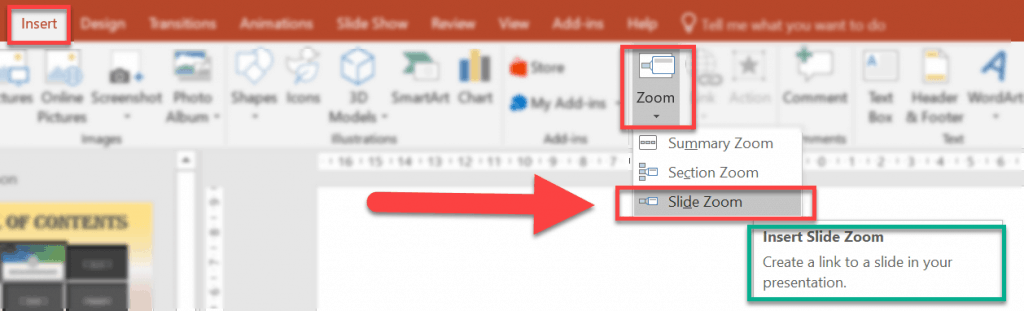
To create a Slide Zoom, go to Insert > Zoom > Slide Zoom.
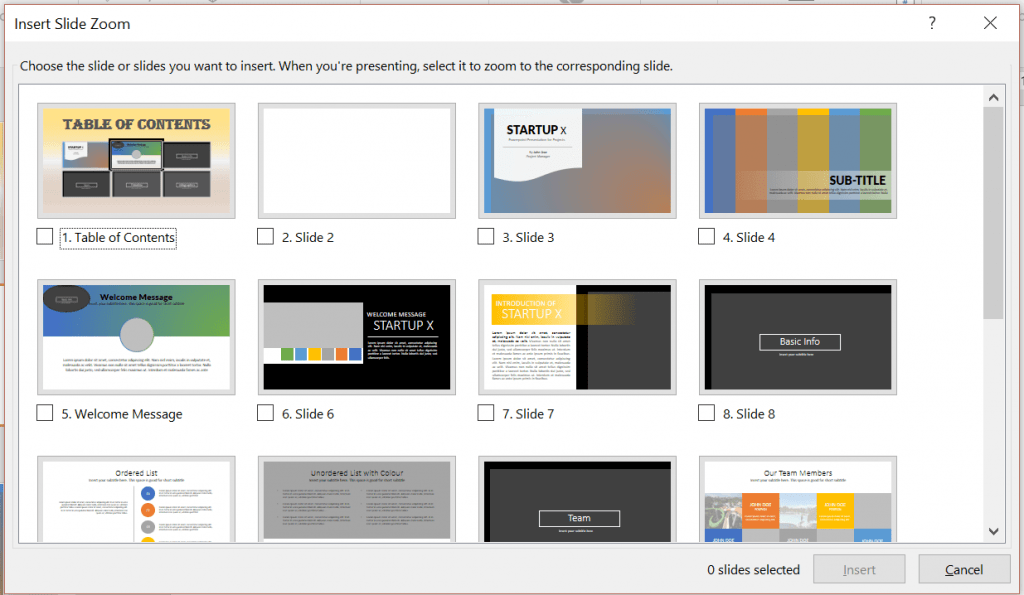
When you click on Slide Zoom, the following dialog box will pop-up on your screen.
And just like the Section Zoom option, the slides you select will appear as thumbnail(s) in the current slide. Here’s what my Welcome Message slide looks like when I chose to insert 2 zoom slides.
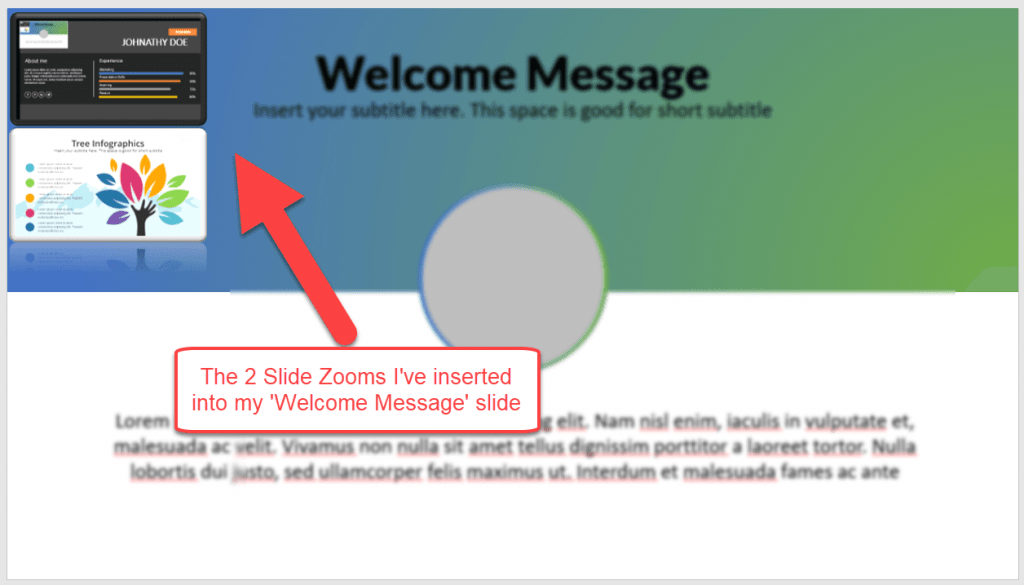
If you want to change how your slide zoom slide looks like, click on the thumbnail image so you can access the Zoom Tools menu. In the screenshot above, you may notice the rounded edges on the thumbnails. This is because I added the Reflected Bevel Zoom Style to change the appearance a bit.
When you’re giving your presentation to your audience, simply click on the thumbnails to zoom into the slide you want to jump to. If at any time during your presentation, you decide that you don’t want to use the slide zoom, then don’t click on the thumbnails. PowerPoint will simply skip the slide zoom effect.
Final Words On PowerPoint’s Morph and Zoom Features
These two additions to PowerPoint – the Morph and Zoom transitions – make PowerPoint more competitive with more modern presentation software like Prezi. Whether you want to shell out more money for an Office 365 subscription is absolutely up to you. What I can tell you though is that if you give presentations on a regular basis, and you’re tired of showing the same old boring PowerPoint slideshow, then you may want to spend a few dollars more to wow and win over your audience!